Wednesday, July 31, 2013

Grocery Bag Basket

It's berry picking season - Yeah!  Here is a great and FREE way to make your own basket for berry picking using an old paper grocery bag. This great idea is from Handcraft Your Life:

Grocery Bag BasketsFruit Basket Tutorial

Tuesday, July 30, 2013

Blue Jean Bracelet

There are soooo many things you can do with old blue jeans!  Here's one project!  A blue jean bracelet!  Love it.  So cute and so simple from Bill:

DIY jean bracelet

Monday, July 29, 2013

8 Tips for Creating an Unforgettable Customer Service Experience

8 Tips for Creating an Unforgettable Customer Service Experience
from www.handmadeology.com  by Victoria Tane
It’s my job to never forget what it’s like to be a customer. I treat all my customers, whether virtual or face-to-face, as I would like to be treated.  Follow these 8 tips for customer service success.
  1. Always greet your customers and, whenever possible, by name. People love to be remembered and feel special when they are recognized.
  2. Create a warm and welcoming environment. Dress your booth as you dress yourself or your home. Your booth is your home as long as you’re going to be there. Make it comfortable and a place you’re proud to invite guests into.
  3.  Give your customer a personalized shopping experience. Encourage them to talk about their previous buying experience. That gives you a focal point for their next purchase. Be attentive to their likes and dislikes.
  4. Be generous with your time and your expertise. Help your customers make the proper selection so that you will gain their trust and they will feel confident about making their next purchase.
  5. Be attentive to the customer and go the extra mile. If they want it longer, lengthen it. If they want it shorter, shorten it. If they want it purple, purplify it. Make it so it’s right for them, not what’s expedient for you. Give them more than they expect.
  6. Be grateful for your customer loyalty and reward it. Special orders? Of course. Free shipping? Sure thing! Lost an earring? Make you a new one. No hassles, no hems, no haws. Glad to make it easy. Long term customer loyalty is much more important than a single sale.
  7. Remember that the customer experience doesn’t end when the sale is complete. Treating your customers right will give them a reason to come back. People remember when they’re treated right and even more when they’re treated poorly.
  8. Be willing to admit and apologize for mistakes when you make them. Ship the wrong thing? So sorry, let me ship you the right thing and for the inconvenience, here’s a merchandise credit on your next purchase. Apologize for your mistakes and make your best effort to make it right.
I feel my mission as an artist and businesswoman is to continually surprise, delight and come up with new ideas that will entice my customers to buy my work. I am grateful for their patronage and I let them know it. In the end, gratitude is golden.
©Victoria Tane Studios 2011

Friday, July 26, 2013

Kid Friendly Sweet Potato Fries

Baked Sweet Potato Fries

Posted on Jun 21st, 2013
Baked Sweet Potato Fries Post Image
Like this article? Rate it!
 
Baked sweet potato fries are a delicious, healthier alternative to heavier, greasier deep-fried white potato fries. Try these alongside your next burger or sandwich!
If you’d like, you can sprinkle these with various seasoning mixes in place of or in addition to salt and pepper. Try chili-lime seasoning, smoked paprika, or garlic and onion powder.
Recipe Yield: 6 Servings
Prep Time: 10 minutes
Cook Time: 25 minutes

INGREDIENTS:

  • 2 large sweet potatoes, scrubbed
  • 1-2 tbsp. olive oil
  • Kosher salt and freshly ground black pepper

INSTRUCTIONS:

  1. Preheat oven to 450 F. Line baking sheet with foil and spray with nonstick pan spray.
  2. Peel sweet potatoes and cut into 1/4-inch slices. Cut slices into 1/4-inch sticks.
  3. Place sweet potato sticks in a large resealable plastic bag and add 1 to 2 tablespoons olive oil. Seal bag and shake to coat potatoes with oil.
  4. Place potatoes in a single layer on prepared baking sheet. Sprinkle with salt and pepper and bake at 450 F for 20-25 min, until cooked through, crisp, and golden-brown, turning once or twice with a spatula.
  5. Serve immediately.
-

Thursday, July 25, 2013

Alphabet Ideas

Here are a ton of great ideas for teaching your preschooler the alphabet without using the traditional flashcard approach.  These are really fun and engaging ideas that your preschoolers will love.  These ideas are from No Time for Flashcards.  Be sure to check out their FB page too!


letter crafts for kids
We love the alphabet and we love creating and playing with letters. These 25 activities teach all different aspects of the alphabet including letter recognition, letter sounds, letter shapes and just plain fun! These activities are dynamic and are meant not just to teach the alphabet but to make learning letters a memorable and engaging experience.

Fruit Pizza

I absolutely LOVE pizza!  It's my favorite food.  I argue that it is extremely healthy as it contains all the food groups - except fruit.  Well this recipe solves that problem and will put a big smile of your kids' faces too!  From Daydream Kitchen these yummy mini fruit pizzas look absolutely delicious!!


Ingredients:

  • 1 small pack of ready made sugar cookie dough
  • 4 cups of colorful fruit of your preference
  • 1  8 ounces pack/bar of softened cream cheese
  • 1 pack of cool whip

Directions:

1.    Roll sugar cookie dough into small balls just under an inch and place them in muffin trays, in cup shapes.
2.    Cook sugar cookie cups in the oven at 350 degrees for approx 7 mins,
3.    Whip cream cheese.
4.    Add in cool whip until well integrated.
5.    Transfer the whip in a plastic food storage bag, cut off the corner of the bag with scissors and squeeze out the cream onto the baked cookies.
6.    Play around with the adding of fruits as you like.

Wednesday, July 24, 2013

Crayon Candle

As a mom of three young children, I have an entire bag of broken crayons that I was saving for something just like this!  Make a candle out of your old crayons!  From No Time for Flashcards, we have an excellent tutorial to make the candles.  **Note - you can also melt the crayon in the microwave, just do it in slow increments of about 30 seconds each.  Also, so are not left with the "crayola" smell, just add some essential oil to each color even different scented oil for each color, that would be fun!  Here's the tutorial:

Crayon Candle !
I have been wanting to try this for ages, finally I saved up enough crayons from restaurants, and goody bags . This took a while , it was a true nap time creation from the time my son fell asleep until I heard “Mama I’m up” almost 3 hours later. So block off some time without little hands before starting this project.
  1. Gather your materials. You will need many crayons of various colors, something to melt the crayons in ( I use aluminum cup liners in a ratty old cake pan- the wax does leak through some times) , some popsicle sticks for stirring, a recycled jar and a candle wick.
  2. Start by setting your oven to 220-265 I am impatient and melt them at 265 but many people have said that that is too hot and they had smoking, so my suggestion is to start low and adjust accordingly.
  3. Peel the paper off the crayons and break into small pieces. I used 7-10 crayons of each color for my candle.
  4. Melt.
  5. Put the wick in the jar and hold onto it as you pour the melted crayon into the jar.
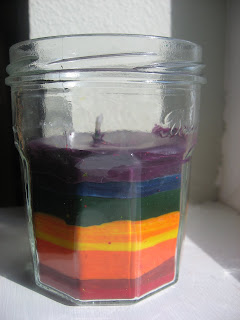
If I had had a longer wick I would have wrapped it around a popsicle stick and laid the stick across the jar to keep it in place.
  6. Let the wax set before adding the next color.
  7. This is what happened when I didn’t wait long enough.
  8. Keep adding and letting the color set.
  9. Trim the wick when all colors are added and set.
** Update – I lit the candle and it burned well for about 15 minutes, after that the flame got tiny tiny . The smell was fine, although I admit to liking the smell of crayola! Overall I would do this as a pretty decoration, exploration about melting and color mixing and not to make a candle to use in emergencies ! **

Tuesday, July 23, 2013

Braided Bracelet

Here is a simple picture tutorial to make a lovely braided bracelet.  There is not a materials list so I'm going to say you need for braiding, two thin strips of leather  and 4 strands of a thin cord.  The backing looks like a much thicker piece of leather.  This tutorial is from Joyzz.com:

Monday, July 22, 2013

Clean Your Car Like a Pro


Unless you’re fastidious about your car’s interior, it’s usually the last thing on your cleaning list. As the months roll by, grime, wrappers, dust and junk can just pile up. Unfortunately, most of us finally get around to the deep cleaning when we tape the “For Sale” sign on the windshield. So whether you’re selling your car or just want to clean it up for spring, these tips from professional detailers will give you the most return for your energy. You’ll feel like your car is brand new again.

Step 1: Slide seats forward and clean out the junk

You’ll be surprised by what you find. We found a lost cell phone, enough pens and pencils to equip a small office, and enough change for several vending machine lunches. Vacuum the seats, remove the mats and vacuum the carpet. Use a brush attachment for the dash and door panels. Don’t forget to clean out and vacuum those handy door pockets (another source of buried treasure).

Step 2: Deep-clean carpet and upholstery

« Previous Photo

Use a carpet cleaning machine to get the deep dirt that settles into the fibers of the carpet. (Clean cloth seats this way as well.) It sprays the carpet with a solution of water and cleaner and then sucks the dirt and grime into a reservoir. A machine like this pays for itself after just a few uses. You can also rent one from a rental center or use a spray-on cleaner and a scrub brush instead.

Step 3: Clean and condition leather or vinyl seats

« Previous Photo

After a couple of years, you’ll notice that the color of the leather seats no longer matches the rest of the interior. It’s not enough just to condition the leather. First spray on leather cleaner and rub vigorously with a clean terry cloth towel. To avoid rubbing the grime back into the seats, keep flipping the cloth to expose a fresh surface. Let the seats dry for an hour and then rub in a leather conditioner like Lexol to keep the leather supple. It’s available at discount stores and auto stores.

Step 4: Remember to clean nooks and crannies

« Previous Photo

Detailing means just that—finding and dealing with all the trim lines and recesses that a quick once-over cleaning job misses. Wrap a cloth around an old, worn screwdriver (without sharp edges) and spray Simple Green or other all-purpose cleaner on the cloth. Move it gently along the trim lines to pick up the gunk. Keep refreshing the surface of the cloth. Go around all the buttons and controls as well. Follow up with a rejuvenator like Armor All.

Step 5: Brush out the air vents

These louvers are a real magnet for dust, and a vacuum with a brush attachment just won’t get it all. Take an inexpensive paint brush and give it a light shot of Endust or Pledge furniture polish. Work the brush into the crevices to collect the dust. Wipe the brush off with a rag and move on to the next one.

Step 6: Wash the windows, including the top edges

« Previous Photo

Ever notice that line of grime on the tops of windows when they’re partially rolled down? Most people overlook this detail when giving their vehicle a quick wash. A few minutes with Windex and a clean rag is all it takes.

Step 7: Scrape off those annoying stickers

« Previous Photo

While all of your national and state park stickers may call to mind great memories, they can be a visual hazard as they accumulate. The high-quality stickers will pull off if you can get under a corner and carefully pull them free at a 90-degree angle. Others will leave a gummy residue and require a bit more attention. Cover your dash with an old towel and dab on Goo Gone. Then scrape and wipe it off.

Step 8: Kill bad odors.

« Previous Photo

Whether your vehicle smells like a Big Mac or cigarettes, one pump of the Odor Gun will solve the problem.

Friday, July 19, 2013

Appetizer: Dip and Cheese Ball Combo


Avatar Image
4.53 Mitt(s)13 Rating(s)13 votes, average: 4.53 out of 513 votes, average: 4.53 out of 513 votes, average: 4.53 out of 513 votes, average: 4.53 out of 513 votes, average: 4.53 out of 5
Prep Time 
Cook Time 
Difficulty Easy
 
Share 

Recipe Description

This beautiful creation will bring oohs and aahs at your next party. A delicious twist on the standard 7-Layer Dip and Cheese Ball, yet it’s a showpiece that is just as easy to prepare. The flavor is addicting. Get ready to be hounded for this recipe.

Preparation Instructions

Preheat the oven to 325 degrees. In a medium bowl, combine the tortilla chips and butter. Press into the bottom of a 9-inch springform pan. Bake for 15 minutes, remove from the oven, and let cool for a little while. (I usually place it in the fridge so the crust firms up.)
In a large bowl, blend the cream cheese, eggs, chili powder and cumin with a mixer. Add the green chilis, jalapeno and both cheeses and blend with mixer. Pour over the crust and bake for 30 minutes at 325 degrees. DO NOT OVERCOOK. Remove from the oven and cool in the pan for 10 minutes. Run a knife around the edge of the pan. Let cool to room temperature.
Spread the sour cream over the top and decorate with the tomatoes, green onions, black olives and cilantro. Refrigerate until serving. Remove the sides of the pan and serve with tortilla chips.
This can be prepared 1 day in advance.

Ingredients

  • 1 cup Crushed Tortilla Chips
  • 3 Tablespoons Butter, Melted
  • 16 ounces, weight Cream Cheese, Softened
  • 2 whole Eggs
  • ¼ teaspoons Chili Powder
  • ⅛ teaspoons Cumin
  • 1 can Diced Green Chilies, Drained (4 Oz. Can)
  • 1 whole Jalapeno Pepper, Seeded And Diced
  • 4 ounces, weight Shredded Colby-jack Cheese
  • 4 ounces, weight Shredded Sharp Cheddar Cheese
  • ⅓ cups Sour Cream
  • _____
  • TO GARNISH:
  • 1 whole Tomato, Chopped
  • Green Onions, Chopped
  • Black Olives, Diced
  • Cilantro, Chopped