Showing posts with label Monday Solutions. Show all posts

Monday, August 3, 2015

MONDAY SOLUTIONS: 23 Game-Changing Baking Hacks

MONDAY SOLUTIONS:  23 Game-Changing Baking Hacks
https://www.yahoo.com/food/23-game-changing-baking-hacks-124777961446.html


23 Game-Changing Baking Hacks

By: Perry Santanachote
23 Game-Changing Baking Hacks
Credit: Laura Murray/Thrillist
Baking can be an infuriating science, but the advantages far outweigh the headache. Fresh-baked cookies whenever you damn well please? Homemade pancakes to feed your hot date the day after? Girly, indulgent cupcakes in the privacy of your own home? All reasons you should learn to bake.
Especially when just starting out, there are many ingredients and pieces of equipment you won’t have, but, with these life-changing baking hacks, you won’t need them. Give some of these a go next time you try your hand at baking. You’ll look like a pro – or at least fake one real well.
image
Credit: Laura Murray/Thrillist
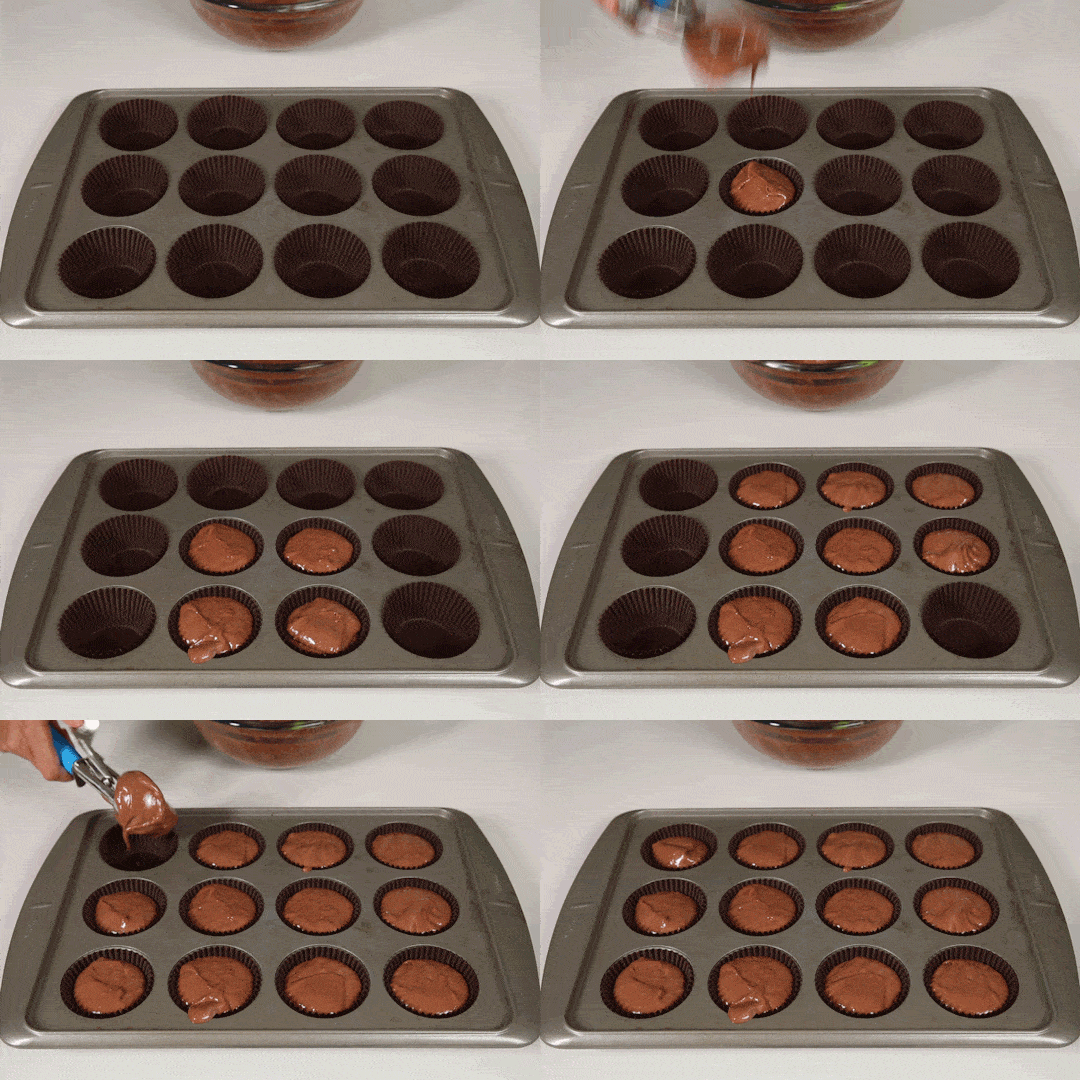
Use an ice cream scoop for cupcakes
They’re the perfect size for portioning out cupcake batter.
Make your own powdered sugar
Blend 1 cup granulated sugar and 1 teaspoon cornstarch in a food processor until fine and powdery. Sift through a fine-mesh strainer.
Test if your baking soda is stale
To test baking soda, put 2 tablespoons of white vinegar into a small bowl and add 1 teaspoon of baking soda. If it fizzes immediately, it’s still good.
Test your baking powder, too
To test if baking powder is still good, combine 1 teaspoon baking powder with ⅓ cup hot water. If it bubbles, it’s still good.
image
Credit: Laura Murray/Thrillist
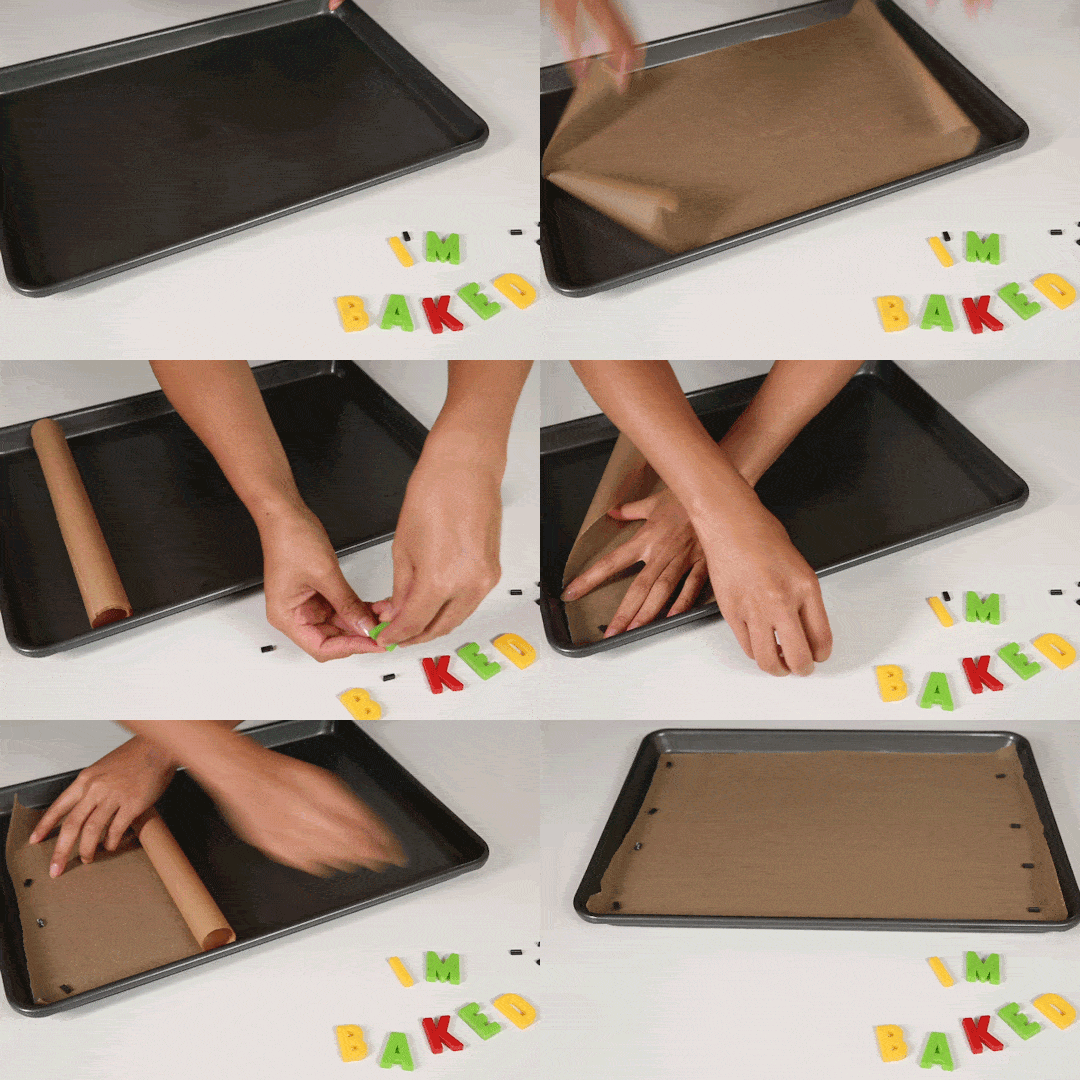
Keep parchment from rolling up
Trying to keep parchment paper from rolling in on itself is an exercise in futility. Stay sane and use magnets to keep it planted to the baking sheet.
Bring eggs to room temperature quickly
Place cold eggs in a bowl filled with warm water. Let sit until the eggs come to room temperature.
Make cake flour from ingredients you already have
1 cup all-purpose flour + 2 tablespoons cornstarch = cake flour.
Whip cream in a jar
This also gives you amazing arms. Chill a Mason jar in the fridge. Fill it halfway with heavy cream, add a teaspoon of powdered sugar, seal the lid, and shake vigorously for 2 minutes or until it’s thick and fluffy.
image
Credit: Laura Murray/Thrillist
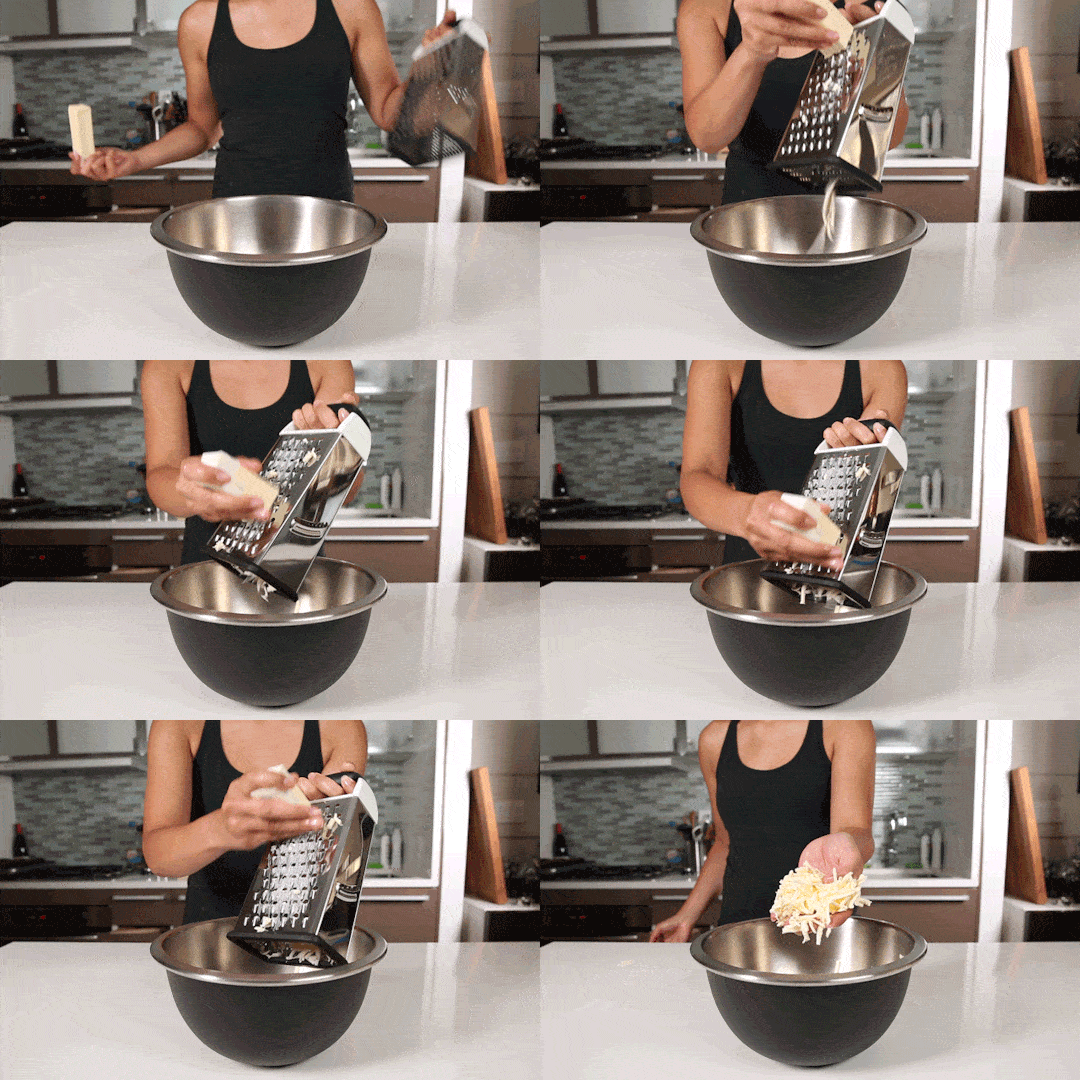
Grate butter instead of cutting it into recipes
For recipes that call for cut butter or folded butter – like pies, biscuits, and croissants – grate the butter into the dry mix for the same effect with less effort.
Make buttermilk in 10 minutes with ingredients you already have
Stir together 1 cup milk with 1 tablespoon lemon juice (or white vinegar). Let it sit at room temperature until thick and slightly curdled, about 10 minutes.
Bring cold butter to room temperature quickly
Many baking recipes call for butter at room temperature, but that can take at least 30 minutes. Save some time with this cheat. Cut butter into chunks. Fill a glass bowl with hot water. Pour out the water and invert the hot bowl to cover the butter. Let sit for 2 minutes, uncover, and use.
Soften crispy cookies
Whether they turned out crispier than you like, or they’re one day too stale, place a slice of sandwich bread in the cookie jar. The following day, cookies will be soft, chewy, and moist.
image
Credit: Laura Murray/Thrillist
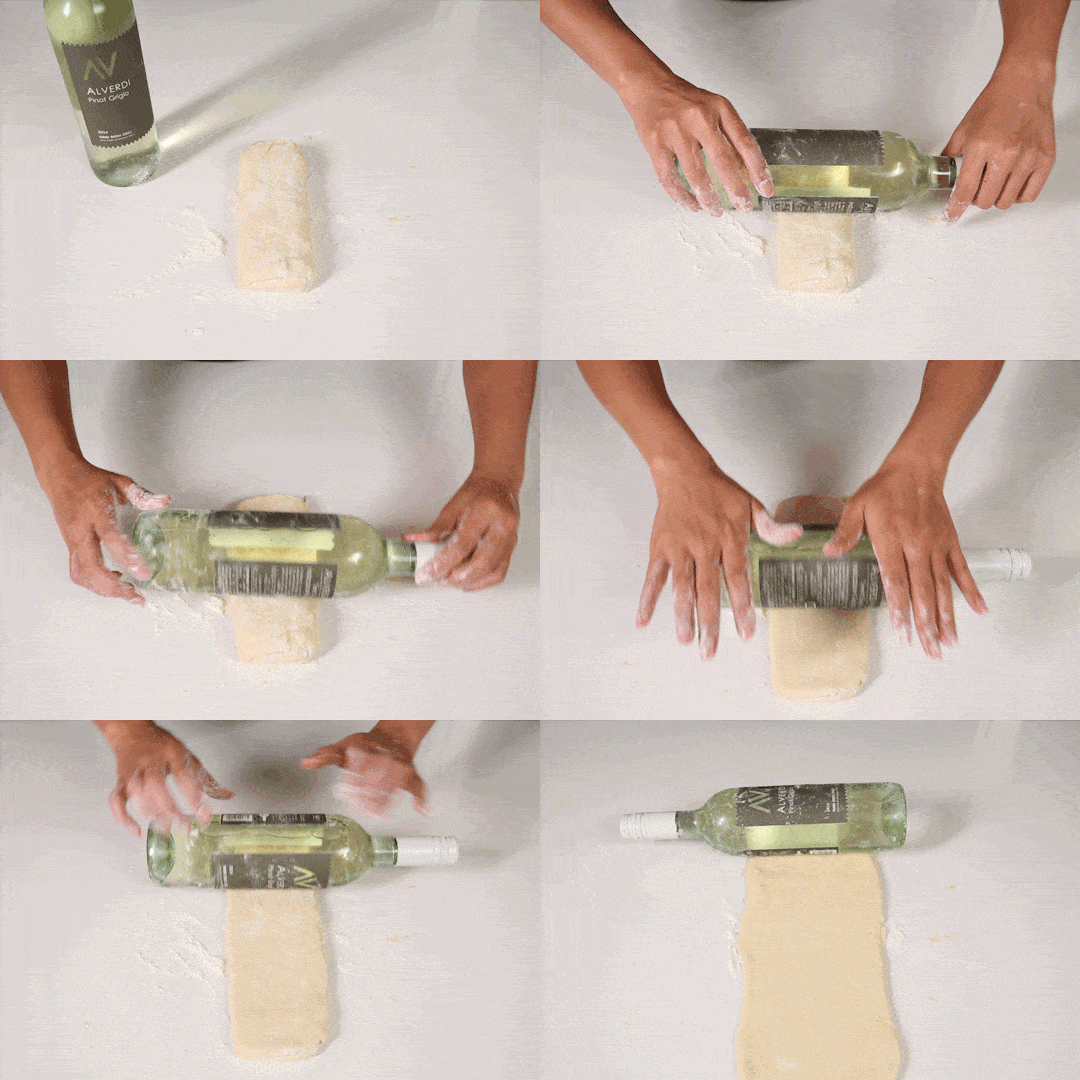
Roll pastry dough without a rolling pin
Use a chilled wine bottle. The cold will also prevent your dough from softening too quickly.
DIY corn syrup
Melt 1 cup of sugar with ¼ cup water over medium heat until sugar melts, about 3 minutes. It’ll thicken up as it cools.
Mayo makes an effortlessly moist cake
For a moister crumb, add 1 cup of mayonnaise to the batter.
Use a muffin tin for even cookies
For soft and evenly round cookies, bake them in a muffin pan so they don’t spread out.
image
Credit: Laura Murray/Thrillist
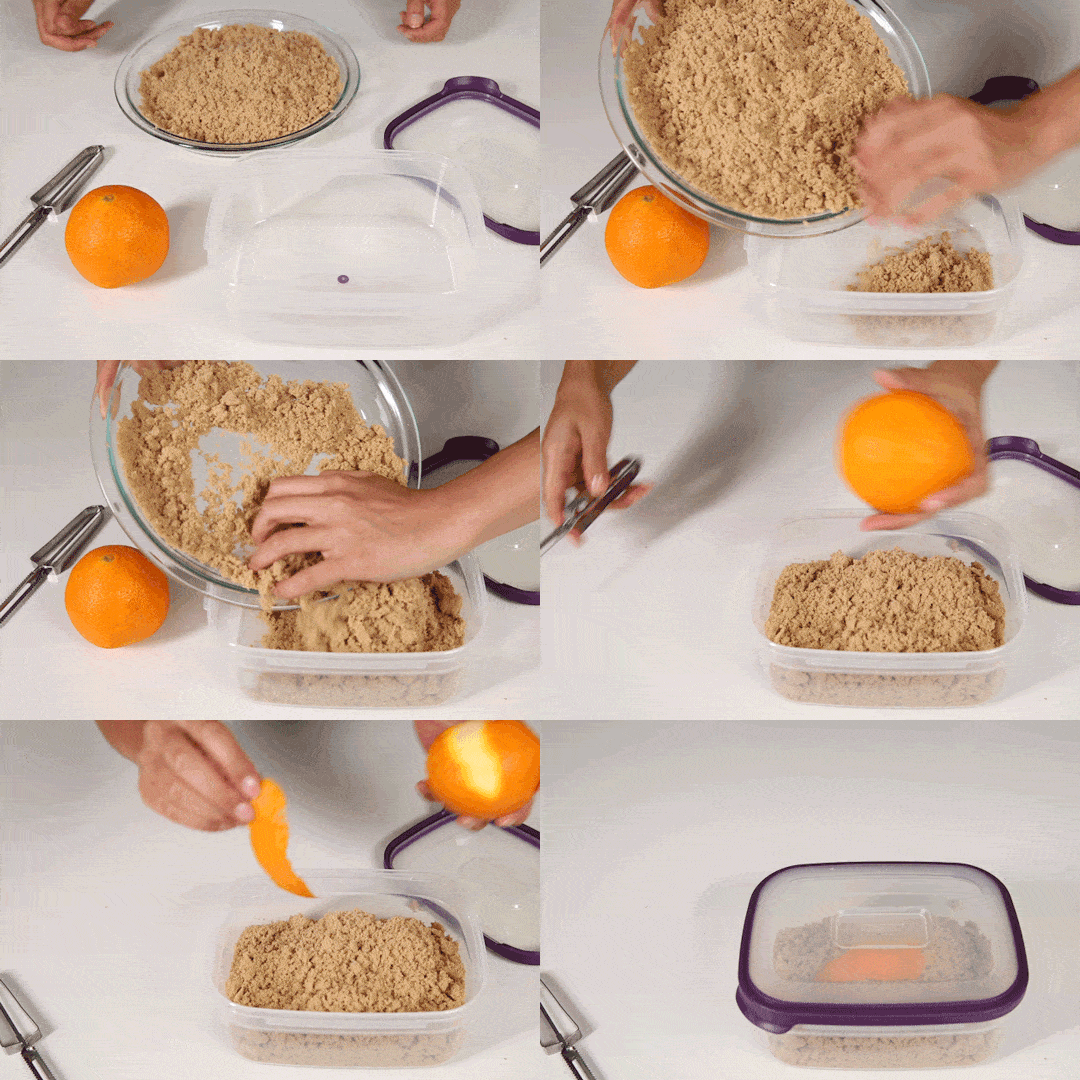
Keep brown sugar soft
Toss a strip of rind from an orange or lemon in with the brown sugar and seal it in a Ziploc bag or container. It’ll stay nice and soft. A slice of bread or marshmallows will also work.
Soften brown sugar when it’s already hard
Microwave it in a baking dish covered with a wet paper towel for 20 to 30 seconds. Use a fork to break it apart. It’ll feel like packable sand once again.
Slick measuring cups before scooping sticky ingredients
Honey, syrup, molasses… whatever sticky substance you measure will slide right out when you spray the measuring cup with cooking spray first.
Prevent blueberries from sinking for even distribution
A dash of flour will help blueberries – or whatever you’re throwing in your batter – defy gravity. The flour makes them stick to the batter and stay suspended instead of sinking to the bottom. Toss berries with a tablespoon of flour before folding them in, but use flour from the recipe – don’t add extra.
image
Credit: Laura Murray/Thrillist
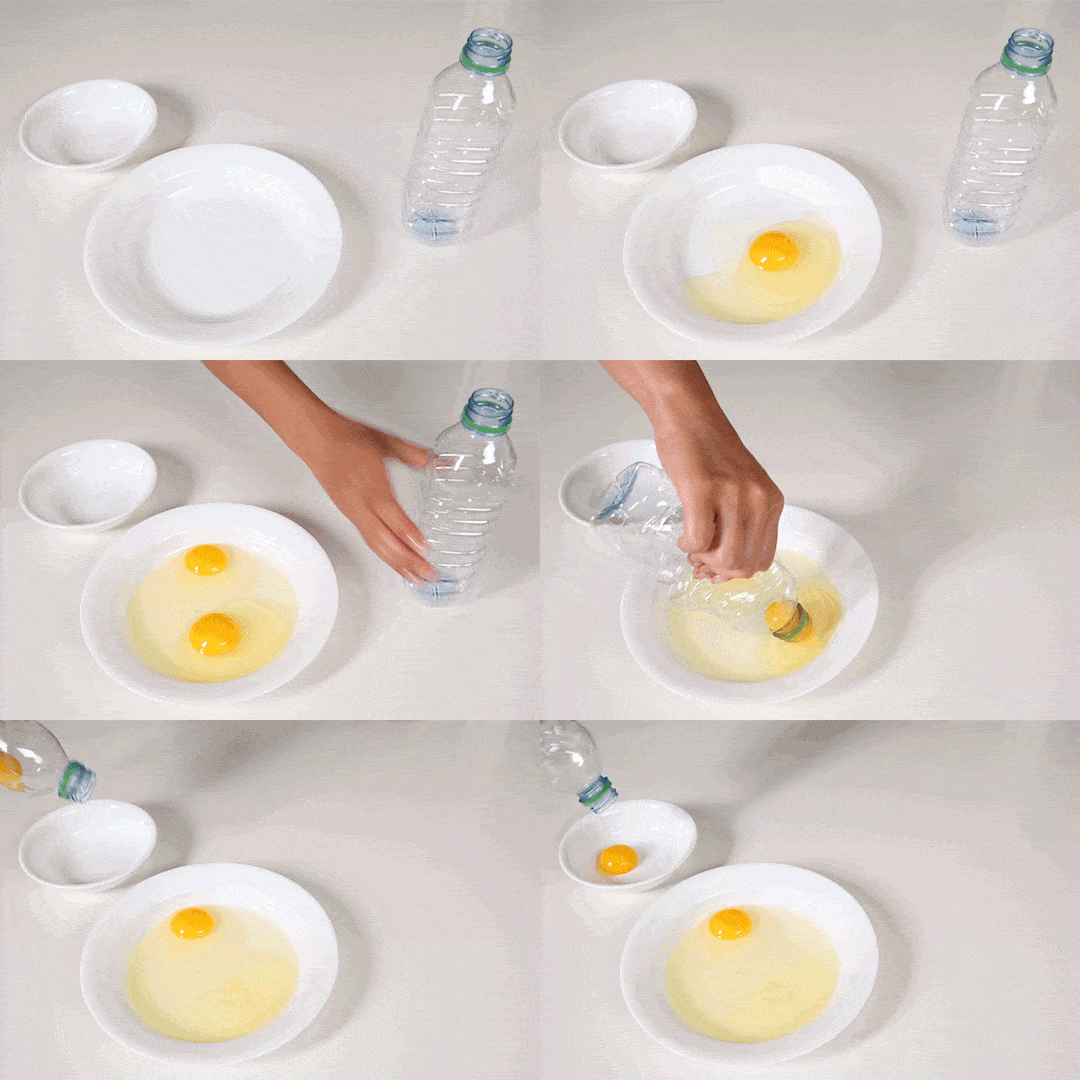
Separate eggs with a plastic bottle
Break eggs into a bowl. Use an empty bottle to suction the yolks out.
Use a Ziploc bag for detailed icing
Fill a Ziploc bag with frosting and cut the tip off one corner. Squeeze the frosting through the hole and pipe it right onto your treat.
Frost cupcakes quickly with an ice cream scoop
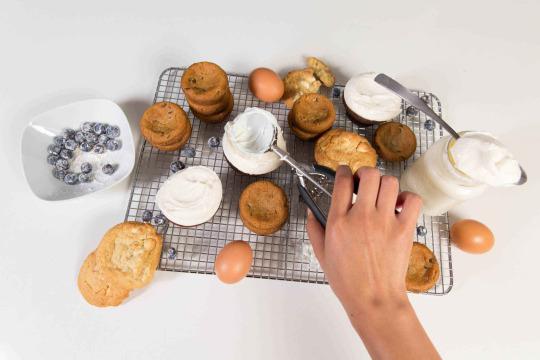
For that “Magnolia look,” use an ice cream scoop to portion out the frosting onto the cupcake. Then turn the scoop over and use the rounded end to spread it out to the edges, leaving a cute crater in the center.

Monday, July 27, 2015

Monday, July 20, 2015

Monday Solutions: Recycle That Cookie Sheet

DIFFERENT WAS TO RECYCLE COOKIE SHEETS

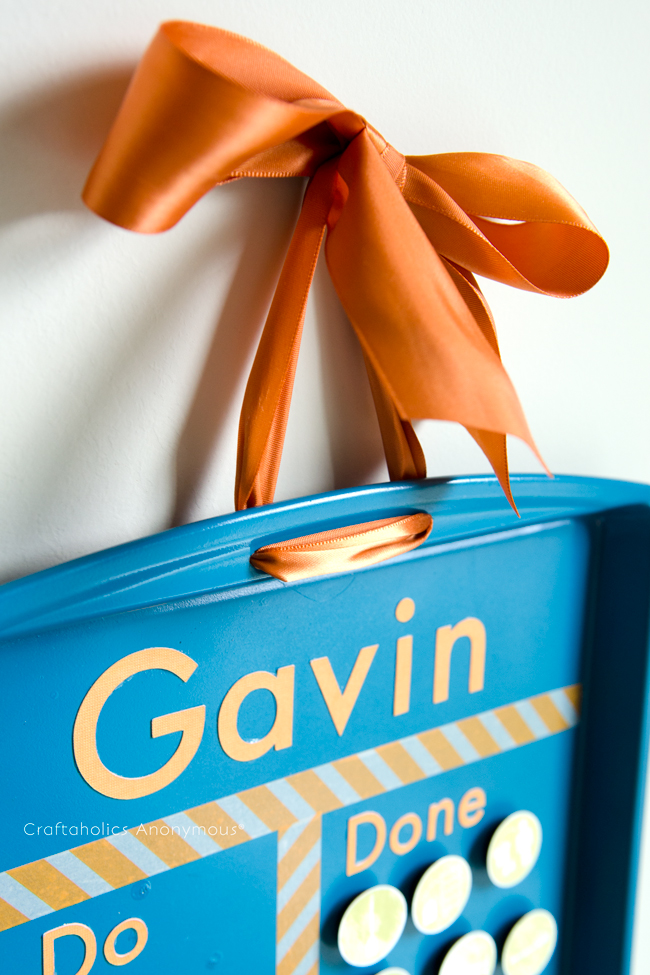
How to Make Cookie Sheet Chore Charts

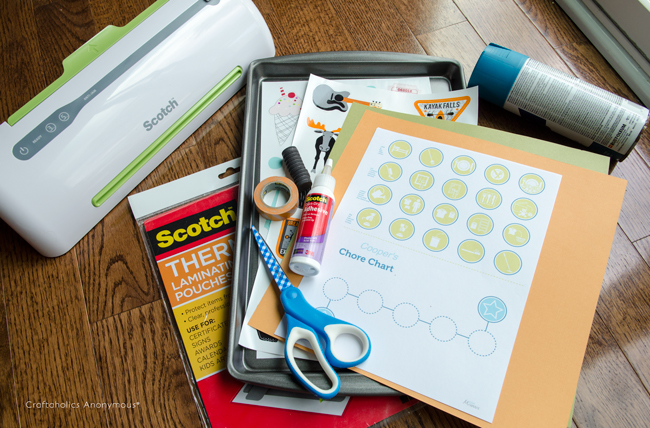
chore chart suppliesSupplies:
  • Scotch® Pro Thermal Laminator
  • 2- 8.5″ x 11″ Laminating Pouches
  • Designer Scissors
  • Quick-Dry Adhesive
  • Scotch® Expressions Decals – this project used “Backwoods” design
  • Cookie Sheet – 1 for each child
  • 3/4″ Circle Magnets
  • Washi Tape in coordinating colors
  • 1 can of Spray Paint
  • Cardstock in coordinating colors
  • Hot Glue Gun
  • 1″ Circle Paper Punch
  • Die Cutter
  • Drill
  • 1.5″ wide Orange Ribbon – about 3 yards
  • Chore Chart and Progress Chart Printable {I found mine here.}
Step-by-Step Instructions:
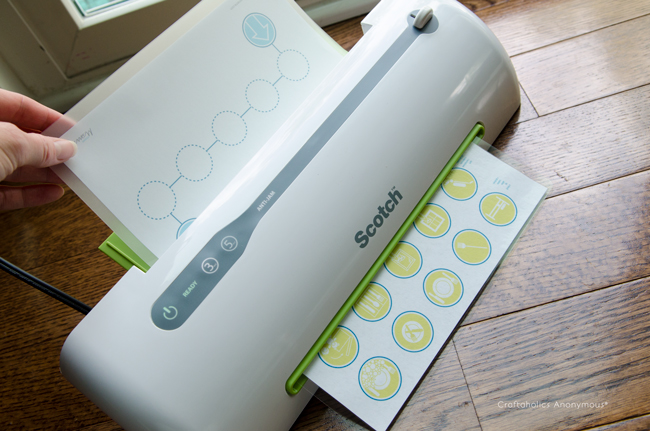
laminator
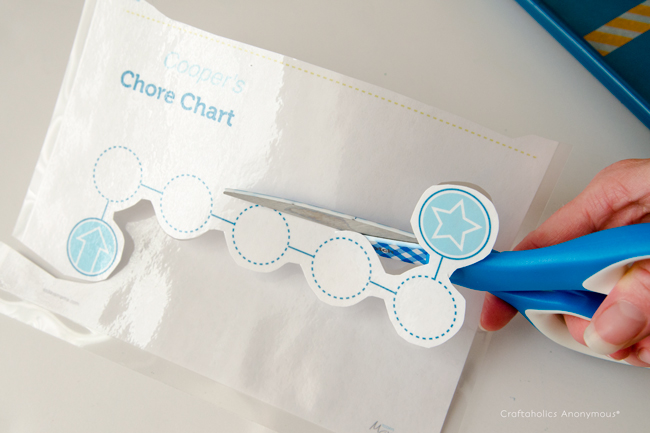
  1. Print out a free chore chart and progress chart printable of your choice and use the laminator and laminating pouches to laminate the sheets.
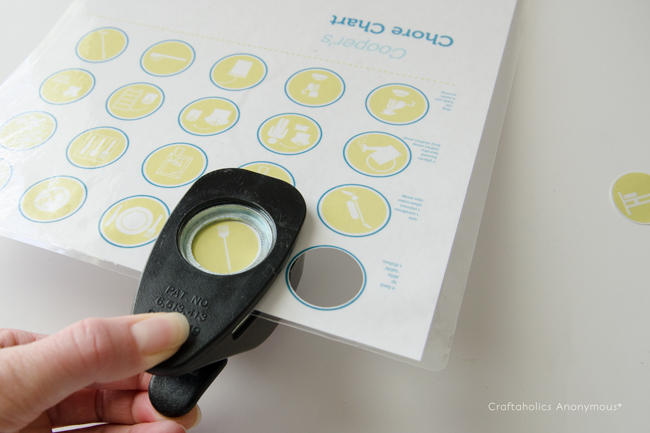
  2. Spray paint the cookie sheet using 2-3 coats of paint. Set aside and allow it to dry thoroughly. make chore charts
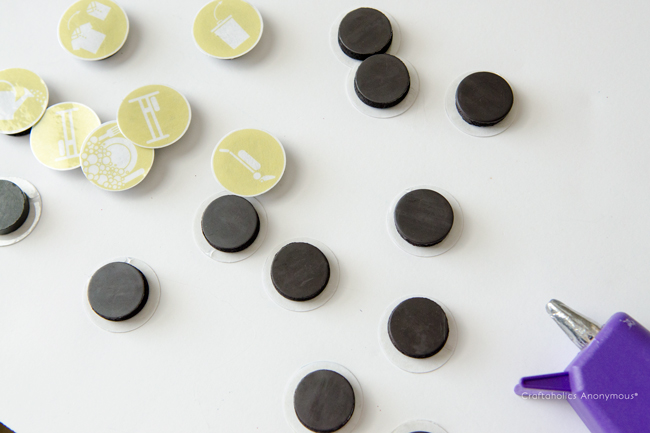
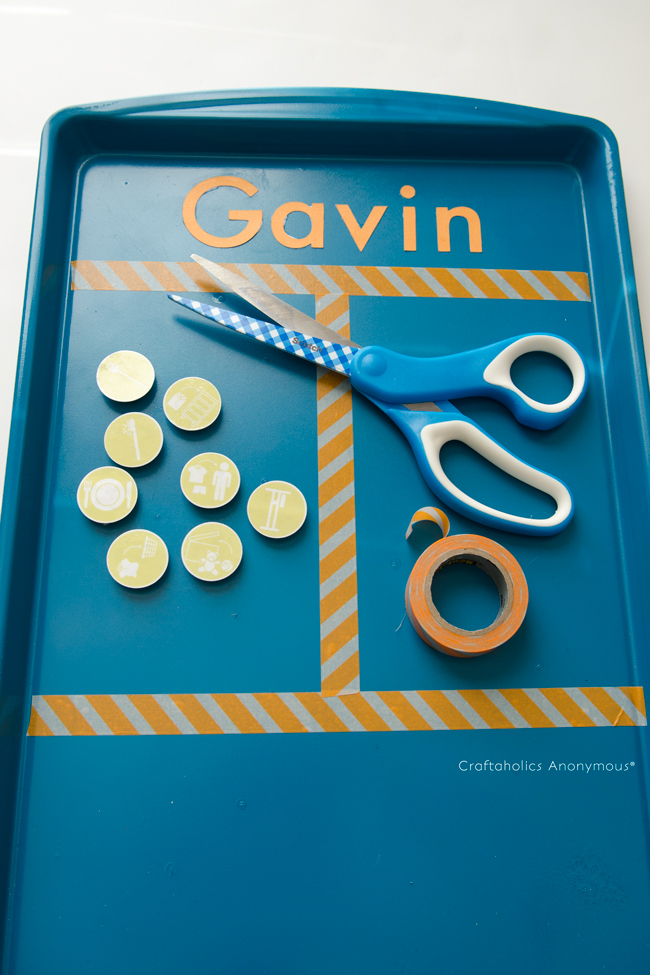
  3. Use a 1-inch circle punch to punch out the pictures of each chore, leaving the progress chart in tact. chore chart magnets
  4. Using a hot glue gun, adhere one chore picture to one magnet. Repeat until all chore pictures have a magnet on the back. how to make chore charts
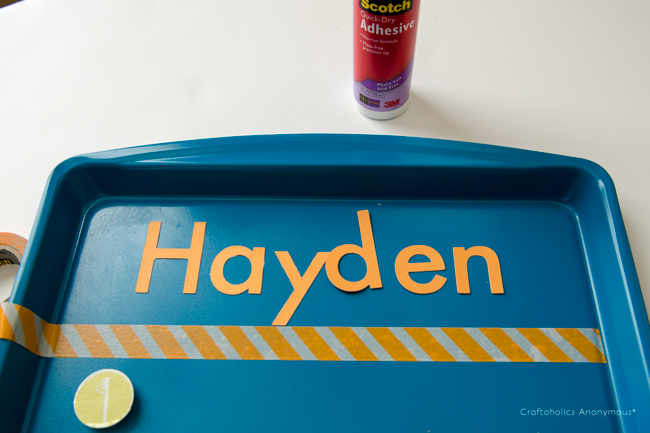
  5. Use a die cutter to cut 2-inch letters to spell your child’s name with the cardstock. Then, use the die cutter to cut 2-inch letters to spell out “To Do” and “Done” with the card stock.
  6. Adhere the letters of your child’s name to the top of the cookie sheet using the quick-dry adhesive.
    1. TIP: You can use washi tape to help apply the letters straight. chore chart tutorial
  7. Apply strips of washi tape in the color of your choice to the cookie sheet in an “I” shape. Use the scissors to trim off the excess. If you don’t mind an uneven edge on your washi tape, you can simply tear it instead of cutting with scissors.
  8. Use the quick-dry adhesive to adhere the “To Do” and “Done” letters to the cookie sheet in the two rectangles that you created with washi tape in Step 7. diy chore chart
  9. Cut around the progress chart at the bottom of the free printable and apply to the cookie sheet with hot glue. chore-charts-9
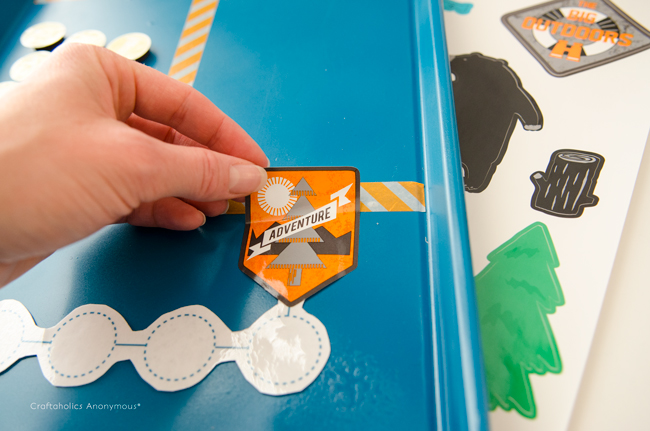
  10. Let your child pick out a Scotch Expressions Decal that represents the prize they are working to earn. For example, use the Backwoods designs to indicate a camping trip to work towards.
  11. Have your child adhere the decal to the end of the progress chart as a reminder of the goal. Since the decals are removable, they can choose different ones each week to represent new prizes. Chore charts made with cookie sheets. Love this idea!
  12. Use a drill to create two holes in the top handle of the cookie sheet. Thread ribbon through the holes and tie in a bow. Then hang on the wall.
    1. NOTE: Be sure to follow manufacturers’ guidelines for using drill and always use safety glasses when using power tools.
  13. As your child completes chores in the “To Do” section, move the magnets to the “Done” section and move the letter one space to the right in the progress chart.

Turn an Old Cookie Sheet into a Serving Tray

Is your coffee table looking a little bare-bones these days? Are you always playing hide and seek with your remote? Or, do you just want an excuse to be served breakfast in bed? Forless than $10, you can transform an old baking sheet into a unique serving tray that’s functional and beautiful. Here’s how to make your own fabric serving tray:
You’ll need: A yard of fabric (pick one that matches the room’s décor), spray adhesive, scissors, plastic knife, a baking sheet, felt (optional).
1. Cut your yard of fabric large enough so that it completely covers the front of your baking sheet and a small part of it can be wrapped around the backside.
2. Liberally spray the front of the baking sheet with spray adhesive.
3. Place your fabric in the center of your baking sheet. Quickly (before the adhesive dries) smooth the fabric onto the tray. Start from the top and work your way down, pressing out any air bubbles.
4. Take your plastic knife and press it into the edges and corners of the baking sheet until they become well defined.
5. Flip the tray over and spray the back with adhesive. Pull the fabric taut against the edges (for crisp lines) and then fold the remaining fabric onto the back of the tray. Start with the top two edges, and then fold the bottom two. If you have any extra fabric, trim it away with scissors.
6. If you want to make your new serving tray slip-proof, cut a piece of felt for the bottom of the tray and attach it with the spray adhesive. Bonus: This will help hide any remaining fabric edges, creating a more “finished” look.
7. Let it dry, and you’re done! This tray will look great on your coffee table or ottoman, and can hold anything from remote controls to cups of coffee. (Using it for breakfast in bed is optional, but we recommend it!)

Summer Road Trip #2: DIY Travel Games

Pin It Now! 
Hi again from Washington!

We're loving the site seeing and family visits, but that trip home is just around the corner. And come Saturday, we'll be breaking out our el cheapo Thrive-friendly travel games to keep those kids entertained all 14 hours.

But instead of spending money on travel games at the store, I cheated (and you can too!)

Want to make your own?

For these travel games you'll need:


And a quick copy/paste from google of your favorite board games. I printed mine out back to back and then lamenated them for good messure.


This is so stinkin' easy.

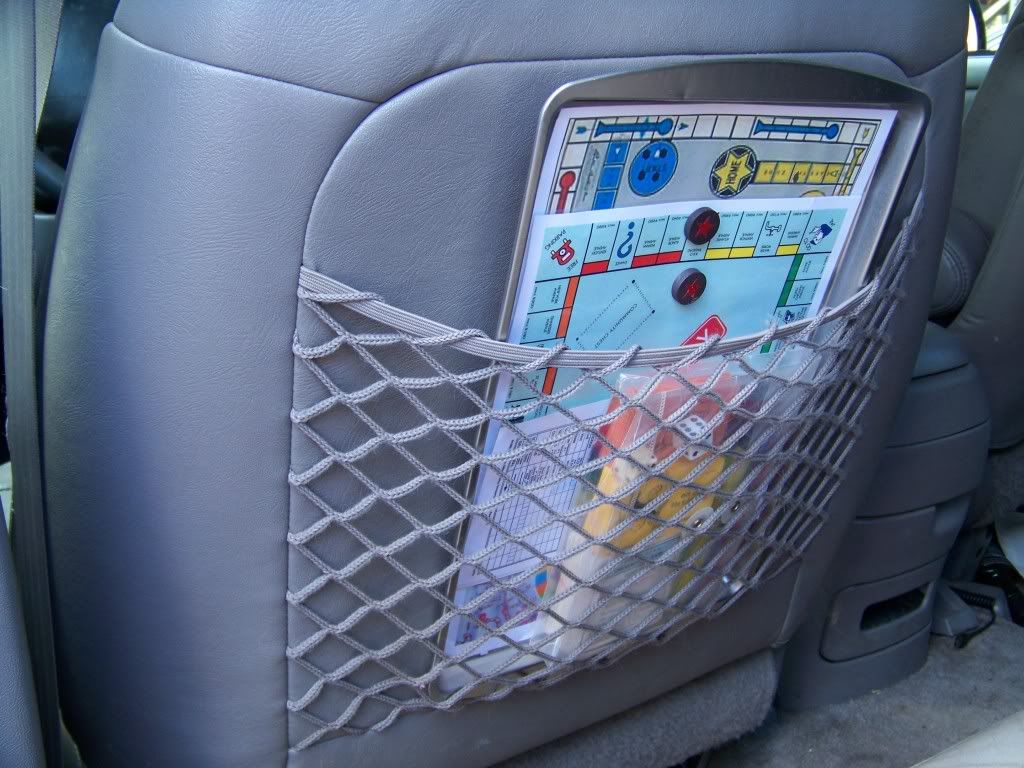
You can use any magnets you have on hand--circles, magnetic tape or even the cheapie magnets that come with the phone book--to both hold the game boards in place and make the game pieces.

See?


Chutes and ladders + magnetic tape game pieces + regular dice instead of a spinner. The lip of the cookie sheet keeps the dice from rolling away.


Yahtzee is easy with laminated sheets, markers and dice.


Connect Four + circle magnets.


Monopoly with magnet tape used for markers ...


... and houses and hotels.

Money is recorded on paper and real estate / community chest cards are kept in check with little pig tail rubber bands.


And everything stays neet and tidy in a little coupon organizer or zip lock bag.


And the best part (besides being practically free) is how quick clean up is: boards and games pieces store easily on the cookie sheet ...


... and everything fits easily in the back of the seat.


Done and done.

So have fun making your own travel games for road trips or just around time.

Wish us fun on the drive home!

Don’t Toss Your Cookie… Sheet! (Magnetic Memo Board)

Don’t Toss Your Cookie… Sheet! (Magnetic Memo Board)

My inspiration!
My inspiration!
No donation for you!
Such an easy project- and really something I can use. My “Blogging” area of the home office is in a state of constant disarray, with piles of business cards, sticky notes to myself, shipping receipts, etc. waiting to be filed away. So a DIY magnetic memo board would be a perfect addition to the office- and a way to keep certain to-do items organized.
Similar to the magazine, I spray painted my cookie sheet, starting with a metal primer first and a pretty garden green color on top.
Oooh, pretty.
Oooh, pretty.
But unlike the magazine (which recommended craft paper), I used a piece of fabric from a vintage sheet I had. A sheet on a (cookie) sheet- ha!
Seriously, though- how cute will that be on the green tray?!
Lovely!
Lovely!
So I “mod-podged” a piece of sheet fabric on the tray, and let it dry overnight.
Gettin' sticky with it...
Gettin’ sticky with it…
I’ll be the first to admit that I’m not 100% skilled at découpage… I need some pointers for that skill!
But it worked out- when all was happy and dry, I had the prettiest magnetic memo board you can imagine!!
Beautifying my office space, one project at a time.
I think I’ll specifically use it to hold business cards. I spend a lot of my time networking with other bloggers or southern artisans that I really admire, and this is a great way for me to remind myself of folks I need to contact.
Magnetic Cookie Sheet Memo Board by Sadie Seasongoods
Perfect, perfect, perfect!

Monday, June 1, 2015

Monday Solutions: Cleaning Tips and Tricks

Monday Solutions:  Cleaning Tips and Tricks


Cleaning can be a chore, even just the regular day-to-day sweeping and dusting. Then you get into places that can be hard to clean and well . . . they might get put off for a little longer than you intended. Now that the weather is nice, it is time to tackle those tough tasks. 
Now, we know things have to get cleaned, but we are also all about efficiency. A wise person once said "work smarter, not harder." Here are 19 tips to finally get to the things you haven't cleaned lately and more importantly, how to make it easier. 

1. Detail Your Own Car

Sure you can take it to a shop, but it will set you back about $200. Or you could do it yourself with a mixture of club soda, dish soap and vinegar. Scrub the solution with a firm brush and steam clean to remove residue. For full instructions go here.
19 Ways To Conquer The Hard To Clean Things In Your Home

2. De-Gunk Window Screens 

A lot of dirt can build up between your screen and glass window pane. Sprinkle some baking soda onto the dirt and pour on just enough vinegar to let it bubble up. Use an old toothbrush or cotton swap to scrub away stuck on gunk and rinse out wish warm water. 
19 Ways To Conquer The Hard To Clean Things In Your Home

3. Clean Your Ice Maker

If you have a refrigerator with an ice maker, when is the last time that you cleaned it? Probably never right? A dirty ice maker can make ice that tastes or smells funny and can harbor bacteria. There are a few ways to clean it, but this one just uses steam. Don't use a harsh cleaner that could damage the ice maker - check the manual if you're unsure. If you threw it away, you can find most manuals online at the company's website. 
19 Ways To Conquer The Hard To Clean Things In Your Home

4. Get Rid Of Laundry Odors 

If you have a high efficiency front load washing machine, you know that they can get really smelly. Simply running the machine on a hot cycle with bleach every couple weeks can keep it from getting dirty in the first place. If you've really let it go, find the directions for a vinegar/ baking soda remedy here.
19 Ways To Conquer The Hard To Clean Things In Your Home

5. Clean Your Grout 

Nothing makings a clean house look filthier than stained, nasty grout. Using just Clorox Toilet Bowl Cleaner With Bleach and a scrub brush this tile went from gross to great in just 10 minutes. If you have darker grout, test a spot below an appliance or out of sight before you do the whole floor - it does have bleach so it could do some damage. 
19 Ways To Conquer The Hard To Clean Things In Your Home

6. Clean Microfiber Couches 

Microfiber couches are supposed to hold up to dirt, but if yours looks more like the right side of this one than the left side, even after scrubbing with rubbing alcohol try using distilled water. Hard water can cause dark edges circles to appear, so soaking the top layer and rubbing with a cloth can help lift out those hard water stains. Once it dries, gently brush with a hard bristled brush and it should look almost new again. 
19 Ways To Conquer The Hard To Clean Things In Your Home
via Tada's Kooky Kitchen

7. Rid Stains From Laminate Counters

Laminate is a great option for a counter top, but a lingering spill can still stain it. If regular soapy water doesn't lift it, spread some baking soda and scrub with a gentle cloth to pull up the mark. Natural stones like marble can absorb a stain too, but you need to create a poultice specific to the spill and stone type to get rid of it. 
19 Ways To Conquer The Hard To Clean Things In Your Home
via Home Depot 

8. Clean Hair Brushes 

Anyone who has used a hair brush knows that they can get really gross. If yours is really nasty, make cuts every couple rows to loosen up hair. To remove product residue soak the brush in a solution of hot water and baking soda. 
19 Ways To Conquer The Hard To Clean Things In Your Home
via Passion For Savings

9. Dust Air Vents 

Use an old paint brush or makeup brush to dust out your car's air vents that your vacuum can't get to. 
19 Ways To Conquer The Hard To Clean Things In Your Home
via The Family Handyman

10. Dust Your Ceiling Fan Faster

Instead of trying to avoid dust in the face and all over the bed or floor below, wipe down a ceiling fan using a pillow case. Wrap it around each blade and pull off the dirt. Give it a quick wipe down with a cloth to get any stuck on bits.  

11. Remove Rust From Knives

If your favorite knife has started to look a little worse for wear, and you've tried every DIY option with no results you don't have to buy a new one. Just grab a bottle of Bar Keeper's Friend and scrub away - the rust will start to vanish in minutes. 
19 Ways To Conquer The Hard To Clean Things In Your Home
via The Make Your Own Zone

12. Wash Fido's Toys

Dog toys can get really, really gross. Drool, dirt, dust and whatever else is all over these things. For the health of your dog - and you if you pick them up too - give them a wash. You can find simple instructions to clean soft toys, squeaky toys and plastic toys here.
19 Ways To Conquer The Hard To Clean Things In Your Home
via Good Dogs & Co.

13. Awkward Glass Bottles 

Sometimes those pretty decorative bottles develop a dirty residue inside and a bottle brush just can't reach. Pour coarse salt, dish soap and a tiny bit of warm water into the bottle and shake -hard then rinse. The solution should be gritty enough to scrub but liquid enough to move around. Depending how dirty they are you might have to repeat this process a few times to get rid of all the marks. 
19 Ways To Conquer The Hard To Clean Things In Your Home
via She Endeavors 

19 Ways To Conquer The Hard To Clean Things In Your...


11. Remove Rust From Knives

If your favorite knife has started to look a little worse for wear, and you've tried every DIY option with no results you don't have to buy a new one. Just grab a bottle of Bar Keeper's Friend and scrub away - the rust will start to vanish in minutes. 
19 Ways To Conquer The Hard To Clean Things In Your Home
via The Make Your Own Zone

12. Wash Fido's Toys

Dog toys can get really, really gross. Drool, dirt, dust and whatever else is all over these things. For the health of your dog - and you if you pick them up too - give them a wash. You can find simple instructions to clean soft toys, squeaky toys and plastic toys here.
19 Ways To Conquer The Hard To Clean Things In Your Home
via Good Dogs & Co.

13. Awkward Glass Bottles 

Sometimes those pretty decorative bottles develop a dirty residue inside and a bottle brush just can't reach. Pour coarse salt, dish soap and a tiny bit of warm water into the bottle and shake -hard then rinse. The solution should be gritty enough to scrub but liquid enough to move around. Depending how dirty they are you might have to repeat this process a few times to get rid of all the marks. 
19 Ways To Conquer The Hard To Clean Things In Your Home
via She Endeavors 
14. Hard Water Stains In Your Faucet
These open-style facets look so pretty - until they get grimy. Create a paste with coarse salt and cleaning vinegar (it is slightly more acidic than regular vinegar and can really power through stains.) Rub it onto the stains and let it sit for 15. Give it a quick scrub before rinsing and the deposits will be gone. 
19 Ways To Conquer The Hard To Clean Things In Your Home
via Made From Pinterest

15. Get Rid Of Driveway Stains 

Stains in a driveway look terrible, but they're so hard to clean. To pull out an old, embedded stain this product called Pour-N-Restore is your best bet. It is a poultice and draws out the dried in oil stains. The product pours on as a liquid that you spread over the stain. As it dries it becomes a powder that holds onto the oily stain so you can sweep it away instead of rinsing it into your lawn. 
19 Ways To Conquer The Hard To Clean Things In Your Home
via Instructables