Friday, September 28, 2012

Chicken Rollatini Stuffed with Zucchini and Mozzarella

Chicken Rollatini Stuffed with Zucchini and Mozzarella

From  skinnytaste.com 


Shredded zucchini, garlic and mozzarella cheese rolled in chicken cutlets, then dipped in oil and fresh lemon juice, breaded and baked to perfection!

A wonderful way to use up end of summer zucchini and your family will love this, even the non-vegetable lovers!!


I've listed the nutritional info for one, I first made this last week without photos and enjoyed one with a side of rice and vegetables and I felt very satisfied. Today I remade this for lunch and had a hard time finishing two with a fresh garden salad on the side.


Chicken Rollatini Stuffed with Zucchini and Mozzarella
Gina's Weight Watcher Recipes
Servings: 8 • Serving Size: 1 cutlet • Old Points: 4 pts • Points+: 4 pts 
Calories: 171.9 • Fat: 6.3 g • Protein: 20.3 g • Carb: 7.9 g • Fiber: 0.9 g • Sugar: 1.3 g Sodium: 280.7 mg (without salt) 


Ingredients:
  • 1 tsp olive oil
  • 4 cloves garlic, chopped
  • 1 1/2 cups (1 medium) zucchini, shredded   (you can substitute broccoli)
  • 1/4 cup + 2 tbsp Romano cheese (or parmesan)
  • 3 oz part skim shredded mozzarella
  • salt and pepper to taste
  • 8 thin chicken cutlets, 3 oz each
  • 1/2 cup Italian seasoned breadcrumbs
  • 1 lemon, juice of
  • 1 tbsp olive oil
  • salt and fresh pepper
  • olive oil non-stick spray 

Directions:

Wash and dry cutlets, season with salt and pepper.  Preheat oven to 450°. Lightly spray a baking dish with non-stick spray.

In a large skillet, heat oil on medium-high heat. Add oil when hot then saute garlic a minute, or until golden. Add zucchini, 1/4 cup Romano cheese, salt and pepper and saute about 3-4 minutes, stirring occasionally. Set aside to cool. When cool, add mozzarella cheese and mix to combine.

Lay chicken cutlets down on a working surface and spread 3 tbsp of zucchini-cheese mixture on each cutlet. Loosely roll each one and keep seam side down.

Combine breadcrumbs and grated cheese in one bowl; in a second bowl combine olive oil, lemon juice, and pepper in another bowl.

Dip chicken in lemon-oil mixture, then in breadcrumbs and place seam side down in a baking dish (no toothpicks needed). Repeat with the remaining chicken. When finished, lightly spraywith oil spray.

Bake 25 - 30 minutes. Serve immediately. Serving size is listed as one, but if you are having this as a low carb meal with a salad, I suggest you have two.

Thursday, September 27, 2012

Kids Indoor Winter Garden

Grow Fun with Kids!  I know that Winter is just around the corner, but how about having an indoor garden for your kids this winter??  Here are lots of cute planting  ideas that kids will love to do and watch grow:


Wednesday, September 26, 2012

Hand Painted Tumblers

Found this adorable craft from Radical Possibility and had to share it.  The founds some cute tumbler glasses, hand painted an adorable confetti pattern on them which completely transformed these glasses into a beautiful work of art.  I cannot paint or draw very well, but I believe I could do this:


You can find the glasses at thrift stores, Goodwill, Dollar General, or anywhere really.


Use a small paint brush and any acrylic paint color that you would like.  After it dries, make sure you  seal it afterwards.


Simple and yet makes such a lovely accent!!

Tuesday, September 25, 2012

Chain Double Wrap Bracelet Tutorial

For our Jewelry Spotlight this week - another tutorial on how to make a Cord and Chain Double Wrap Bracelet.  These bracelets are becoming very popular lately and I know why, because they are just beautiful!!  Now, when I did this tutorial, I changed it up a bit and used silver chain because that's what I prefer and ribbon instead of the faux leather cord.  This tutorial is from Studs and Pearls.


DIY: Cord and Chain Double Wrap Bracelet


CC Skye - Thompson Double Wrap Bracelet (Polyvore.com/Zappos.com)


Thompson Double Wrap Bracelet, $264 (CoutureCandy.com)


Supplies:- Curb chain (I used brass)
- At least 60 inches of cord (The original version used leather. I used black faux leather cord, which was a personal preference)
- Sewing thread, same color as your cord
- Sewing needle, jewelry clasp, jump rings, jewelry pliers


1) Measure a length of chain that will fit comfortably around your wrist. You'll need two strands.


2) Insert the cord through the topmost link in one of the strands.


3) Insert the cord through the next link, essentially wrapping the cord through the top of the link.

4) Pull it through, and bring it back up "behind" the chain and into the next link...


5) And keep on repeating. Easy enough! You're just weaving the cord in and out through the links. Be sure to keep your chain in one direction; this will make it easier for you to go along the chain with your cord. (I used a flash in the photographs from here on in, so you can see the black cord better!)


6) Keep on going...


7) When you've reached the end of the chain - don't cut it just yet! Insert it through the first link of your second chain.


8) And just keep on weaving the cord through the entire second strand, just as you did in the first few steps. You'll end up with something like this.


9) Thread a needle, and insert it into the cord in between the two chains.


10) And simply weave the needle/thread in and out of the two strands. You don't have to necessarily go through the cord...just under the cord. Go back and forth between sides; this way, you can attach the two strands together.
11) When you're all done, tie off your thread, tie off your cord, and seal it off with some clear nailpolish if you choose to do so. Attach your clasps and jump rings; maybe even some charms if you'd like.


I like the brass chain against the black faux leather cord, but of course you can use any color chain you'd like, with any color cord you'd like.

Monday, September 24, 2012

Turn an Old Door Into...........


DIY Projects:
Turn a Door Into ...
Who knew you could do so much with just a simple reclaimed door? We'll show you how to turn an old door into:

  1. Remove the old hardware by scraping away built-up layers of paint so the screwdriver has a firm grip on the screw heads. If screws remain stuck, loosen them with a sharp hammer blow to the handle of the screwdriver.
  2. Remove the old glass by placing cardboard under and over the panels and smashing it out with a hammer. Use a chisel to scrape away putty and remove glazing pins.
  3. Scrape off paint and trim use a hot airgun or hair dryer to heat the paint while removing it with a metal scraper, disposing carefully as it may contain lead. Mark 4-in. around the panels to square up the edges of the table with a circular saw.
Prep 1Sue Ferris[+]
Prep 2Sue Ferris[+]
Prep 3Sue Ferris[+]

TIP

Wear safety gear including gloves and glasses.

Step 2: Secure the Backing

Notch corners in the underpanel to allow for the legs. Put the backing in the panels, apply adhesive and secure the underpanel to the door with 1-in. screws. From the top, secure 1-in. screws through the backing to pull up the underpanel.
Step 2: Secure the BackingSue Ferris[+]

Step 3: Position the Infills

Generously apply construction adhesive on the backing then secure three infill pieces in each panel. Core out and square up the lock and handle holes with a sharp chisel and cut matching infill pieces to fit, securing with adhesive.
Step 3: Position the InfillsSue Ferris[+]

TIP

Check the dimensions of the cutting list against the door before cutting the pieces, adding 2-in. to the trim to allow for mitering and checking the plywood backing and infill pieces fit in the panels.

Step 4: Prepare the Rails

At the base of the end and side rails mark 3 1/2-in. from the ends and 3 1/2-in. from the top, joining with a curved line, using a circular saw and jigsaw to cut and a belt sander to smooth the outer surfaces of the rails.
Step 4: Prepare the RailsSue Ferris[+]

Step 5: Make the Dowel Joints

At the top of the legs and end of the rails, use a doweling jig to drill three 3/8-in. holes 1 3/8-in. apart. Do a test fit and adjust if necessary, apply wood glue in the holes and on the end grain of the rails, assembling with dowels.
Step 5: Make the Dowel JointsSue Ferris[+]
Step 5: Make the Dowel Joints 2Sue Ferris[+]

Step 6: Assemble the Frame

Tap the legs and rails together with a mallet then position wood corner blocks at the outside corners to hold the frame and set up a long ratchet cargo strap to pull the frame tightly and leave to dry. Check legs are plumb and square.
Step 6: Assemble the FrameSue Ferris[+]

Step 7: Add the Corner Bracing

Position the corner braces 3/8-in. from the top of the legs to allow for the underpanel, securing with #8 x 3-in. screws into the legs and #8 x 2-in. screws into the rails.
Step 7: Add the Corner BracingSue Ferris[+]

TIP

Alternatively, use angled metal braces with 45° ends.

Step 8: Attach the Tabletop

To secure the tabletop to the frame, position one cleat on each end and three on each side by drilling two pilot holes into the rails and two clearance holes into the tabletop, securing with screws.
Finished Diagram[+]
Step 8: Attach the TabletopSue Ferris[+]

TIP

Alternatively, use tabletop brackets.

Step 9: Attach the Trim

Miter the trim, drill pilot holes then secure it to the tabletop with 1 5/8-in. screws, filling the screw heads with wood filler. Hand plane the infill pieces level then smooth with a belt sander using coarse sandpaper then a random orbital sander.
Step 9: Attach the TrimSue Ferris[+]

Step 10: Smooth and Finish

Fill gaps between the infill with polyester resin and leave to dry; then, smooth with 120-grit sandpaper. Apply three coats of French polish over the tabletop, lightly rubbing between coats with steel wool. Finish with a coat of beeswax polish.
Step 10: Smooth and FinishSue Ferris[+]
Finished TableSue Ferris[+]


Friday, September 21, 2012

Sex in a Pan

Sex in a Pan

Sex in a Pan
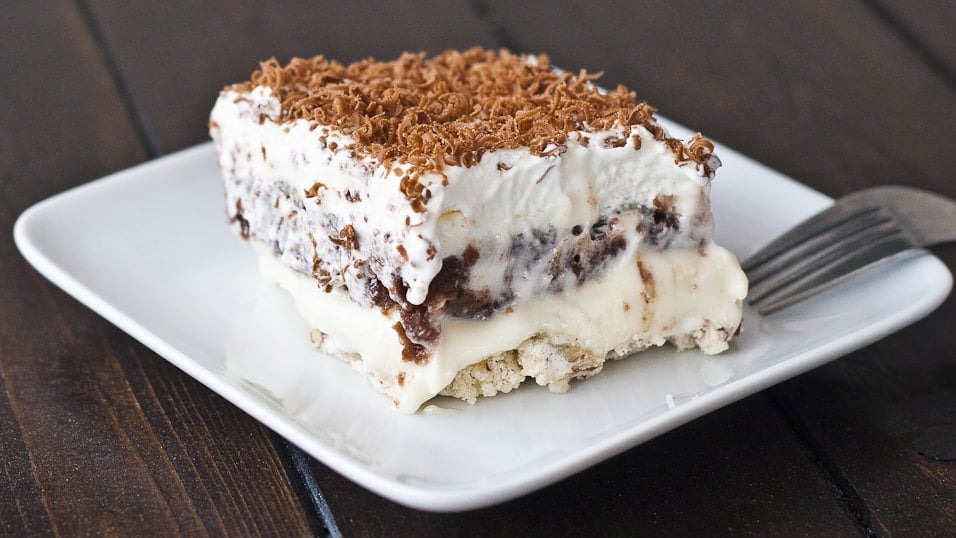
Don’t laugh at the name of this dessert! OK, you can laugh, it is funny. I have no idea why it’s called sex in a pan, maybe because it’s so good. I remember a long time ago, before I was married, and used to live on my own, one weekend my friend came over and she introduced me to this dessert. I had no idea what it was, but she promised me I was going to love it so we made it. We did not come up with the name, that is the name that it was known to her and her mom had been making it for her for as long as she could remember. I know a lot of readers have commented on the name of this dessert, so I know it goes under many different names, apparently it just depends where you’re from.
Oh my God, it was unbelievable.
I was in love, I had never had anything like it before. Now I don’t know how popular this dessert is, or if it’s a dessert for children or what, because I don’t really care. I’m an adult and I like it. The bottom layer is the crust made with pecans and flour and butter, the next layer is a layer of cream cheese sweetened with powdered sugar and made fluffier with whipping cream. Then you have a layer of chocolate pudding, then another layer of vanilla pudding and top it off with whipping cream and sprinkled with chocolate. Does that not sound good?
I don’t have step by step pictures of me making this recipe, well simply because I was too excited while making it and couldn’t waste any time taking pictures. :) Maybe some day I will though. I just had to share this wonderful dessert with you. Have you guys had this before? Isn’t it to die for?
Sex in a Pan
Rating: 5
Prep Time: 45 minutes
Cook Time: 20 minutes
Total Time: 1 hour, 5 minutes
Yield: 10 servings
Sex in a Pan
Ingredients:
    Crust
  • 1 cup pecans, chopped
  • 3 tbsp white sugar
  • 1/2 cup butter
  • 1 cup flour
  • Cream cheese layer
  • 1 8 oz package cream cheese
  • 1 cup powdered sugar
  • 1 cup whipped cream or cool whip
  • Vanilla pudding
  • 1 package of instant vanilla pudding (5.1 oz or 144 g)
  • 3 cups milk
  • Chocolate Pudding
  • 1 package of instant chocolate pudding (5.1 oz or 144 g)
  • 3 cups milk
  • Last layer
  • 2 cups whipped cream or cool whip
  • shaved chocolate
  • Free Coupons
Instructions:
  1. Preheat oven to 350 F degrees.
  2. Spray a 9×13 inch baking dish with cooking spray.
  3. In a mixer mix all the crust ingredients together and press the mixture into the prepared baking dish.
  4. Bake it for about 20 minutes.
  5. Prepare the vanilla pudding as per the instructions on the package.
  6. Prepare the chocolate pudding as per the instructions on the package.
  7. In a mixer add the cream cheese, powdered sugar and the cup of whipped cream. Mix until light and fluffy.
  8. Let the crust cool. Spread the cream cheese mixture over the crust evenly. Spread the chocolate pudding over the bottom crust, then the vanilla pudding. Top with the whipped cream and sprinkle with the chocolate.
  9. Refrigerate for a couple hours so that it sets.

Thursday, September 20, 2012

Discovery Bottles

Preschool is one of my favorite age groups.  I have taught preschool and once my daughter gets a bit older, I have a feeling I will do it again.  I have made some discovery bottles with glitter and water and rice and they were always a really big hit with the kids. These bottles go even further and are really great!  My favorites are the bottle with the scented oil and the one with the pipe cleaners and magnets.  These are a wonderful way to let children safely explore their environment utilizing all of their senses as well! (Note:  Make sure you glue all lids on the bottles to ensure the kids cannot open them.  She suggests glue gun, I've used super glue with excellent results)  These bottles are from Cathy Denman from Pre-School Play


We've had our discovery bottles for well over 2 years and they are really lasting well.  I've recently added a few more so thought I would share with you what ours are filled with.  These are so easy to make.  All you need it empty clear plastic bottles with lids, a glue gun and whatever you can find to fill them with.  When I first started making these I didn't have a glue gun so experimented with different sorts of glue and basically for the best results you need a glue gun.


This one is my favourite! Glycerine and glitter - it is much more effective than it looks in the picture and very relaxing (probably why I like it:))


Hair Gel and Marbles


Marbles in Shampoo. Good for comparing with the Marbles in Hair Gel, to see the the different ways the marbles behave in each.


Animals hidden in shredded paper. Lots of twisting and turning of the bottle required to get the animals to appear.


Good old glitter in distilled water (snow storms). Quick dramatic results when shook, that can be repeated again soon after.  I used glitter strands in this one


Car in rice. We use this one to learn about the different parts of a car.  Can you see the wheels / windows / lights / mirrors etc.


Coloured water and oil - I think I need a fish in this one!  I stupidly said to my son the other day 'look the two liquids don't mix together' to which he responded by vigorously shaking the bottle until they did!  After a while they did seperate again!


This one contains blue food colouring, washing up liquid and water.  Shaking creates fantastic blue bubbles which turn white before popping.


Giraffe in tiny bits of black plastic.  This one makes a lovely sound as you twist and turn the bottle, trying to find the giraffe.


Coloured sand and perspex numbers. (The sand was coloured with grated green chalk).


Artificial flower fragranced with oil.  Encourages the use of other senses in exploring the bottles.  You could have a set of discovery boxes that focus entirely on smells.


Cut up pipe cleaners.  Use magnetic wands to draw the pipe cleaners up the side of the bottle.


Jumping beans - again can be explored with a magnetic wand.


Paper clips in de-stilled water to demonstrate that magnetism also works in water.