Friday, November 30, 2012

Red Velvet Trifle

RED VELVET TRIFLE
by Julia


Red Velvet Cake
Recipe adapted from Pinch my Salt
2 1/2 cups all purpose flour
1 teaspoon baking powder
1 teaspoon salt
2 Tablespoons cocoa powder (unsweetened)
2 oz. red food coloring
1/2 cup unsalted butter, at room temperature
1 1/2 cups sugar
2 eggs, at room temperature
1 teaspoon vanilla extract
1 cup buttermilk, at room temperature
1 teaspoon white vinegar
1 teaspoon baking soda
Preheat oven to 350 degrees. Butter and flour two 9-inch round cake pans or three 8-inch round cake pans.
Sift together the flour, baking powder, and salt into a medium bowl; set aside. In a small bowl, mix food coloring and cocoa powder to form a thin paste without lumps; set aside.
In a large bowl, using a hand mixer or stand mixer, beat butter and sugar together until light and fluffy, about three minutes. Beat in eggs, one at a time, then beat in vanilla and the red cocoa paste, scraping down the bowl with a spatula as you go. Add one third of the flour mixture to the butter mixture, beat well, then beat in half of the buttermilk. Beat in another third of flour mixture, then second half of buttermilk. End with the last third of the flour mixture, beat until well combined, making sure to scrape down the bowl with a spatula.
In a small bowl, mix vinegar and baking soda. Yes, it will fizz! Add it to the cake batter and stir well to combine. Divide batter evenly between the cake pans and place them in a preheated 350 degree oven. Bake for 25-30 minutes. Cake is done when a toothpick inserted in the center comes out clean.
Cool the cakes in their pans on a wire rack for 10 minutes. Finish cooling on a wire rack. All the cakes to cool completely before assembling the trifle.
Chocolate Ganache
1/2 cup half and half
1 cups dark chocolate, chopped
Warm the half and half in a saucepan over medium heat. Allow it to almost boil, but don’t let it boil. As soon as is it really hot, remove it form the heat and stir in the chocolate. Stir until melted and allow it to cool to room temperature, stirring occasionally. Once it has cooled (at room temperature), it is ready to be used in the trifle.
Mascarpone Whipped Frosting
Recipe inspired from Recipe Girl. Who wouldn’t be inspired by her amazing trifle pictures, gorgeous!
8 ounce mascarpone cheese, at room temperature
4 ounces cream cheese, at room temperature
1/3 cup sugar
2 cups heavy whipping cream
*If you don’t have mascarpone, sub all cream cheese, so a total of 12 ounces.
In a large bowl with a hand mixer or stand mixer, beat cream cheese, mascarpone and sugar on high speed until light and fluffy. Reduce speed to medium and slowly pour in whipping cream. Continue whipping until mixture resembles soft whipped cream. This took about 10 minutes.
Trifle Assembly
Arrange a single layer of red velvet cake chunks on the bottom of the trifle dish. Spoon about 1/3 of the ganache on top of the cake cubes, then spoon about 1/3 of the mascarpone frosting onto the ganache. Sprinkle the frosting with mini chocolate chips. Repeat layers until you run out of room in your dish (which took 3 layers for me).

I garnished with some crumbled red velvet cake and a little sprinkling of mini chocolate chips. It was super pretty and even more tasty!

Thursday, November 29, 2012

Kids Christmas Tree Ornaments

I can't wait to try this with my kiddos this weekend! We are getting ready for Christmas and the first Saturday of December is when we decorate the house and the tree.  My kids always like to make some new ornaments for the tree and these are going to be so fun!


Here's what you need:

Ribbon about 12 inches or so per tree
Beads  - about 10 8 to 10mm beads and 2 smaller seed beads
Needle
Thread

Thread your needle ensuring that the thread is double and add one seed bead.  Add one pearl bead then go through the ribbon about 1/4 inch before one end. add another pearl bead.  Take the ribbon about an inch to the right of the bead and loop it back  and thread through the needle again, as shown in the picture leaving the loop on the side.  Thread another bead and make another 1 inch loop with the ribbon on the left side.  Continue threading beads and ribbon gradually making you loops smaller and smaller as you reach the top of your tree.  Finish off with one last pearl and seed bead and make a knot at the top and bottom of the tree.  Trim ends at the bottom and make a loop with the remaining thread at the top to hang the ornament on the tree or where ever you would like.

So Cute and So Fun!

Jennifer
BrankletsNBling

Wednesday, November 28, 2012

Crepe Paper Flower Embellishment

Sometime the packaging is almost as important as the gift!  Here is a really cool tutorial to make a crepe paper glittered flower to put as an embellishment on any gift or scrapbook page or even as a cute napkin ring holder.  Check it out from Under a Blue Moon:

Crepeflower
I saw a picture of a glittery pink flower and decided I needed to figure out how to make a one for myself.
Here are the step by step (mostly) pictures and directions:
Flower Tutorial
Step 1:
First take a length of crepe paper streamer (mine is about 24" long) and fan-fold into eight layers.

Then cut out a double humped shape to make the petals (you will have eight of them). They don't have to be perfectly even.
Step 2:
I took a small button and smeared a thin layer of glue on it and then plunked it into the glitter.  I then took a small rhinestone and put it in the middle for added bling.

I also got the base of my flower ready.  I just cut a circle about an inch in diameter out of card stock.
Step 3:
I found the best way to glitter the edges was to pour a little pile of white glue and a little pile of fine glitter onto a piece of card stock.  Then fold the petal in half and gently dab the edges in the glue and then in the glitter.  Unfold and let dry.
Step 4:
When the petal edges were dry I scrunched up the bottom and glued it to the outer edge of card stock circle.  Do the same with the second petal, glueing it to the opposite side.
Step 5:
Repeat with two more petals.
Step 6:
For the second layer of petals I glued them a little closer to the center and off-set them so they covered two of the petals from the first layer.
Step 7:
Repeat with the last two petals.
Step 8:
Glue your glittered button to the center.  
And there you have it.  I thought it made a pretty embellishment for a present.  Or you make a napkin ring out of a strip of cardstock and glue it to that for a girly napkin ring.  


~Jennifer

Tuesday, November 27, 2012

Beaded Ornaments from Old Jewelry

What an excellent way to reuse some old costume jewelry you may have lying around your house.  If you don't have any, you can always get some from a local thrift shop or consignment shop.  This wonderful tutorial is from Joanne Palimisano from Selvage Secrets:


HOW TO MAKE CHRISTMAS ORNAMENTS FROM OLD NECKLACES


To make these ornaments, we took apart some faux pearl necklaces, re-strung the beads on dressmaker pins and then inserted the pins into polystyrene balls. These ornaments are easy to make, and they make great gifts.

Tools and Materials

  • hot glue gun and glue sticks
  • scissors
  • small Styrofoam balls
  • a box of 1-1/16" dressmaker pins 
  • 2 to 4 old costume jewelry necklaces (depends on the number and size of ornaments)
  • package of clear seed (bugle) beads, cream or a color of your choice 
  • ribbon

Gather Beads

Make sure the necklaces you are taking apart are not valuable. There is a way to test for real pearls — check online. Cut the string of the costume jewelry and pour the beads into a platter with raised sides. You don't want to use a bowl — it is hard to maneuver a pin in it.

Insert Beads on Pins

Choose the size of the Styrofoam ball you want to work with, depending on the amount of beads you have.
Start stringing your beads onto the pins, leaving at least 1/2 to 1/3 of the pin exposed. Do a variety of patterns: one bead, two beads, three, depending on the size and shape. Always put the smallest bead on first, then the largest. Use the seed beads as toppers on the pinheads. Also, use them if the bead holes are too large and can slip through the pinhead.
Put a little glue on the tip of the pin and then insert it into the Styrofoam. The glue will help keep it all together and prevent the pins from sliding out of the ball.

Add Ribbon to Hang It

When you get close to filling the whole ball, add ribbon to the top. Glue down the ribbon, then pin it down with beads; glue the pins down, too.

Use Seed Beads as Filler

Fill in whole ball. When it gets harder to fill in some tiny spots, use the seed beads, four or five together, as filler and for additional height.

Monday, November 26, 2012

No Sew Ruffle Flower Tote

This an an awesome tutorial from Chrissy from the blog The Pearl
Photobucket


No Sew ruffle flower...tutorial


I have the privlige of being a part of the best MOPS group ever
We always have great food, heart warming conversations and amazing speakers.
The icing on the cake is we have a first class craft cordinator.

A MOPS craft budget is not very big.
and none of us want to make something that looks like it was a preschool project.

We have made some great items that I still use year after year.
necklaces, key fobs, and magnets.

One of my favorite crafts we did a few years ago was to decorate a tote bag.
We cut out fabric and used wonder under to attach it to the bag.
they were super cute.

This year we brought back the bag idea but did it a little different.
we made fabric ruffles and used fabric paint pens


I shared these bags on facebook and a few people asked how they were made.
I made a tutorial for you today...

Supplies needed...


  • scissors
  • pen/pencil
  • glue gun / glue sticks
  • fabric
  • circle template (can free hand)
  • fabric
  • tote bag 


1. trace (or free hand) a circle onto your bag
2. circle on bag
3. cut fabric into strips. I made mine about 1 1/4"


4. add a strip of glue about 3-4 inches along the line of your circle
5. start scrunching your fabric on the glue line, be careful as the glue is hot
6. add another 3-4 inch line of glue and continue scrunching the strip of fabric. when you get to the end of a strip just overlap the ends and keep scrunching.
7. when you get to the end of the outer circle you need to continue your circle about 1/2 inch below. I drew a pen line so you could see where i continue my circle. Keep moving your circle 1/2 inch in until you reach the end. 

8. You can either just finish your flower by closing up the center with the ruffles or add a button.
That's it.

Easy Peasy.


Makes the perfect gift.

Friday, November 23, 2012

Week-End Breakfast Delish Idea


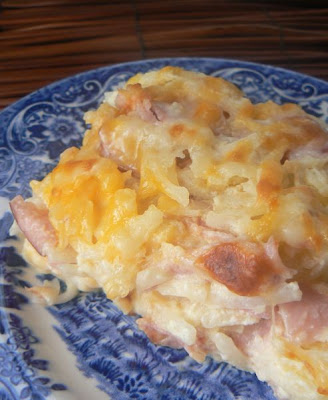
Cheesy Ham and Hash Brown Casserole


When I saw this recipe at Mommy's Kitchen (back in Sept.!), I knew I wantedWeek to make it.

This is such an easy recipe and everyone loves it. I am also thinking this would be a great potluck dish!

cic

Cheesy Ham and Hash Brown Casserole

1 30 oz. bag frozen, shredded hash brown potatoes
8 oz sour cream
1 can cream of chicken soup
1/2 cup butter, melted
1 small onion, diced fine
16 oz package cubed ham (I use sliced deli ham too)
2 cup shredded cheddar cheese, set aside 1 C

Stir all the ingredients together. Place into a lightly greased casserole dish (9 x 13 in). Sprinkle top with 1 C cheese. Bake at 350 degrees for 45 min - 1 hour. Let cool a bit and serve.

Thursday, November 22, 2012

Happy Thanksgiving!

From our family to yours - My mom and I would like to wish everyone a wonderful and

Happy Thanksgiving  full of many blessings!!

Neat snack for the kids for Thanksgiving :) (this would be a fun 'plate' to make with the kiddos to serve during Thanksgiving)

~Jennifer & Linda

BrankletsNBling
GirlieGals

Wednesday, November 21, 2012

Christmas Snowflake Wall Art

I found this beautiful design from Compartment Life.com Blog and found it fascinating   The cost to make this this nothing, unless you don't have a can of spray paint laying around somewhere!  You can make this into whatever you want. What a cute idea for snowflake ornaments or wall art for your Christmas decor!  Can't wait to try it!


  • Toilet paper rolls: free, I used about 40 small toilet paper roll and maybe 10 paper towel rolls
  • Hot Glue Gun and Glue: free, I already owned it
  • Spray Paint: free, I already had the colors in my shed that I was planning on using
  • Scissors, Pencil and Ruler: again all free because honestly I already had them


and this one:

Cut your toilet paper rolls down to about 2 inches.
Plan your design and hotglue rolls together.

Take outside or to a well ventilated area and spray paint your creation.


~Jennifer

Tuesday, November 20, 2012

Cord Bracelet Tutorial

These bracelets are becoming increasingly popular and I found this great tutorial on how to make them from Honestly...WTF


Before you begin, seal the tips of the cord by burning them with a lighter. This will prevent the cord from fraying as you work. With a pair of flat nose pliers, squeeze one side of the S hook until it is completely closed. Do the same to the other side but leave just enough room for the cord to slip through. Thread 6 inches of cord through the closed side of the hook. Fold 3 inches of cord back on itself, creating a zig zag. Bend the last  2 inches of the cord over the zig zag. (Click images to enlarge)
Coil the cord twice around towards the left loop. Push the tip through the opening of the left loop. While pinching the tip with your left fingers, use your right fingers and push the coil to the left until the loop is closed and the knot is tight. Test the adjustable knot by sliding it towards the base of the S hook.
Repeat the same steps on the other side. This time, coiling towards the right side and pushing the coil in the same direction.
Trim and re-burn the tips if necessary. Your wrap bracelet is finished! It can be wrapped around the wrist 2-3 times and adjusted with the sliding knots.
Try making the bracelets with leather cord too. Have fun!

Monday, November 19, 2012

Helpful Hints and Home Remedies


 o
Helpful Hints, Home Remedies
from gardenweb.com


Found this on another forum: 1. Budweiser beer conditions the hair
2. Pam cooking spray will dry finger nail polish
3. Cool whip will condition your hair in 15 minutes
4. Mayonnaise will KILL LICE, it will also condition your hair
5. Elmer's Glue - paint on your face, allow it to dry, peel off and see the dead skin and blackheads.
6. Shiny Hair - use brewed Lipton Tea
7. Sunburn - empty a large jar of Nestea into your bath water
8. Minor burn - Colgate or Crest toothpaste
9. Burn your tongue? Put sugar On it!
10. Arthritis? WD-40 Spray and rub in, kill insect stings too, remove glue from labels on plastic containers.
11. Bee stings - meat tenderizer
12. Chigger bite - Preparation H
13. Puffy eyes - Preparation H (but don't get it in your eyes)
14. Paper cut - crazy glue or chap stick (glue is used instead of sutures
at most hospitals)
15. Stinky feet - Jell-O!
16. Athletes feet - cornstarch
17. Fungus on toenails or fingernails - Vicks vapor rub
17a. Infection in/around nails - White Vinegar
18. Kool aid To clean dishwasher pipes. Just put in the detergent section and run a cycle, it will also clean a toilet. (Wow, and we drink this stuff)
19. Kool Aid can be used as a dye in paint also Kool Aid in Dannon Plain yogurt as a finger paint, your kids will love it and it won't hurt them if they eat it!
20. Peanut butter - will get scratches out of CD's! Wipe off with a coffee filter paper.
21. Sticking bicycle chain - Pam no-stick cooking spray
22. Pam Will also remove paint, and grease from your hands! Keep a can in your garage for your hubby
23. Peanut butter will remove ink from the face of dolls
24. When the doll clothes are hard to put on, sprinkle with corn starch and watch them slide on.
25. Heavy dandruff - pour on the vinegar!
26. Body paint - Crisco Mixed with food coloring. Heat the Crisco in the micro wave, pour into an empty film container and mix with the food color of your choice!
27. Tie Dye T-shirt - mix a solution of Kool Aid in a container, tie a rubber band around a section of the T-shirt and soak
28. Preserving a newspaper clipping - large bottle of club soda and cup of milk of magnesia , Soak for 20 min. and let dry, will last for many years!
29. A Slinky Will hold toast and CD's!
30 To keep goggles and glasses from fogging, coat with Colgate toothpaste
31. Wine stains, pour on the Morton salt And watch it
absorb into the salt.
32. To remove wax - Take a paper towel and iron it over the wax stain, it will absorb into the towel.
33. Remove labels off glassware etc. rub with Peanut butter!
34. Baked on food - fill container with water, get a Bounce paper softener and the static from the Bounce Towel will cause the baked on food to adhere to it.
Soak overnight. Also; you can use 2 Efferdent tablets, Soak overnight!
35. Crayon on the wall - Colgate Toothpaste and brush it!
36. Dirty grout - Listerine
37. Stains on clothes - Colgate
38. Grass stains - Karo Syrup
39. Grease Stains - Coca Cola, It will also remove grease stains from the drive way overnight. We know it will take corrosion from car batteries!
40. Fleas in your carpet? 20 Mule Team Borax - Sprinkle and let stand for 24 hours. Maybe this will work if you get them back again.
41. To keep FRESH FLOWERS longer Add a lit tle Clorox , or 2 Bayer aspirin, Or just use 7-up instead of water.
42. When you go to buy bread in the grocery store, have you ever wondered which is the freshest, so you "squeeze" for freshness or softness? Did you know that bread is delivered fresh to the stores five days a week?
Monday, Tuesday, Thursday, Friday and Saturday. Each day has a different color twist tie. They are: Monday = Blue, Tuesday = Green, Thursday = Red, Friday =
White and Saturday = Yellow . So if today was Thursday, you would want red
twist tie; not white which is Fridays (almost a week old)! The colors go alphabetically by color Blue - Green - Red - White - Yellow, Monday through Saturday. Very easy
to remember. I thought this was interesting. I looked in the grocery store and the bread wrappers DO have different twist ties, and even the ones with the plastic clips have different colors. You learn something new everyday!
Enjoy fresh bread when you buy bread with the right color on the day you are shopping.

Friday, November 16, 2012

Great Side Dish for Any Occasion


Scalloped Potatoes with Leeks

0


206


0


Scalloped potatoes with sauteed leeks can be assembled a day in advance in a casserole that travels from refrigerator to oven to table.
Martha Stewart Living, March 2008
  • Yield Serves 6 to 8

Ingredients

  • 2 tablespoons unsalted butter, plus more for baking dish
  • 2 leeks, trimmed, thinly sliced, and rinsed well (about 1 cup)
  • 6 russet potatoes (2 1/2 pounds), peeled and thinly sliced
  • 1/2 teaspoon coarse salt
  • 1/8 teaspoon freshly grated nutmeg
  • Freshly ground pepper, to taste
  • 8 ounces Gruyere cheese, shredded (about 3 cups)
  • 1 cup heavy cream
  • 1 cup homemade or low-sodium store-bought chicken stock

Directions

  1. Preheat oven to 350 degrees. Butter a 12-cup baking dish. Melt butter in a skillet over medium heat. Add leeks, and cook until translucent, 3 to 4 minutes.
  2. Arrange 1/3 of the potatoes in dish, slightly overlapping slices. Sprinkle with 1/2 of the salt, 1/2 of the nutmeg, and pepper, followed by 1/2 of the leeks and 1/3 of the cheese. Repeat. Top with remaining potatoes in a spiral. Sprinkle with remaining cheese. Combine cream and stock. Pour over cheese and potatoes. Cover with parchment and foil. (Mixture can be refrigerated overnight.)
  3. Bake for 30 minutes. Increase temperature to 425 degrees, uncover, and cook until top is golden brown and potatoes are tender, about 45 minutes. Let rest for 15 to 30 minutes before serving.

Thursday, November 15, 2012

Snowman Hot Cocoa

I found this idea from Pinterest from For What it's Worth... and just loved it!  Such a cute idea for kids to make and give out for gifts to parents, siblings, teachers or anyone special in their lives.  Here it is:


1. Start with a Half Pint Canning Jar.  (these are the Better Homes & Gardens Brand from Wal-Mart...I love the top)
2. Fill it with Mini-Marshmallows
 3. Make the Brim of the Hat using Black Paper or Fabric (it should be stiff though, so use Cardstock or Construction Paper or Felt) The most difficult part of this whole project...sizing the brim.  Basically it's a circle with a center Circle cut out of the middle that just fits over the open rim of the jar but llisn't big enough that once you slip it over the, it will be flimsy.  So just slightly small than the lid cover.  
Different jars will have different openings, so once you find that perfect balance, just use that as your pattern!
 4. Cut a piece of black ribbon to wrap around the lid of the jar...to complete the top-hat look.
 5. Give that man a face!  I used Puffy Paints, but regular acrylic craft paint works too.
 6. You can stop here if you'd like.  And gift your little snowman with a couple bags of hot chocolate.  Everything up to this step, including ALL materials cost me ~$2.50 per gift set to make 12.
7. Thanks to my new friend, Amy...there can be MORE to this Snowman...take another jar and fill it with Hot Cocoa Mix.  (I didn't have a large jar, so I used the individual serving packets.  It fits 5 servings)
 8. Hot glue some buttons on it...and Hot Glue your Marshmallow Jar to the top of the Cocoa jar.
 9. Use up some ribbon or Scrap Fabric for the scarf! (I just cut the ends for "fringe")

~Jennifer