Wednesday, October 31, 2012

Fun Holiday Decor

Don't we all have those extra cupcake liners laying around the house?  Here is a very cute idea for decorating your home for the holidays using cupcake liners from Shades of Gray


Cupcake Liner Pom Poms
You'll need: 
-Hot Glue Gun
-Cupcake Liners (at least 100)
-Sewing pins
-Styrofoam ball

1. Take two liners and place a pin through the center 2. Fold/scrunch around the pin 3. Place a tiny bit of hot glue on the tip 4. Push into the styrofoam ball 5. You can "fluff" them as you go (pull them open slightly) 6. I just stuck a pipe cleaner into the top and hung from our chandelier.
So it's super easy but each one took up more time than I had anticipated. I also made a pom pom flower to stick in one of our vases 

Such a cute and original decoration!  Love it!

~Jennifer

Tuesday, October 30, 2012

Jewelry Knots

Great tutorial on many of the different kinds of knots used in making jewelry, from simple knots to the sliding knots.  These great tips are from abeadstore.com


Using Cord in Jewelry Making Projects - Tips & Techniques

These are a group of tips and techniques for using Cord in Beaded Jewelry. We've collected many tips that will help you assemble and finish your Jewelry projects when using cord.

Figure 1Figure 2
Figure 3Figure 4

Tying a "Half Hitch" Knot

  • Figure 1 shows the simple loop that you form with your cord to start a Half Hitch knot.
  • Be sure to position the knot in the correct position before tightening. Even though this is a very simple knot, it can be very hard to get out, especially when tied in Waxed Cord or Silk.
  • To make a beaded grouping like the one in Figure 2, you tie your first Half Hitch knot and tighten it. Thread the desired beads onto your cord, then form the loop for the second knot. Slide the knot close to the beads, being careful not to completely tighten the knot until it is holding the beads snuggly together. A stiff head pin or tweezers with pointed ends can help you slide and position the loop before tightening.
Notes on this knot:
    This is the same knot that people use to create pearl necklaces where a knot appears between each pearl. Pearl Necklaces were traditionally tied on Silk thread. Since silk dries and wears out over time, beaders now sometimes choose to use other materials for making knotted necklaces.
    When doing off loom bead weaving (Peyote stitch, Square stitch, etc.), this knot can be used to join new thread to your project when the previous thread has gotten too short to continue. Align the ends of the new and old thread - then tie the Half Hitch using both threads. See Figure 3 for an illustration of how you would align and loop your threads.
    When finishing the ends of stretchy cord (Elasticity, Stretch Magic) the Half Hitch is also useful. String your beads on the stretchy thread - make the last bead on each end a crimp bead. Align the two ends side by side and half hitch them together, as in Figure 3. Separate the ends, run each one back through the crimp on the same side and close the crimp using crimping pliers. Tube crimps are best with elastic since they are less likely to cut cord than round crimps.
    The Half Hitch knot is a good one for making a loop at the end of your piece of jewelry when you are using you cord doubled. SeeFigure 4.
    This knot is also called an "Overhand Knot".

Tying a "Lark's Head" Knot

  • The picture above shows the cord position necessary for forming a Lark's Head knot. Simply fold your cord and put it through a hole or around an object, then put the loose ends through the loop created.
Notes on this knot:
    This is a knot that you probably use all the time but may have not known it's name. Lark's head knot are great for attaching a cord to a donut bead (as shown) or connecting a cell phone finding to your phone..

Tying a "Square" Knot

  • Figure 5 shows the cord position necessary for forming a Square knot.
Notes on this knot:
    This is a good knot to use when joining two pieces of cord together. It will hold well as long as the cord you are using is not too soft or slippery. For example this knot tends not to work very well with elastic cord.
    This knot is used in decorative cording or macreme because the knot can be tied repeatedly to create a pattern. Beads can be strung onto the cord within or between knots to enhance the design.

Figure 6

Tying a "Surgeon's" Knot

  • Figure 6 shows the cord position necessary for forming a Surgeon's knot. Note that the end of the cord is passed through the loop one extra time on one side only.
Notes on this knot:
    This is used when you want a more secure knot than a Square knot. It tends to curl up a bit when tightened - it stays together better, similarly, it is a lot harder to get apart!

Tying a Sliding Knot (for Adjustable Length Jewelry)

Sliding knots are adjustable knots used to make all sorts of adjustable-length jewelry. No clasps, crimps, or jump loops are necessary. All you need is plenty of cord and a pair of scissors. Allow about 8" of cord for the knotted section of your piece. For example, if you want the finished length of a necklace to be 20 inches, start with at least 28" of cord. You can always trim the cord after tying the first knot if it seems too long. The minimum size that will fit around most people's heads is about 20 inches.
Note that in the pictured steps, we have used two colors of Greek Leather so that it is easier to see the knotting technique. When you create your jewelry, the two ends will probably be the same color, similar to the "you're finished" picture.
step one sliding knot

Step 1

Choose stringing material, such as rattail, Greek leather, waxed cord, or polyester cord. Cross the free ends of your cord. Make sure you've already strung your pendant on it! If your pendant has a snap bail, you can put it on later.
step two sliding knot

Step 2

Fold about 3" of one end back on itself. Both loose ends of the cord should be pointing in the same direction.
step three sliding knot

Step 3

Pinch the bend together around the other loose end. Leaving about a finger width of space at the end.
step four sliding knot

Step 4

Wrap the free end of the bent cord around all the cords a few times coiling toward the bent end. We like to use at least three coils to make a neat & secure knot, but you can choose how many loops you like for your design.
step five sliding knot

Step 5

Slide the end through the loop on the end. Push the coils toward the loop.
step six sliding knot

Step 6

Tighten the knot.
step seven sliding knot

Step 7

Repeat on the other side. Trim any loose ends that are sticking out.
step finished sliding knot

You're finished!


Stringing Techniques

Sometimes, even when you know that your cord should be small enough to go through the hole in a particular bead, it is difficult to get it strung. Here are some tips that may help.
  • Cut the end of the cord with very sharp scissors. That creates a 'clean' end, less likely to catch on the edge of the hole.
  • Use the old sewing technique of wetting the end of the cord and pinching it down with your fingers before inserting into the hole (like threading a needle).
  • Clean the holes out with a Bead Reamer or similar tool. This tool has a long thin diamond file (looks like an awl that has a surface that looks like a very fine file). You might be able to find something similar at a good hardware store, or we sell these tools at Hand Tools - Bead Reamer.
  • Instead of wetting the end of the cord with water, wet it with white glue (brands like Elmer's or Eileen's Tacky Glue work fine). Smooth the cord end down, pinching it down to be as small as possible. No glue should be beaded up on the cord. Then let the end dry until it is not tacky. You should now have a good chance of fitting it through the hole. Just snip off the end that has the dried glue on it and continue your project.
  • Remember that bead holes have to measure a little larger than your cord to be able to string them. For example, cord that is 0.8mm requires beads with holes that measure at least 1.0-1.2mm to avoid complete frustration.

~Jennifer

Monday, October 29, 2012

Recycled T-shirt Bags

Ten minute no-sew recycled t-shirt bag!

from:  leethal.com

Tutorial time!  I got a gig teaching a recycled t-shirt project at the library a few months ago, with a request for a recycled tee bag – the only bags I’d made from tees in the past had required sturdy sewing, and I didn’t want hand-sewing to be the only thing holding the bottom closed in a class version of the bags, so I started brainstorming about some kind of hand-sewing-friendly or no-sew bag idea…. and here’s what I came up with!
No-Sew T-shirt Bags! No-Sew T-shirt Bags!
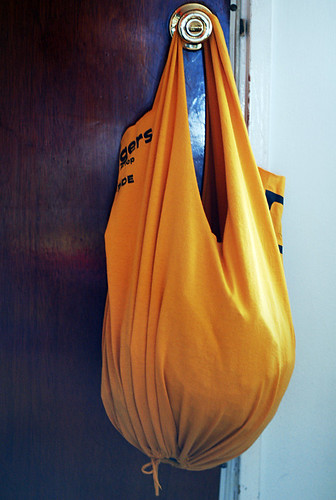
The simplest version of these bags is great for smaller tees, or the more light-weight kind of girl-tees – just turn the bottom of the shirt into a drawstring and tie it closed!  As you can see, even with a not huge tee, this will still leave a significant hole in the bottom of your bag, but for purposes like grocery shopping, this size hole shouldn’t really matter…
No-Sew T-shirt Bags!
But to make smaller holes, just make more than one of them!  Here’s a bag bottom with 2 holes:
No-Sew T-shirt Bags!
And now for the actual tutorial – for this one, with the step-by-step, I will be making the bottom with 3 holes.  So, start with a t-shirt that you don’t wear anymore, or a fun one you found at a thrift 
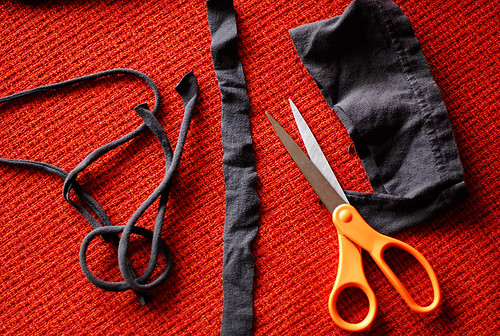
store.  Besides a tee, you’ll also need scissors and a safety pin.  That’s it!
No-Sew T-shirt Bags!
Cut the sleeves off, but try to make a somewhat straight line, and go in a bit from the seam – these lines will be the sides of your straps:
No-Sew T-shirt Bags!
Cut some strips from those sleeve pieces – about half an inch wide, the length of one time around a sleeve is good, and as many strips as the number of holes you’ll be making in your bag bottom. (I’ve made bags with 1, 2, and 3 holes, but I haven’t tried more than that.)  Pull the ends of the strips to stretch them out and make them curl in:
No-Sew T-shirt Bags!
Cut the neck out to become your bag’s opening – the way you cut this can depend on your tee’s picture (if there is a picture), and also the shape you want your bag.  Just make sure you cut a big enough opening to fit things through, for a functional bag:
No-Sew T-shirt Bags!
You could make it rounded, V-shaped, or squared like this one:
No-Sew T-shirt Bags!
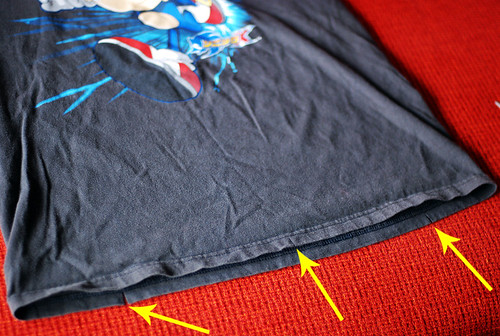
Now the top/straps part is done, time for the bottom.  Snip slits in the hem part of the tee bottom – as many slits as you want holes.  3 slits, below, is for 3 holes, for a single hole, like the yellow one at the top, just cut one slit, and for 2 holes, snip 2 slits.  The slits should be equally spaced from each other, but the spacing doesn’t need to be exact – I just eyeballed my slit placement, no measuring:
No-Sew T-shirt Bags!
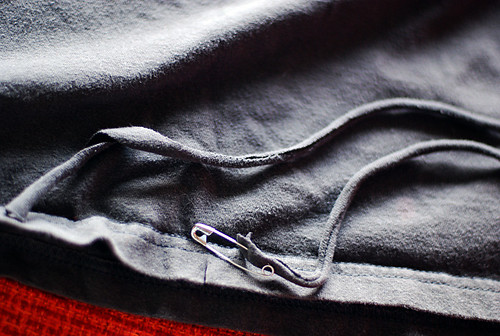
Now stick a safety pin through the end of one of those strips you made, and start running it through the hem, through one of the slits:
No-Sew T-shirt Bags!
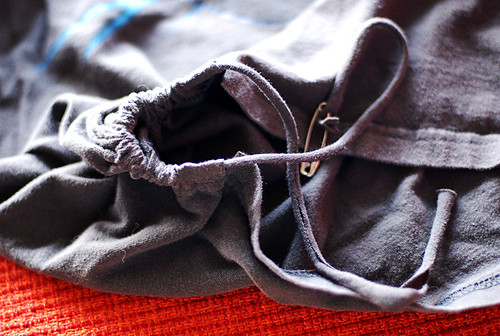
Run it through to the next slit (or all the way around and back to the beginning, if you’re making a single hole) and pull the cord so it’s centered-ish:
No-Sew T-shirt Bags!
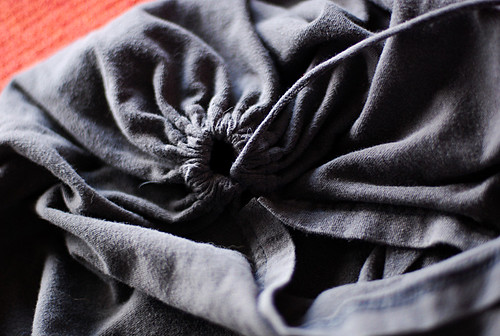
Tie the hole closed as tightly as you can, and tie a tight knot:
No-Sew T-shirt Bags!
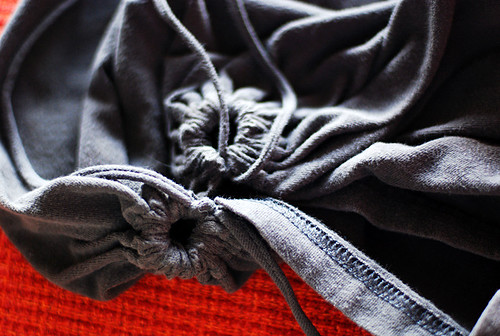
Now repeat those steps for the remaining sections, one slit to the next, tie tightly.  This is after the second hole is closed:
No-Sew T-shirt Bags!
For an ultra sturdy bag bottom, tie one cord strand from one hole together with one strand from the hole next to it, tightly, and repeat for each strand (as many of these knots as the number of holes you have; ignore this step if you’re making a single hole), so that the holes are all tied to each other.
No-Sew T-shirt Bags!
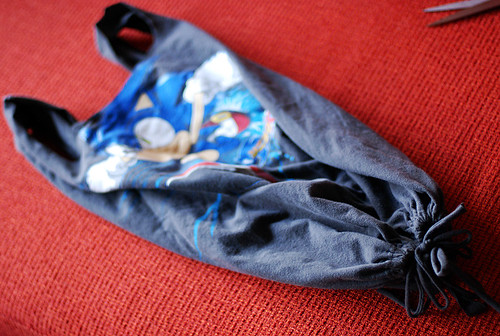
Now, you can choose whether you want the t-shirt cord ties hanging down at the bottom, or hidden on the inside.  To hide them inside, bring them through the center, then tie bows on the inside so they don’t fall back through.  Or, tie bows on the outside if you prefer (or you could just cut the cords short and skip the bows):
No-Sew T-shirt Bags!
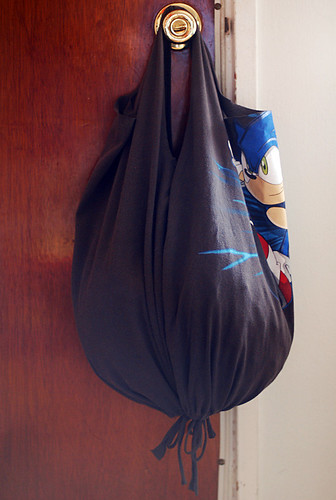
My finished Sonic bag!
No-Sew T-shirt Bags!
The 1-hole version of this project takes more like 5 minutes, but the more holes you have, the longer it takes (by a few minutes) – it’s my favorite kind of project: 100% recycled materials (in this case, just the tee and nothing else!), minimal tools, quick+easy, and a super useful finished product!
No-Sew T-shirt Bags!
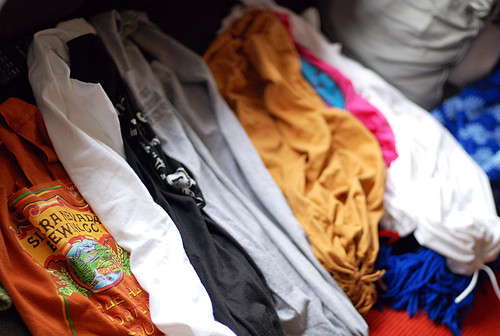
I made these for everyone in my family as extra bonus xmas gifts – my mom just told me she’s been using hers all the time and they are stronger than she would have expected.  I even used my family’s bags to wrap their gifts in, to save on paper wrapping waste and because it looked fun!
B
You can always save it away in your memory (or bookmarks) for your next gift-giving occasion.  I hope you love this project as much as I do!  Now go and make lots of them so you’ll never be without a reusable shopping bag again!

 Besides grocery bags, purse bags, beach bags and gifts-what other uses can you think of for these cute "no sew" bags?


Friday, October 26, 2012

Comfort Food Made Easy-Mac & Cheese

The Extra Creamy Cheesiest  Mac & Cheese

from http://www.clevercraftycookinmama.com

  One day I decided to tackle one of the most loved dishes in all of childhood, the boxed mac and cheese.  I had this feeling I could make a tastier version without having to run to the store, and using things I already had on hand in my pantry.  I wanted to keep it mom friendly though, and tried to mimic the steps from the box, so it would feel familiar and easy to whip up at a moments notice.  This is what I came up with.
Cheesy cheesy goodness.  Your kids will beg for this one
Now doesn't that just scream ooey gooey deliciousness?  What kid wouldn't want a big ol' bowl of this golden cheesy goodness? Plus you can make a big pot with only FIVE ingredients. (full printable recipe at end of post)
A few ingredients you probably already have on hand
So there are only a few common ingredients to make this delectable comfort food.  
Noodles (any kind will do, but shells are great for holding a lot of sauce), 1 can evaporated milk, 
1 can cheddar cheese soup, 1-2 cups of shredded cheese, butter, and salt and pepper to taste (or Johny's seasoning salt).

After cooking and draining your noodles, add them back to the same pot.  
Add your butter and stir it around til the warm noodles melt it.  (Just like you would on the box)

I'm assuming you know how to boil water, cook noodles, drain, then add 4 TBSP butter ;)

Next stir in 1 can of cheddar cheese soup (this would be like adding the cheese packet here)
Add some cheddar cheese soup to the party
Next you will want to add about half the can of evaporated milk and stir until combined.  
(This is like adding the milk on the box) Now we're starting to look like something yummy is about to happen!
Get in my belleh!  (Ok not yet, but SOON)
When combined, then it's time to add the grated cheese.  This is really at your own discretion, but between 1-2 cups of cheese works great. (You can leave the burner on medium low or low to help melt things together) Start with one cup and mix in, if you need more, add a little at a time.  
(This is where we add real cheese to so called mac and CHEESE, what a concept!!)
Any medium/mild cheddar will work, I used Tillamook cheese (popular on the NW coast)
The reason you keep some of the evaporated milk back is that after the cheese melts, if its a tad on the thick side, add a touch more milk and stir until you have your desired consistency.  This is a good time to taste and season.  The KEY here is seasoning.  I normally would use Johnny's Seasoning salt, which has salt, pepper, paprika, garlic and onion powder in it, BUT then my kids will see the little black specks of pepper as "POISON" and deem the dish inedible.  So I use a sea salt grinder and give it a couple cranks. It's all white and therefore kid approved. Taste and check the levels here.  Add a bit of extra seasoning to taste. 

Now we are done!  Serve it up to the small fry and watch them beg for more.  It's ooey gooey comfort food that I think is as easy to make as a box mix, but has a ton more flavor and appeal, and you can customize it to your family's tastes.

Enjoy!  Here is the printable recipe:

Easy Extra Creamy Mac & Cheese

Ingredients:
1 16oz box pasta (shells, macaroni, bow tie) I used 3/4 or 12 oz for this recipe
4 Tablespoons butter
1 can cheddar cheese soup(10 3/4 oz)
1 can evaporated milk (12 oz)
1-2 cups grated cheddar cheese
Salt and pepper to taste or seasoned salt (like Johnny's)

Directions:
Cook and drain noodles.  Add back to warm pot, stir in butter, cheese soup,
and half the can of evaporated milk.  Stir until combined. 
Add 1 cup of cheese to start with, add more until desired cheesiness.
Keep the burner on low to help melt things together.
If it gets too thick, add some reserve evaporated milk to thin down
Add salt and pepper to taste

Serve warm as side or main dish.  Enjoy!

Thursday, October 25, 2012

Candy Corn on the Cob

This project is perfect for those of you who love candy corn - like me and my kiddos!  I got the idea from the Blog Instructables.com and changed the recipe a bit:


IMG_1590.JPG


IMG_1594.JPG

Place you candy corn on a dish and you can add one of the following for the filling- sugar cookie dough, marzipan or as I did peanut butter to make it healthy of course!  just start stacking your candy corn as shown in the picture and adding you filling of choice until you have a full cob.  You may want to wrap the whole thing in saran wrap to tighten it down more once your finished, and voila!  Your done. The kids had so much fun making this and eating it too!

Wednesday, October 24, 2012

Halloween Door Hanger Craft

A cute Halloween door decoration.  Little to no sewing necessary!  This adorable craft comes from Nap Tim e Crafters:

 **If sewing is not your thing - no problem just cut out the letters from felt or another contrasting fabric and use fabric glue to glue into place.


Spooky Door Hanger

Here's what you'll need:
  • 3 8" embroidery hoops
  • 3 9" fabric scraps
  • Fabric scraps for embellishing
  • Craft Paint
  • Hot Glue Gun

 1. Paint the outside ring of each embroidery hoop- don't worry about the inside one b/c it won't show
 2. I did reverse applique for my letters and it was actually much easier than I thought it would be! Pin your fabric scrap wrong side up to the wrong side of your 9" fabric piece. Trace your letters onto the wrong side of your fabric scrap (make sure it's backwards) and then stitch around it, sewing through both layers of fabric 
 3. Trim the excess fabric away from the front side making sure you only cut through the top layer of fabric. 
 4. Put each fabric piece inside the embroidery hoop and hot glue the fabric edges to the back
 5. Arrange your embroidery hoops and hot glue together
 6. Hot glue a safety pin to the back of the top 2 to use for hanging. 
7. Thread your ribbon through and enjoy!