Friday, January 31, 2014

Garlic Parmesan Mashed Potatoes or Cauliflower

Garlic Parmesan Mashed Potatoes


These mashed potatoes are easy to make and full of flavor. I even used this recipe to make mashed cauliflower instead of potatoes.

UPDATE: I have received a lot of questions on how to substitute the cauliflower in place of potatoes. I use a vegetable steamer to preserve the most nutrients while cooking the cauliflower. It takes about 20 minutes to steam a full head of cauliflower in the steamer. (Yes, I use the entire cauliflower to make this recipe). You may also boil the cauliflower 7 to 10 minutes if you do not have access to a vegetable steamer. Once the cauliflower is tender and almost falling apart, I add the milk, butter, garlic salt, chives, and Parmesan to the drained pot. Next, I take a hand mixer to whip the cauliflower mixture into a smooth and creamy texture. Enjoy!

Garlic Parmesan Mashed Potatoes Recipe

INGREDIENTS

5-6 large russet potatoes, peeled and cut into chunks 
1/2 c. milk 
2 T. butter
1 t. garlic salt
1/2 c. grated Parmesan cheese
2 T. fresh chives
salt and pepper (to taste)

DIRECTIONS

1. Wash, peel, and dice potatoes into large pieces. Boil the potatoes, garlic, and 1 t. salt in 6 cups of water until tender (about 20 minutes).

2. Drain and mash potatoes.

3. Add the remaining ingredients to the potatoes.

4. Combine until smooth and free of lumps.

Serves 3-4
bon appétit

Thursday, January 30, 2014

15 Foods You Can Grow From Scraps

15 Foods You Can Grow From Scraps
from:  http://www.stumbleupon.com/su/2NlxNF/:M_r.hQLe:Xdd@KAeQ/www.mrshappyhomemaker.com/2013/04/15-foods-that-can-be-regrown-from-scraps/

15 Foods That Can Be Regrown From Scraps


15 Foods That Can Be Regrown from Scraps
love gardening.
Well, not actually the work behind the gardening so much – it’s the harvesting that I really look forward to.  There is nothing like fresh veggies from your own personal garden! I actually just planted a bunch of things in my vegetable garden, and may have gone a little plant happy at the feed & seed store. Oops.
Obviously, we all know about the normal ways to grow plants – from seeds.  But, did you know that there are a ton of plants that you can grow from scraps?  Plants, that will in turn, produce more food.  I did some research on this through various sources, and compiled this list.
Let’s count them out – from 1 to 15…

1, 2, 3, & 4.  Spring Onions, Leeks, Scallions, & Fennel
These are the ones I regrow the very most, I always have a mason jar of green onions regrowing above my kitchen sink. The technique is quite simple.  Once you are done with them (any of the above four), simply place the root end in a jar of water & it will begin to regrow within just a few days.  Just make sure to replace the water with fresh as need be.
15 Foods That Can Be Regrown from Scraps

5. Lemongrass
You can regrow lemongrass the same way you regrow the green onions.  Simply place the root ends in a glass of water, refreshing the water as needed. You will want to wait to harvest your lemongrass until it is about 12 inches tall.
15 Foods That Can Be Regrown from Scraps
6.  Ginger
Plant a small chunk off of your piece of ginger in potting soil with the newest buds facing up. Ginger enjoys non-direct sunlight in a warm moist environment. Before long, it will begin to regrow shoots and roots. Once the plant is established and you’re ready to harvest, pull up the whole plant, including the roots. Remove a piece of the ginger, and re-plant it to repeat the growing process.
15 Foods That Can Be Regrown from Scraps
7. Potatoes 
Pick a potato that has a lot of good formed eyes, and cut it into 2-3 inch pieces, taking care to be sure that each piece has at least 1-2 eyes on it. Leave the cut pieces to sit at room temperature for a day or two, which allows the cut areas to dry. Potato plants thrive on a high-nutrient environment, so it is best to flip compost into your soil before you plant. Plant your potato pieces about 8 inches deep with the eye facing up.  Cover it with 4 inches of soil, leaving the other 4 inches empty. As your plant begins to grow and more roots appear, add more soil.
15 Foods That Can Be Regrown from Scraps
8. Sweet Potatoes
You will need sweet potatoes with good formed eyes, just as you would want with a regular potato. You can bury the entire potato or use pieces under a thin layer of topsoil in a moist place with plenty of sun. When the shoots begin to reach a height of four inches you will need to replant the sweet potatoes, allowing them about 12 inches between each another. It takes about 4-6 months to grow sweet potatoes this way.
9, 10, 11, & 12.  Romaine Lettuce, Celery, Bok Choy, & Cabbage
These all are regrown by placing the roots in a dish of water. Cut the leaves or stalks off to about an inch above the roots.  Place the root end in a dish of water.  Make sure that the roots are inside of the water, but do not submerge the rest of the plant.  Place in a sunny window & spray with water 1-2 times a week to keep the top of the plant moist.
15 Foods That Can Be Regrown from Scraps
13.  Onions
Onions are one of the easiest vegetables to regrow from scraps. Just cut off the root end of your onion, leaving a 1’2  inch of onion on the roots. Place it in a sunny location in your garden and cover the top with soil. Make sure to keep the soil moist by watering when needed. As you use your home-grown regenerated onions, keep replanting the root ends you cut off, and you’ll never have to purchase onions at the store again.
15 Foods That Can Be Regrown from Scraps
14.  Garlic
You can re-grow a plant from a single clove.  Simply plant it with the root-end down. Sit the plant in a sunny window.  Once established, cut back the shoots and the plant will put all it’s forces into producing a nice garlic bulb – full of flavor & capable of repelling sparkly vampires.  You can repeat this process with a clove from the new bulb you have just grown.
15 Foods That Can Be Regrown from Scraps
15. Pineapple
To re-grow pineapples, you will need to remove the green leafy part at the top and take care that no fruit remains attached. Either hold the crown firmly by the leaves and twist the stalk out, or you can cut the top off the pineapple and remove the remaining fruit flesh with a knife. If you do not remove all the fruit parts, it will rot after planting and will likely kill your plant. Carefully slice small, horizontal sections from the bottom of the crown until you see root buds (the small circles on the flat base of the stalk). Remove the bottom few layers of leaves leaving about an inch worth of them at the bottom of the stalk.  Plant your pineapple crown in a warm and well drained environment. Water your plant regularly at first. Once the plant is established, you can cut down to about once a week. You will see growth in the first few months but it will take about 2-3 years before you are able to harvest.
15 Foods That Can Be Regrown from Scraps

Wednesday, January 29, 2014

Edible Porcupine

EDIBLE PORCUPINE
frum Mummy Chit Chats  https://www.facebook.com/photo.php?fbid=260756030756389&set=a.107947576037236.19134.104844369680890&type=1&theater

Tuesday, January 28, 2014

Tuesday's Tips ~ What to Consider When Pricing Your Jewelry

Tuesday's Tips ~ What to Consider When Pricing Your Jewelry
from:  http://www.handmadeology.com/everything-to-consider-when-pricing-your-jewelry-for-maximum-profits/


Everything to Consider When Pricing Your JEWELRY for Maximum Profits

Everything to Consider When Pricing Your JEWELRY for Maximum Profits

2
Everything to Consider When Pricing Your JEWELRY for Maximum Profits
Does this sound like you?
  • You’re creative
  • You make beautiful jewelry!
  • People want to buy everything you create!
  • But Wait…You aren’t making any money!
There are a few reasons why you may not be bringing in the profits you desire. One of the biggest mistakes that we see jewelry designers make is that they underprice their work.
There are a bunch of factors to consider when pricing your jewelry that are sometimes overlooked:
1. Cost of Materials
Hopefully, you are meticulously accounting for the cost of materials into your pricing. Be meticulous by figuring out exact amounts down to every jump ring and inch of wire.
2. Labor
One of the things often overlooked into pricing (especially with makers) is labor. The best practice for pricing is to include your labor fee into the pricing formula you chose.
3. Overhead
Adding overhead into your markup is a controversial topics. Some schools of thought teach to figure out your overhead to the penny and add it into your pricing. Others say work backward with healthy margins to make sales goals that get you to your break even point. Both methods work. The point is, “don’t forget to consider your overhead when you are pricing your work.”
4. Perceived Value
What do your DREAM clients consider your jewelry to be “worth?” The price of your product is directly related to your originality, the materials you use, and your proprietary techniques. Your ability to communicate the value to your customers will allow you to elevate your price point.
5. Retail vs Wholesale Pricing
The biggest mistake we see jewelry designers make? They price their jewelry at a wholesale price point instead of retail. You must understand how the to price for retail and only sell retail on your website or ETSY.
At the end of the day, to build a profitable jewelry brand, you need to be pricing your jewelry correctly.
Tracy and Robin are back at it with Flourish & Thrive Academy! They just launched their 2nd video in a free trainings series.
The first one taught the “4 Essential Steps” every jewelry designer needs to take to build a strong foundation for your jewelry business. If you missed it don’t fret, it is still live!
Their newest video is called “Our Stories” bespoke jewelry designer Tracy Matthews @ sales maven Robin Kramer of Flourish & Thrive Academy break down their past business experiences. They share their success, their failures and everything they have learned in between.
These ladies are the real deal! Why? Because they share some of their deepest, darkest secrets and the shortcuts to success that no one in the jewelry industry is willing to tell you. Trust me, they are breaking down barriers here.
P.S. The free video training series isn’t all Flourish & Thrive Academy has to offer. Their  active community of success driven jewelry designers is one of the best out there. Don’t you think it is time to check it out?HERE

Friday, January 24, 2014

Crock Pot Spare Ribs by Paula Deen

Crock Pot Spare Ribs
from:  Paula Deen.com

SLOW COOKER PORK SPARE RIBS

Slow Cooker Pork Spare RibsRecipe Courtesy of 


Servings: 4 servings
Prep Time: 10 min
Cook Time: 6 hours
Difficulty: Easy

Ingredients Add to grocery list

4 pounds pork spare ribs, back membranes removed and cut into individual ribs
Kosher salt
Fresh ground black pepper
1/2 cup chili sauce
1/4 cup orange marmalade
1/4 cup apple cider vinegar
2 Tablespoons soy sauce
3 Tablespoons brown sugar
1 teaspoon ground cumin
1 Tablespoon grated ginger
2 cloves of garlic, crushed

Directions

Liberally season ribs with salt and pepper and place in a slow cooker. In a small mixing bowl, whisk together remaining ingredients; pour sauce over ribs. Cover and cook on low for 6 hours.

Wednesday, January 22, 2014

For Beaders ~ BASIC WIRE INFORMATION


For Beaders ~ Basic Wire Information

About Wire, Shapes, Sizes and More

Basic Wire Information
By Cristina Ramos, from Sunshine’s Creations

If you are wondering about wire, or have already fallen in love with it like I have, and want to get started making jewelry with it, here’s some basic information about it.

Wire is made of several materials like gold, silver, copper, steel or aluminum, it's also easy to find gold plated and silver plated wire, and the choice of wire depends solely on each one's liking… or budget!When we’re just getting started it’s better to try the pieces out with copper wire, since it is less expensive, and you might me surprised on how beautiful it turns out!

When buying wire you’ll find that most suppliers give you a bunch of options on it. You have to choose what metal you’d like, the degree of hardness of the wire, the wire’s shape and its gauge! Decisions, decisions…

The hardness of the wire means that we can know beforehand if it'll be hard to work with or not. It comes in three different degrees of hardness: hard or full hard (it's the same thing), half hard and dead soft.
Hard wire is the most robust and harder to work with, so we need to use the tools more often, and it's appropriate for bangles, bracelets and heavier pieces. The half hard wire is the most popular because it's quite versatile, it's easier to manipulate and, if we need to we can work harden it in order to better keep its shape. The dead soft wire is the easiest to manipulate (we can work it mostly with our fingers) and it's the best for wire wrapping, however we need to be very careful because it kinks and gets tool marks easily.

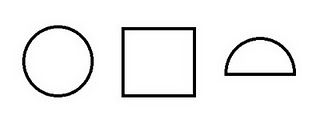
After choosing the hardness of the wire, we need to choose its shape.Beyond the common round wire, there's also square wire and half-round wire!
You wouldn't believe the difference this simple change in the wire shape can make to the look of the final piece! Besides, the different shapes really make life so much easier for the wire artist, I should know since I make all my pieces with round wire, that never stays where we want it and slides off each other, unlike the square wire, for instance!
The square wire is perfect for wire wrapping, especially to wrap a bead or cab, and the half round wire is the one that we wrap around the square wire, binding it together. I think these two types of wire are like the round wire evolved, because they make the artist's work so much easier.

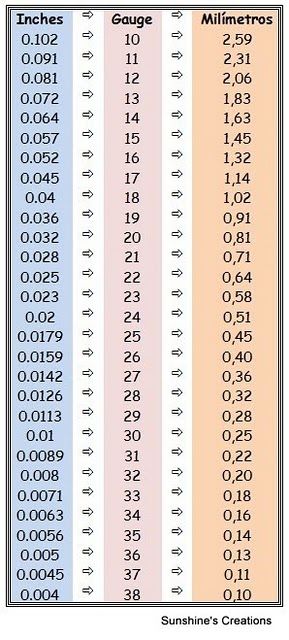
One of the issues I stumble upon frequently while reading tutorials is the measurements, either the diameter of the wire or the length necessary, because I’m European but mostly use American tutorials. So I searched the web and created this chart to help me to swiftly convert those measurements into the units that I'm most comfortable with.
As a reminder I'll just say that, in gauge numbers, the higher the number, the thinner the wire.


Wire Gauge Chart (wire thickness)
Jewelry Wire Gauge Chart
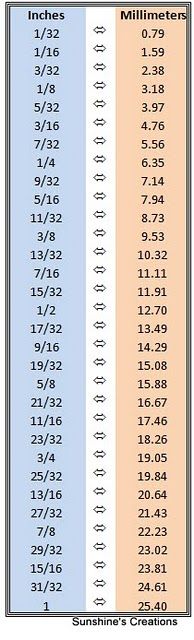
Inches to Millimeters Chart
1 inch = 25.4 mm
inches to millimeters chart


I hope this information has helped you. Wire is a fun and versatile medium and every time I pick it up and let my fingers have that little tête-a-tête with it the final piece is always amazing! Just remember:
Have fun with wire!
Cristina Ramos

Friday, January 17, 2014

Stay Warm this Winter with "Howard's Carrot and Cauliflower Soup"

Howard's Carrot and Cauliflower Soup

Howard's Carrot and Cauliflower Soup


  • from www.mrfood.com
Howards Carrot and Cauliflower Soup
Watch Video
This creamy and delicious veggie soup is so tasty, you'll have a tough time convincing your gang that it's actually good for you! Leave it to Howard to come up with an easy soup recipethat's both hearty and healthy.
Yields: 10 cups
Serving Size: 2 cups
Cooking Time: 1 hr
What You'll Need:
  • large carrots, cut into chunks
  • 1 head cauliflower, cut into chunks
  • 4 cups chicken broth
  • 4 cups water
  • 1/2 teaspoons salt
  • 1/4 teaspoon black pepper
  • 1 cup milk
    campaignIcon 
  • Parmesan cheese for sprinkling
    campaignIcon 

Make Simple Turkey Pot Pie
What To Do:
  1. In a soup pot, combine all ingredients except milk. Bring to a boil over high heat, then reduce heat to low and simmer 45 minutes, or until vegetables are very tender.
  2. Using an immersion blender, puree until smooth. Stir in milk and simmer an additional 5 minutes, or until hot. Spoon into bowls and top with Parmesan cheese.
Nutritional Information
Amount per serving:
Calories - 153, Calories from Fat - 20, Total Fat - 2.5g, Sat Fat - .89g, Cholesterol - 4mg, Total Carbs - 24g, Fiber - 9g, Sugar - 12g, Protein - 12g
Notes
  • If you don't have an immersion blender, no problem! Just transfer mixture to a blender, puree until smooth, then return to soup pot and complete the recipe.
     
  • And speaking of resolutions, we recommend our Skinny Eggplant Parmesan as a delicious and guilt-free option!
OOH ITS SO GOOD!

Read more at http://www.mrfood.com/Soup-Recipes/Howards-Carrot-and-Cauliflower-Soup/ml/1/?utm_source=ppl-newsletter&utm_medium=email&utm_campaign=mrfooddaily20140102#4I7yeFRV5tP7XIAC.99

Wednesday, January 15, 2014

CRAFTY WEDNESDAY ~ Cleaning Seashells

CLEANING SEASHELLS
From:  http://allaexpression.com/blog/i-can-to-do-this-seashell-art-myself-artist-explanation-about-working-with-seashells/


Prejudice or wrong statement about seashell art.
Creating seashell art is a very simple craft at first glance. But in reality to make seashell art work is a very complicated, delicate and time consuming process which includes many steps!
  • Step1.   I’ve driven over 1 or 2 hours to the the best shelling spots in New York. After that all seashells are collected on the beach. I spend many hours combing the sand and shores for the perfect and sometimes unusual seashell fragments, sea glass and driftwood.
  • Step 2. Each seashell is hand rinsed in warm water and leaves on 24 hours in bleach for totally cleaning and smell removing. Sometimes I can put some shells in special solution with muriatic acid for 10-20 seconds at a time and after that rinse shells with water. The shells get very bright color. If you left in the muriatic acid for too long or not rinsed with soap water, the acid will continue to dissolve the shell. (How to restore seashell colors)

  • Step 3. I like to rub each shell after totally drying with Johnson’s baby oil or sometimes covers each shell with satin varnish for preserve natural color.
  • Step 4. I have to decide what canvas size or wood peace I like to use as a base for my work and what type of design theme I want to create. I can use various materials including some tiny pieces of natural stones, sea stars, corals or even gar scales for texture. I am always finding out different techniques and experimenting with new materials.
  • Step 5. Painting alone can take several days depending on the look I am trying to achieve. Sometimes I have to apply multiple coats to the background or to the shells. Usually I try to preserve natural seashell color and can use paints only in case for colorless and originally doll shells.
  • Step 6. After the background is ready I put out the seashells. It is not a simple step, a lot of thought and time I spend into which seashells fit best positions with each painting.
  • Step 7. Glue each shell on it position. If you prefer to use the multi purpose Elmer’s Glue, you have a chance and time to change your mind and improve any mistakes with seashell position. But try to avoid the extra glue amount! Glue can collect under the seashells causing them to slide, so each seashell needs to be pushed down to remove any not necessary glue amount. Glue also can leave marks on the painting!
  • Step 8. The Glue dries over a 24 hours period. After that I like to cover my seashell painting-mosaic with satin varnish for preserve natural color.
  • Step 9. I also screw in my own hanging wires so when a painting is purchased it is ready to hang. I title each painting-mosaic with names that I feel best represent the painting and what might have inspired me to create a particular piece.
  • Step 10. Pricing of my artwork depends on the time it took to make and the materials involved and rarity of seashells used. All of my paintings are originals and can be found no where else in the world. I might be able to recreate a similar painting but no two paintings or figurines will ever be exactly the same, because of unique seashells.
Share