Wednesday, June 19, 2013

Covered Bins

So cute and so cheap!  Love this idea from Tales from a Cottage!  Just a simple bin from the dollar store covered with a cute fabric and the beauty of it is there is NO SEWING involved!  That's right!  All tacky glued together!


I decided I’m going to try making my own for a much better price.   So I set off to the dollar store to see what I could find.  Basically, all they had were some little plastic bins, but they were the perfect size for what I was looking for.  I snatched up three of them for a total of $3.  Being the fabric hoarder that I am, I thought I’d use up some of the fabric that I already have.  I love to find fabric at the thrift store for next to nothing, and so much of it is pretty vintage prints.  

I busted out my best friend of the crafting world, spray adhesive, my scissors, and got to it! 


1.  Measure enough fabric as if you were gift wrapping a present to cover the whole bin. 
2.  Spray the bottom of the bin generously with spray adhesive and place it in the middle of the fabric.
3.  Cut diagonally into each corner from the edge of the fabric, stopping about half an inch or so before reaching the corner of the bin.

4.  On two parallel sides, ( I chose the longest side of my bin), cut away the excess fabric on each side and fold, so as to create a nice straight line.  Spray each fold with spray adhesive.


5.  Spray adhesive on the smaller ends of the bin covering completely.  Fold and smooth the angled pieces of fabric up along the sides of the bin, and even overlap onto the longer sides a bit. You may need to pull it off a couple of times until you get it nice and smooth.  Repeat on the opposite short side of the bin.


6.  Spray the longer side of the bin and the inside with spray adhesive.  Fold and smooth the pre-folded sides up along the side of the bin and into the center of the bin.  This should overlap the fabric that you previously secured.  Repeat on both sides.

7. Depending on how much fabric you cut, you may need to fill in some areas on the inside.  I cut a couple squares to fit over the ends of the insides of my bin, pre-folded and secured them with spray adhesive to give it a more polished look.  I then sprayed it and placed over the exposed area. 


 A good trick for fitting the fabric into the rounded areas is to cut a small diagonal cut along the bottom or top to help you overlap the fabric a little better and keep it flush. Also, if you want to get REALLY professional, you could line up the patterns perfectly, but I was too giddy about my project that my patience went out the window on that step.  But it would look really nice if you took the time to do that. 

Tuesday, June 18, 2013

Heart Ring

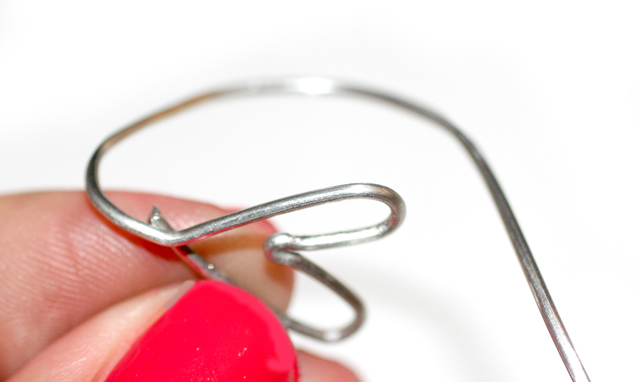
This is such a simple - yet beautiful ring that anyone can make!  The steps are very easily laid out from ISpyDIY also.  The wire gauge is not labeled, but it looks like aluminum wire.


Instructions after the break...


Supplies: Jewelry Pliers and wire.  

Bend the wire over the far part of the plier to make the first hill of the heart. 
Next make a hard bend at the bottom of the hill.  
The make the second hill. 

Squeeze in the valley between the two hill to make a point
Next bend the wire so it will fit around you finger. 
Cut off the excess wire and bend to make a loop at the end. 

Monday, June 17, 2013

How to Make Your Own Birdhouse

Birdhouse Tutorials & Plans

Whether you’re wanting something simple that’s more suited for beginner woodworkers or a project that’s a little more advanced and decorative, this collection of birdhouse tutorials has you covered. Lots of ideas in this bunch, some including free plans to download and most can be made with recycled items and scraps of wood you likely already have on hand so the cost is minimal. Have fun!
birdsandblooms.com
birdsandblooms.com
Coffee Can & Wood Scraps: Made a recycled coffee can and scraps of wood, super easy to clean at the end of season: just slip out the dowel and empty the can.
Modern: Designed as a classic mid-century modern ranch home, includes cutting diagram and how-to video.
curbly.com
curbly.com
sunset.com
sunset.com
Simple: Takes about an hour to make using scraps of fencing and is sized for small birds such as wrens, chickadees and bluebirds.
One Board: Cutting list and plans are included. Provides suggested measurements for entrance hole and height for bluebirds, great crested flycatcher, nuthatch and redheaded woodpecker.
familyfun.go.com
familyfun.go.com
diynetwork.com
diynetwork.com
PVC Pipehouse: PVC is great for birdhouses since it’s weatherproof, items needed include a spiral saw, miter box & saw, scrap wood and silicone adhesive.
Bark Exterior: Pieces of slab wood with attached bark decorate the outer part of the house.
homeenvy.com
homeenvy.com
hgtv.com
hgtv.com
Windmill: Made with assorted recycled items such as barn and fence boards, glass door knob, copper sheets, door face plate and more.
Pallet Wood: Lots of tips for decorating and embellishing along with a tutorial for making a birdhouse with repurposed wood from pallets.
backwoodshome.com
backwoodshome.com
thecrimsonowl.blogspot.com
Gourd Birdhouse Tutorial: Tips for cleaning, painting and cutting a dried gourd, turning it into a lovely birdhouse. Also see this tutorialfor more ideas.
Teapot: Includes plan diagram to download (jpg file), tutorial and teapot face pattern template (made with wood).
runnerduck.com
runnerduck.com
familyhandyman.com
familyhandyman.com
Backyard Birdhouse: Cutting list and shopping list provided. Also lists basic dimensions needed for assorted birds (chickadees, swallows, warblers, starlings, bluebirds, etc.).
Stone: Details step-by-step how to make your own including tips for choosing materials to use.
empressofdirt.blogspot.com
blueroofcabin.blogspot.com
Bucket Version: Here’s a charming “condo” made with a plastic bucket, a bit of wood and topped with a coconut fiber lined basket planted with a few succulents.
Also see these project ideas:
  • Rustic: Embellished with colorful twigs.
  • How to Decoupage: Transform plain wooden houses with pretty decoupaged designs.
  • Mosaic: Cover the outside of a plain wooden house with colorful tiles.

Friday, June 14, 2013

"LOADED" CAULIFLOWER You'll Never Miss Those Potatoes

"LOADED" CAULIFLOWER  You'll Never Miss Those Potatoes
Pinned from genaw.com


"LOADED" CAULIFLOWER
1 cup cooked cauliflower
1 teaspoon butter
Salt and pepper, to taste
1 ounce cheddar cheese, shredded
1 tablespoon ranch dressing or sour cream
1 strip bacon, crumbled
1 teaspoon chives
Butter and season the cauliflower. Place in an individual-serving baking dish, then top with the cheese. Microwave or broil until the cheese is melted. Top with ranch dressing, bacon and chives.
Makes 1 serving
Do not freeze
Per Serving: 290 Calories; 25g Fat; 12g Protein; 6g Carbohydrate; 3g Dietary Fiber; 3g Net Carbs
I wasn't trying to pretend that this was a baked potato, but I had the idea of topping cauliflower with all of the things that go on a baked potato. It was quite good.
Here's a broccoli version:

Thursday, June 13, 2013

Monster Origami Bookmarks

This activity looks like so much fun and what a great way to encourage reading for your kiddos!  I found this from Ctbakerinttheacers and her instructions are fabulous!  Just need a little cardstock and your imagination!


Origami Monster Bookmarks! Cute, huh?


Supplies:
Card stock or construction paper in various colors
Scissors
Hole punch for embellishments
Glue


We started with a 6x6 square
Fold into a triangle
Fold the left corner to the center point
Fold the right corner to the center point
Open up to a triangle again and fold one flap of the center point to the bottom
Re-fold the left corner towards the center point and tuck it into the "pocket"
Re-fold the right corner toward the center point and tuck it into the "pocket"


Cut a contrasting square slightly smaller than the 3x3 pocket
Apply glue and press inside
Cut embellishments- teeth, eyes, nose, tongue, etc.
Apply glue and press in place
Slide them onto the page corner of your favorite book
and voila!


Wednesday, June 12, 2013

Soap Pouch


This Awesome idea from WhiMSylove makes a perfect gift for anyone including Dad!  With Father's Day this weekend this would make a really neat gift for Dad from you or the kiddos (using a more manly towel of course :)


DIY: Soap Pouch


Supplies:
•Towel (I purchased a very inexpensive towel & could get approximately 30 pouches from it! Of course, it depends on the size of your towel. You could also use terrycloth material or even a hand towel or washcloth just as easy!)
•Sewing machine with thread
•Scissors
•Ruler or tape measure
•Soap
•Optional: sewing pins

The measurements are based on this specific brand of soap. You'll have to adjust for other sizes. Basically, just give the soap a tiny bit of wiggle room.