Wednesday, January 9, 2013

Quilted Ornaments


photo


OK, I know Christmas is over - but I have really wanted to make these ornaments and finally found a FANTASTIC video tutorial from Handmade on how to do it!   You can stock up now for Christmas presents or you can make them for many different holidays - Valentine's Day, Easter, the possibilities are endless!  Here are a couple finished ones - aren't they gorgeous?

photophoto


Tuesday, January 8, 2013

Jewelry Spotlight - ES Designs

Gemstone Pendant, Turquoise and Citrine Bundle NecklaceToday's Jewelry Spotlight is on the Fabulous Jewelry from ES Designs.  The proprietor of this wonderful shop is Elizabeth Seidel.  She is a jewelry artist and all the items in her shop are handmade!  She makes beautiful pieces out of natural stones that are casual for everyday wear!  She uses a variety of metals-sterling silver, antiqued copper and brass and plated silver.   All of her jewelry is made with quality semi-precious stones, glass and/or wood.  Elizabeth also welcomes custom orders and is happy to make matching earrings and bracelets for her gorgeous necklaces as well.  Here is a small sample from her Etsy shop:


Check out her Facebook page for specials and new products and don't forget to follow her on Twitter!! 
Gemstone and Hammered Copper Necklace, Faceted Prehnite Teardrop and Hammered Copper Necklace
Gemstone Earrings, Aquamarine and Copper Dangle EarringsGemstone Necklace, Rough Agate Nuggets and Antiqued Copper Neckalce

Monday, January 7, 2013

Never Buy Celery Again

Growing Celery Indoors: Never Buy Celery Again


Remember when we tested and shared how to grow onions indefinitely last week? Well, at the same time, we've been testing out another little indoor gardening project first gleaned from Pinterest that we're excited to share the successes of today — regrowing celery from it's base.

We've figured out how to literally re-grow organic celery from the base of the bunch we bought from the store a couple weeks ago. I swear, we must have been living under a rock all these years or just not be that resourceful when it comes to food, but we're having more fun learning all these new little tips and tricks as we dive deeper into trying to grow more of our own food.

This project is almost as simple as the onion growing project — simply chop the celery stalks from the base of the celery you bought from the store and use as you normally would. In our case, we had a particular homemade bean dip that needed sampling!


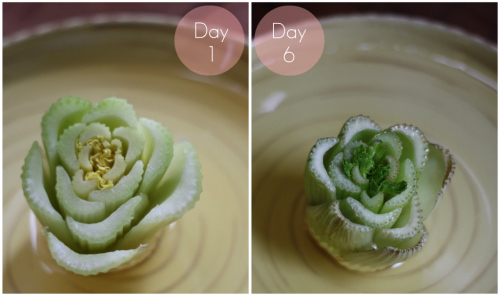
Instead of tossing the base, rinse it off and place it in a small saucer or bowl of warm water on or near a sunny windowsill — base side down and cut stalks facing upright.


We let our celery base hang out in the saucer of water for right around one week, give or take. Over the course of the week, the surrounding stalks began to dry out significantly, but the tiny little yellow leaves from the center of the base began thickening, growing up and out from the center, and turned a dark green. The growth was slow, but steady and evident.


After the 5-7 days were complete, we transferred our celery base to a planter and covered it completely save for the leaf tips with a mixture of dirt and potting soil.


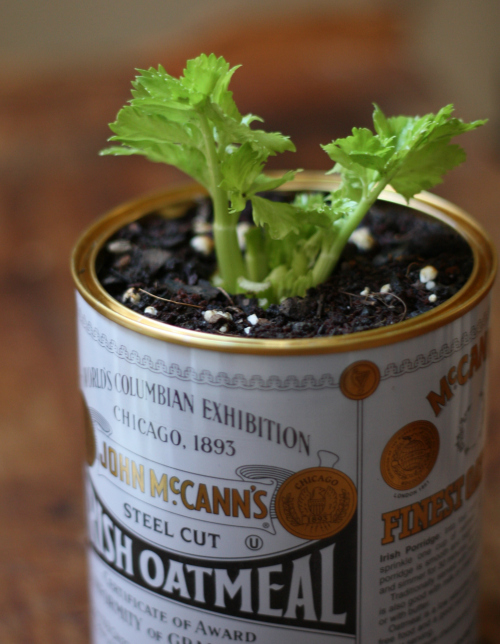
We watered it generously and after planting in the soil, the overall growth really took off. Not only do we have celery leaves regenerating themselves from the base, but you can see clear stalks making their way up and out. It's truly fascinating what we have not even a week after planting in the soil:


A few notes:
  • Change out the water every couple of days while in the "saucer" phase of the project. We also used a spray bottle to spray water directly onto the base of the celery where the leaves were growing out. 
  • The tutorials we saw showed planting the celery directly into the dirt outside — you may want to go this route if you live in a temperate area or want to be able to harvest outdoors. We went with an indoor planter since it's still pretty cold here in VA, we have limited outdoor space in the city, and the space we do have is currently unprotected from our curious puppy.
  • Continue to generously water the celery after planting to keep it thriving.
- + - + - + - + - + - + - + - + - + - + -

Update 1: After a few more weeks of growing time in our sunny window, our celery has continued to thrive. The leaves have grown out generously and bushy and the celery stalks underneath have really taken shape:


- + - + - + - + - + - + - + - + - + - + -

Update 2: Here's how we are looking at almost 3-4 weeks of growth:


Find the full 3-4 week update with even more pics and details on the progress in this post.

- + - + - + - + - + - + - + - + - + - + -

Update 3: Here's how we are looking at almost 5 months of growth, still indoors and still in the same planter:


At this stage, we've been actually been able to cut off stalks as needed in recipes and the celery continues to regenerate leafy stalks from the center of the plant. Find the full 5 month update with even more pics and details on the progress in this post.

- + - + - + - + - + - + - + - + - + - + -

For anyone wondering about the planter, we made it by recycling a tin of steel cut oats we'd since finished. We simply cleaned it out well, then punctured holes along the base to create drainage for the plant.


We placed a thin layer of mulch at the base to help with drainage, followed by a thick layer of dirt/potting soil mixture. After placing the celery base snugly in the planter, we filled the remaining space with more dirt/potting soil to completely cover the celery base. We kept the top to the oats tin and flipped it over to place the new planter on top of it — the lid is a perfect custom fit to the base and catches any runoff from regular watering.

As usual — we'll be sure to keep you posted on the progress of our container celery and hope you'll let us know if you decide to try it out for yourself! If you've tried this before, what other types of vegetables have you known to be able to regrow itself in a similar way?

Friday, January 4, 2013

John Legend's Mac n Cheese


John Legend's Macaroni and Cheese


When musician John Legend visited Martha (Stewart), he shared his recipe for this favorite Southern comfort food, with generous helpings of both Monterey Jack and cheddar cheeses; evaporated milk creates a creamy texture under the golden-brown surface.

Ingredients

  • 4 tablespoons (1/2 stick) unsalted butter, plus more for baking dish
  • Coarse salt and freshly ground pepper
  • 3 cups elbow macaroni
  • 2 (12-ounce) cans evaporated milk
  • 1/3 cup skim milk
  • 2 large eggs
  • 1/2 teaspoon seasoned salt
  • 1/4 teaspoon garlic powder
  • 2 (8-ounce) packages extra-sharp cheddar cheese, grated
  • 1 (8-ounce) package Monterey Jack cheese, grated
  • Paprika, for sprinkling

Directions

  1. Preheat oven to 375 degrees. Generously butter a 13-by-9-inch glass baking dish; set aside. Bring a large pot of water to a boil; add salt and macaroni. Cook until al dente according to package directions. Drain, and return to pot. Add butter, and toss until pasta is coated and butter has melted; set aside.
  2. In a medium bowl, whisk together evaporated milk, skim milk, and eggs. Add seasoned salt, garlic powder, 1 teaspoon salt, and 1/2 teaspoon pepper; set aside. In another medium bowl, combine cheeses; set aside.
  3. Place 1/3 macaroni in an even layer in the bottom of prepared baking dish; cover evenly with 1/3 cheese. Repeat with remaining macaroni and cheese mixture. Pour milk mixture evenly over contents of baking dish. Sprinkle with paprika. Bake until top layer is lightly browned, 35 to 45 minutes. Let stand 10 to 15 minutes before serving.

Thursday, January 3, 2013

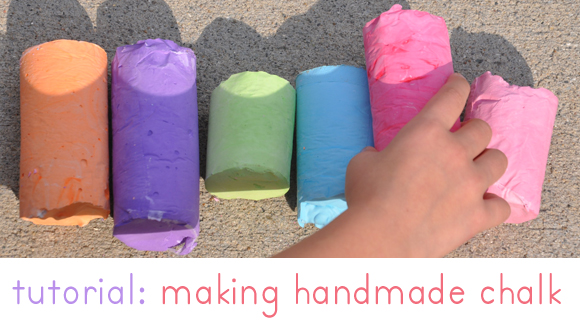
Homemade Sidewalk Chalk

This is a great activity for the kids to both make and play with!  My kids love to color the sidewalk and make hopscotch and other games with sidewalk chalk and now I know how to make our own thanks to Oh My!  I was so excited, I had to share it with you!


homemade handmade chalk tutorial by modern handmade child
What you will need:
•    Toilet paper or paper towel tubes
•    Scissors
•    Duct tape
•    Wax paper
•    Small bucket or disposable container to make the recipe
•    ¾ cup of warm water
•    1 ½ cups Plaster of Paris
•    2-3 tablespoons of tempera paint
•    Paper bag or a “mess mat”

homemade handmade chalk tutorial by modern handmade child
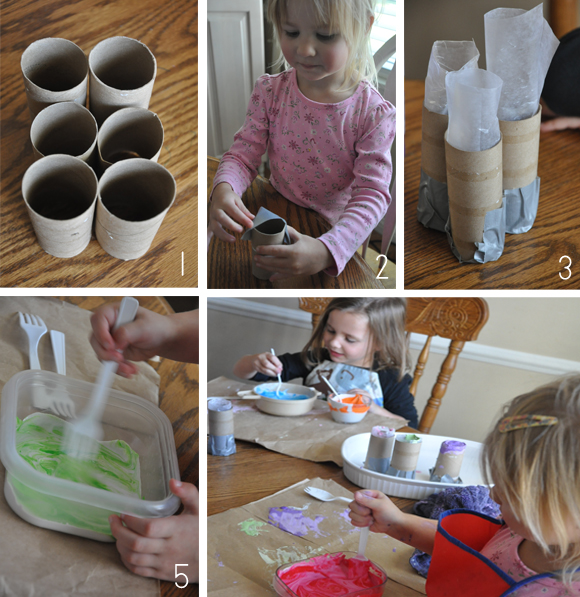
Step 1: If you are using paper towel tubes, cut each tube in half, so it is roughly the length of a toilet paper roll tube.
Step 2: Cover one end of each tube with duct table to hold the contents within.
Step 3: Cut as many pieces of wax paper as you have tubes. Roughly 6 inches X 6 inches. Roll the wax paper loosely and insert into the tubes so as to effectively line the tubes. The top of the wax paper will be higher than the tubes. The wax paper liner will keep the chalk mixture from sticking to the cardboard tubes and will eventually be peeled off.
Step 4: Pour the warm water into your bucket. Sprinkle the Plaster of Paris over the water and stir the mixture with a plastic spoon. The Plaster of Paris roughly starts hardening within 20-30 minutes, so you need to work fast so that it does not harden too quickly.
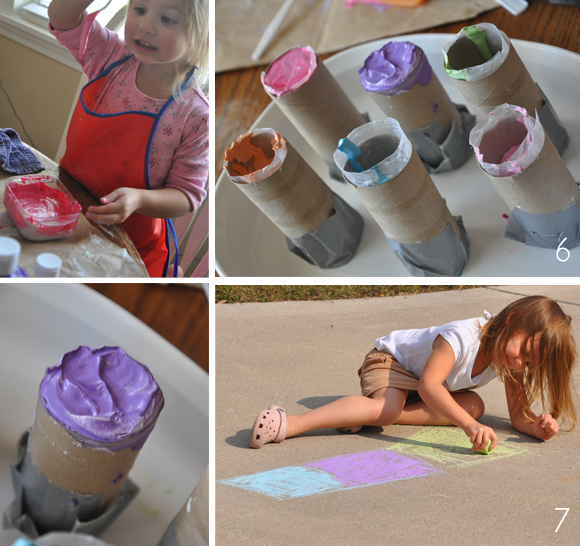
Step 5: Next you will want to pour the tempera paint into the Plaster of Paris mixture and stir so that it is mixed thoroughly. If you would like brighter colors  add more tempera paint into the mixture. We wanted to make a variety of colors of chalk, so we spooned about 1/2-3/4 cup of Plaster of Paris in each separate container and mixed in the different tempera paint colors into each bowl. We ended up making six different colors and next time might mix more.
homemade handmade chalk tutorial by modern handmade child
Step 6: Stand each tube with the tape side down on a cookie sheet/flat baking dish/box lid to make the project easier to transport to a drying location.  Pour or spoon the colored Plaster of Paris mixture into the wax paper lined tubes. Lightly tap the sides of the tubes to release the air bubbles (so you do not have holes in your chalk). After you have poured the mixture into the tubes start another color. When done trim the excess wax paper so that it is closer to the cardboard tube.
Step 7: It took 3 days for our chalk to dry. On the last day, we peeled off the duct tape so that the underside could dry. When the chalk dries, peel off the paper tubes and wax paper. Your chalk is ready!

Wednesday, January 2, 2013

Candle Magic

Here is a fun and simple way to dress up your candles.  You can make these for everyday in your home or use them as a centerpiece for a party or  baby shower!  All you need is a clear glass votive or even a clear glass container for a votive or tea light candle and some tissue paper in the colors of your choice.  Cut the tissue paper to the desirable size, wrap tightly around the candle and glue ends together with regular white glue.  Simple - yet makes such a big difference!

Striped Candleholders

~Jennifer

BrankletsNBling

Tuesday, January 1, 2013

DIY Ring

HAPPY NEW YEAR!!!

Here is a fun tutorial to start to year off right!  I haven't made any rings yet - but this one seems doable and like it will hold up pretty well.  It calls for 18 gauge wire, I think I might use 16 gauge for extra strength and sturdiness.  Great tutorial from I Spy DIY:


Supplies: 
Jewelry Pliers
Wire

Steps:
1. Start with 6" of wire
2. In the middle create a loop to fit your finger, I wrapped around a chapstick tube to create a rounded circle.
3. With your round pliers, grab the top
4. Bend over the top of the pliers to create the right loop of the bow
5. Next grab the bottom wire
6. Bend over the top of the pliers to create the second loop
7. Adjust so your loops are even
6. Take the end of the left loop, and wrap around the center, through the ring
7. Trim the ends of the wire
* If the ends are sharp, file down to dull edges

Enjoy!
~Jennifer
BrankletsNBling