Friday, August 15, 2014

Weekend Recipe: Baked Herb and Parmesan Potato Slices


Baked Herb and Parmesan Potato Slices

from:  http://dynamicsnap.blogspot.com/2014/06/baked-herb-and-parmesan-potato-slices.html


Ingredients:

  • 2 whole russet potatoes (medium size)
  • 2 whole large red potatoes
  • ¼ teaspoon onion powder
  • ¼ teaspoon salt
  • ¼ teaspoon garlic powder
  • ¼ teaspoon dried oregano
  • ¼ teaspoon dried thyme
  • ¼ teaspoon pepper
  • ¼ teaspoon dried parsley
  • ¼ teaspoon dried rosemary
  • 2 tablespoons olive oil
  • 1 tablespoon grated parmesan cheese
Directions:


  1. Preheat oven to 375 degrees F. Rinse the potatoes and dry them off with a paper towel. Slice the potatoes at a slight diagonal. Try to keep the slices at a similar width (1/4 of an inch would be on the thicker side; about 1/8 of an inch is a nice size or even smaller if you like them morecrispy) so they cook evenly. Add the potato slices to a large bowl.
  2. Next add the herbs and spices. Then add the olive oil. Mix all of the ingredients together so the olive oil and herbs evenly coat both sides of the sliced potatoes. Lay the potatoes on to a cookie sheet and top with the parmesan cheese. Try to lay the potatoes as flat as possible on to the cookie sheet rather than stacking the potatoes on top of one another.
  3. Bake in a preheated oven for about 20 minutes or until the thinnest pieces are a golden color. Serve warm right out of the oven as a side dish.

Tuesday, August 12, 2014

Tuesday's Jewelry Spotlight Features Carol Summers of Austin Leigh Designs

Tuesday's Jewelry Spotlight Features Carol Summers of Austin Leigh Designs


I love designing hand cut gemstones to become beaded or wire wrapped earrings, bracelets and necklaces.

Born in Southern Louisiana, I learned sewing and creating with my hands gave me great pleasure, therapy and new things that I would otherwise not have been able to have. Living in Texas for the past 30 thirty years taught me that even though I prefer the cosmopolitan areas, there is still a Wild Wild West.

I feel like this is the dream chapter in my life, “ Do something you love and you will never work a day in your life."

I feel a natural closeness to gemstones from the earth and always enjoy learning about the metaphysical and healing properties of these elements of the earth. I love sharing this information with you and hope that my one of a kind pieces can have a positive impact on your lifestyle. My beaded and wire wrapped jewelry pieces are made from the finest quality elements and I take great pride in making sure your gemstone piece fits you properly.
You will love and desire the powerful energy that is created from wearing a quality gemstone piece from Austin Leigh Designs. I work with AAA and AA quality gemstones, fine Sterling Silver or Gold Filled metals.

Even though I have dabbled in numerous artistic mediums over the years... my current love is semi precious stones and minerals of the earth. When I travel I always manage to find beautiful stones native to the areas I am visiting.

It is my pleasure to give you some background about the qualities of different stones and how many cultures use their healing powers. Should you desire a different stone or style, custom orders are readily excepted. Please feel to contact me with your request.

I was born in the south and hold a special place in my heart for Louisiana. Texas is my home now and has been for the last twenty ifve years. In my heart it is still the wild west.

Follow me @
http:/twitter.com/austinleighd

or

http://www.facebook.com/pages/Lewisville-TX/Austin-Leigh-Designs/301503512097#

or 

http://pinterest.com/austinleighdes

Wanelo

http://wanelo.com/austinleighdesigns


Please enter my shop here for other selections
http://www.etsy.com/shop/austinleighdesigns

"Thanks a Million"

Monday, August 11, 2014

Menu Planner

Menu Planner
by:   http://www.homemadebycarmona.com/2013/01/menu-planner.html


Menu Planner

The Eleventh Hour Cook
How? How is it that the entire day went by and I STILL don't know what to make for dinner? I find myself entering dangerously close to the "whine" line, where the kids pave the way for the dinner hour with complaints of hunger that grow increasingly more pathetic. Just as I enter that last half hour,  the kids rolling on the floor dramatically holding their little tummies, I frantically grab at the first box of what-ever-that-was to "whip up" something. Forty minutes later I am sighing with relief, as the kids and hubby wolf down their admittedly mediocre food, and I am safe for yet another day...until breakfast when I will do this dance all over again!
Nope, I don't want to do this forever...That's how I eventually came up with the perfect solution! I created an easily reusable Menu Planner, one that includes a much needed idea section. 


Saving Solution
Yep, I can't decide if the worst part of cooking is the clean-up or the 2 hours before when you're racking your brain for ideas on what to cook. Well, no more sir! I'm not sure how to elude the monstrosity that is my kitchen after cooking (I'm a ridiculously messy cook), but I refuse to settle for menu mediocrity. So menu planning strategy it is! I have been employing this menu planner for a few months now and it has been my saving grace! We are eating healthier meals, it takes less time to prepare meals, I am saving gads of money, and we have culturally diversified our meals more than ever! It's a win-win-win-win!
Here are just a few menu planning tips you should employ to gain all of these benefits:
To save money: Pick one day to in advance to plan your meals. Create your menu and shopping list at the same time by browsing the sales ad's as well as your cupboard.
To save time: a menu plan gives you the opportunity to prepare entire meals or parts of a meal in advance, use a crock pot whenever you can. Do double duty by choosing meals that have a common ingredient and prepare (pre-cut, pre-soak, pre-wash, pre-cook, etc.) that ingredient all at one time for both dishes
To save your health: Try a new dish and a new seasoning every couple weeks. Keep the food pyramid in mind when menu planning, and include more fresh fruits and vegetables. If you need to, prepare your vegetables, and salads the week in advanced...you'll be more motivated to eat what has already been prepared.
To diversify: Try a new dish and a new seasoning every couple weeks. Glean inspiration from Pinterest Pins, or go online to a recipe directory such as allrecipes.com .

How It Works
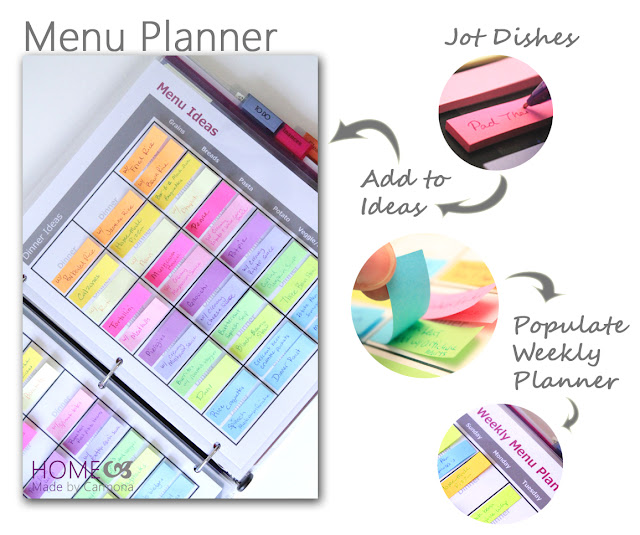
Why sticky tabs? I like my menu planner to be tactile, and I am constantly changing my mind, or moving my meals around. This allows me to do so easily, without constant erasing or scratching out ideas. You would think these page marker sticky notes would lose their stickiness over time, as long as they are housed between two laminated sheets, they will not come off, or lose their stickiness.
The how to use is easy...besides the obvious grid/post-it operation, there are a couple little tricks I use to keep my menu planner working for me. The menu planner is divided into two parts: The Weekly Planner, which I reference to see what is being made for each week of the month. The Menu Ideas section, which is where I take from to populate my weekly meal plan.
First take the time to populate the Menu Ideas section. Go crazy, write on post-it page markers all the dishes you've ever wanted to make... the dishes that make you look like a superstar, the trusty dishes you cook weekly, etc. I went on Pinterest for inspiration and went wild! 
Next glean dishes from your Menu Idea section to populate your Weekly Menu. This is also the time to make your shopping list.
You know , it is far easier to show than to tell: Watch my YoutubeMenu Planner webisode to see how, and gain a few important details.


https://www.youtube.com/watch?feature=player_embedded&v=alwi453xnLg
How to Make Your Own
Simple. Customize, print, laminate, punch holes, and start populating your menu planner! 
I've done most of the work for you, but I won't take away the fun of personalization! Below you will find the Menu Planner printable in word format that you can download and customize, or in pdf format for those who want to print and use as is. Just remember, the word format will be a little discombobulated and needs to be downloaded to view and alter.
If you do not own a laminator, use Scotch brand full-sized self-laminating sheets, just follow the directions on the package.

Customization & Assembly Tips:
Type in Your Own Categories: My categories are: Drink Ideas, Salad & Appetizer Ideas, Breakfast Ideas, Lunch Ideas, Dinner Ideas, and Dessert Ideas. Use as many pages per category as you like. Decide your layout and page order, and place pages back to back so they will be double sided before laminating.
Type in Your Own Subcategories: My planner contains subcategories according to the way I plan and search for meals. Personally I think of my meals by predominant ingredient or meal base: Grains, Bread, Pasta, Potato, Vegetables & Legumes, and Sides. 
A more "normal" labeling method would probably be: Appetizers, Bread, Pasta, Soup, Salad, Sides. Or perhaps label according to cultural food type: Asian, American, African, Indian, Italian, etc. The ideas are endless, the point is to divide up your sections according to the way you think. 
Color-code Subcategories with Post-its: Keeping your subcategories further defined by using one or two colors in each section will make it quick and easy to put the stickies back in their place when not in use. Don't forget to customize your stickies too! I chose to use Post-it page marker signets, but I loved the adorable Martha Stewart brand 1 1/2" x 2" size as well!
Change the Font & Colors: While you're already customizing, why not make it suit your personal style? Whether you change the font, or the colors, or drastically change it, you'll be more motivated to use something you put a little work into.

Customizable Word Format (must be downloaded to be viewed properly)

Print Ready PDF Format

Friday, August 8, 2014

Ready for the Weekend Recipes: Tips for Making Great Baby Back Ribs

Weekend Recipes:  Tips for Making Great Baby Back Ribs:
from:https://www.yahoo.com/food/how-to-smoke-perfect-baby-back-ribs-bbq-master-tim-93421472779.html

Got Baby Backs? Rib Tips from a BBQ Pro
For a showstopping main course, there’s nothing like a smoky, juicy rack of ribs.
"Ribs are awesome for a backyard barbecue because they smell and taste like summer," says Tim Love, co-host of CNBC’s new show Restaurant Startup and the chef/owner of Lonesome Dove, Queenie’s Steakhouse, Woodshed Smokehouse, Love Shack, and White Elephant Saloon in Texas. 
Love is a true barbecue expert and thinks that anyone can learn to make ribs that have the ultimate combination of a crispy crust and succulent meat. Here, the BBQ guru shares his rules for smoking perfect baby back ribs, and his favorite foolproof recipe.
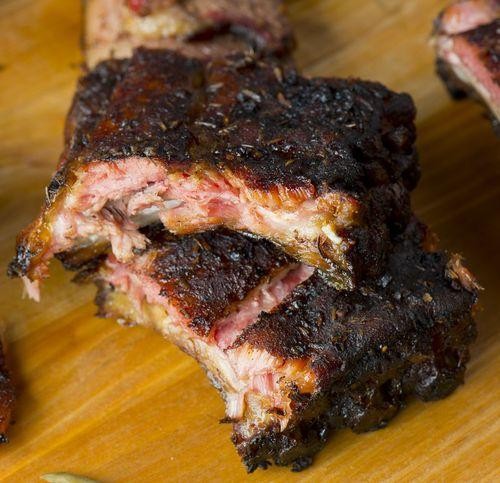
1. Don’t forget to remove the underbelly membrane. ”You need to do this before anything else,” says Love. ”If you don’t remove it, the smoke won’t penetrate the meat properly on the bottom side of the ribs. Also, the membrane will get caught in your teeth.”
2. Use rub, not sauce. ”My ribs don’t see any sauce! All you need is a good, savory rub with plenty of flavor. If you want your rub to be sweet, use granulated white sugar. It caramelizes better than brown sugar and produces a great crust.” 
3. Shut the smoker and do NOT open it until time is up. ”Calculate how long the ribs should take before you place your ribs on the rack. The average baby back ribs should take about three hours and 15 minutes. Your ribs will be exponentially better if you maintain the internal temperature at an even 225 degrees and you keep the door closed at all times.”
4. Never boil ribs. Ever. ”We are making ribs, not corned beef. Boiling the ribs would make them tender but dry. Simmering the ribs would make them juicy and tender, but wouldn’t give them that delicious smoky flavor.”
5. If you’re short on time, use an oven bag. ”There is no ‘quick’ way to make ribs properly. If you have to, season the heck out of them, put them in an oven bag, and then bake them. They will be ready in less than an hour and super flavorful.”
6. If you need sauce with your ribs, start over. ”Sauce is great but should not be required!”
CHEF TIM LOVE’S BABY BACK RIBS
Ingredients:
1/2 rack baby back pork ribs
For the rub: 
1 cup guajillo chile powder
1 cup kosher salt
3/4 cup black pepper, cracked
1/2 cup ground cumin
1/4 cup fresh rosemary, finely chopped
1/4 cup fresh thyme leaves, finely chopped
1/4 cup garlic powder
1 cup white sugar
Special equipment: hardwood chips or chunks, preferably whole pecan wood
Directions
Prepare the grill for indirect heat: If you don’t have a smoker with an offset box, you can build a fire on one side of your grill and then put a piece of foil on the opposite side of the grill. This will create indirect heat.
Prepare the ribs: Remove the thin, papery membrane skin from the back of each rack of ribs by pulling it off in a sheet with your fingers, using the corner of a kitchen towel to gain a secure grip, or with pliers.
Prepare the rub: In a bowl, whisk together chile powder, salt, pepper, cumin, rosemary, thyme, garlic powder, and sugar.
Generously season ribs with the mixture, rubbing onto both sides of the rack.
Place the ribs, bone-side down, on foil to cook with lid closed. Cover the grill and keep the temperature of the grill at a constant 225-degrees. Cook the ribs for about 3 to 4 hours or until tender.

Thursday, August 7, 2014

For the Kiddos: Science Project ~ Tornado in a Jar

Science Project for the Kiddos:  Tornado in a Jar
from:  http://elliemoon.typepad.com/blog/2012/02/tornado-in-a-jar-diy.html


TORNADO IN A JAR DIY

kai saw this in one of his textbooks last week and immediately went into production mode when he got home from school. very simple and very impressive. a tornado in a jar.
you will need: a jar, water and a small squeeze of DISH soap, thats it::
Torn1
Torn2
Torn3
Torn4
now get ready to shake::
Torn7
Torn6
Aa
needless to say this was the talk of the town! and there's no wrong way to shake it really. SIDE TO SIDE is my preferred method but the boys have come up with five different shakes that they favor. raid your recycling bin and give it a whirl!


Tuesday, August 5, 2014

Tuesday's Jewelry Spotlight is Featuring Kathy Carroll of Simply Beaded Treasure

Tuesday's Jewelry Spotlight is Featuring Kathy Carroll of Simply Beaded Treasure
https://www.etsy.com/shop/SimplyBeadedTreasure?ref=shopsection_shophome_leftnav


Beaded Treasures to Wear

I have been creative and doing crafting since I was a little girl.
My grandmother taught me embroidery and simple beading. I have been "making things" ever since!
I started designing and making jewelry in 2007. A co-worker showed me a catalog for Fire Mountain Gems and I was hooked. I started learning all I could about beads, beading pattern and jewelry making. I discovered so many wonderful ways to express myself with beads!
My favorite type beadwork at this time was bead embroidery. I entered the Fire Mountain Beading contest in 2008 with a piece called "Vintage Sparkle" and I was a Finalist! It was such an honor to be a finalist in the first contest that I had ever entered! I opened my Etsy shop that same year!
I love to create beautiful pieces that make people happy! I spend most of my day working on one project or another. I just love the feel of the beads, the colors, textures, the patterns!
I would design and make jewelry even if no one ever bought any of it. I just love the process!
Check out my blog to see behind the scenes work on my jewelry!
http://beedtales.blogspot.com/
I also have a Facebook Fanpage for my shop. I can use all the likes I can get! Thanks!
https://www.facebook.com/SimplyBeadedTreasure

Monday, August 4, 2014

FYI ~ 9 Reasons Why You're a Mosquito Magnet

FYI ~  9 Reasons Mosquitos Choose You Over Others
by:https://www.yahoo.com/health/9-reasons-youre-a-mosquito-magnet-91764600447.html


9 Reasons Why You’re a Mosquito Magnet

9 Reasons Why You’re a Mosquito Magnet
Mosquitoes are picky creatures — unsurprising if you’re the one always ducking for cover under a swarm of bloodsuckers while your friend remains unscathed. Good thing scientists are on the hunt to discover what makes certain people especially attractive to the tiny insects. Here are nine reasons they’ve come up with so far.
You Breathe
In many ways, no one is immune. The fact that humans breathe makes us all mosquito targets to varying degrees. More than 30 years ago, researchers discovered that carbon dioxide is one of the main reasons mosquitos seek us out. The insects will fly to higher concentrations of CO2 (i.e. - large groups of people at sporting events and backyard parties), then use other sights and smells to narrow down their target.
You’re Tall
Because larger people produce more carbon dioxide and more body heat, they’re naturally more attractive to mosquitoes. This is why, when in groups, adults usually get bitten more than children, andmen are targeted more often than women.
You’re Pregnant
Along with swollen feet and morning sickness, pregnant women are also nearly twice as likely to get bitten than those who are not expecting, according to one international study. Two reasons: Pregnant women produce excess amounts of carbon dioxide and body heat. 
You Exercise Regularly
During a workout, the body produces a chemical called lactic acid, which is released through sweat glands on the skin. And one German study confirmed that mosquitoes can detect and are attracted to lactic acid at close range.
Your Feet Stink
One study published in the journal PLOS ONE found that people with a higher abundance but lower diversity of bacteria on their feet are highly attractive to mosquitoes. The bacteria, which is pungent, is also found in Limburger cheese and is so effective at attracting mosquitoes, that scientists are using the cheese to trap and control the flies in Africa.
You’re Wearing Perfume
Mosquitoes suck the nectar of flowers for energy, so they’re attracted to floral scents. And certain floral odors are effective enough that researchers are figuring out how to use them to lure mosquitoes with their sweetness.
You’re Genetically Predisposed
Your genes are responsible for your body odor, so scientists are starting to test how genetic makeup could affect one’s susceptibility to mosquitoes. For example, one study published in the journal Infections, Genetics, and Evolution found that people with a particular HLA gene are more likely to be bitten. 
You Drink Beer
Downing just one 12-ounce beer can increase the risk of being bitten, says the Journal of the American Mosquito Association, although it’s unclear why. Just make sure that backyard beer is worth it.
You Have O Blood Type
This one is debatable. Several studies, including the most recent published in the journal Experimental Parasitology, show that people with blood type O are more likely to get bitten. However Joseph M. Conlon, a technical adviser to the American Mosquito Control Association, has disputed some of the research, blaming “bad statistics.”