Friday, March 29, 2013

Amazing Baked Potatoes from your Crock Pot


Crock Pot Baked Potatoes

Today I am sharing a secret with all of you that I just recently discovered.  I wish I had learned about this a long time ago, or at least at the beginning of the summer.  So here is the secret – you can make baked potatoes in a crock pot!  I know, isn’t that cool.  It is so simple to do.
The beauty of this is you can have baked potatoes without heating up your oven and your house, this is perfect for summertime.  Think about those times when you just don’t have room in your oven along with everything else.  No problem, just cook the potatoes in the crock pot.  Or you have a busy day and just don’t have the time to do baked potatoes.  No problem because it takes 8 hours in the crock pot.  You can have them cooking while you are at work, running errands, etc.  I know, I just changed all of your lives with this secret.  The only thing I ask is that you share this secret with others.  This is too good of a secret to keep to yourself!
Crock Pot Baked Potatoes
potatoes (I used russets)
  1. Wash your potatoes well and let them dry.  Then wrap each potato in a piece of foil (no need for pricking them).
  2. Place the foil wrapped potatoes in your crock pot.  I put 8 medium sized potatoes in my 4 quart crock pot, but I probably could have fit at least 10.
  3. Cook on low for 8 hours.

Thursday, March 28, 2013

Homemade Silly Putty

I thought this was a perfect thing to make and fill those little Easter eggs with!  Such fun and the kids can help make and, of course, play with it too!!  Wonderful tutorial brought to you by Homemade by Jaci:


Silly Putty -2 Household Ingredients

silly putty
I’m always looking for stuff for my kids, especially for the holidays, that doesn’t have sugar. They get so much already!
So, this is what it is. Water, elmers glue, and Borax.
Recipe:
3 Tbsp. Water
1/4 Cup Elmers glue
1/2 teas. borax dissolved in 1/4 Cup HOT water
Directions:
Mix the water with the glue. If you want to add a little food color this is the time. I added some glitter, but it got kind of dissolved, and you can’t see it very well.
P1040243 - Copy
Then you add the borax, hot water solution. It firms up right away. I just dumped out the excess water that was left after it firmed up. Then you play with it!
P1040245 - Copy

Wednesday, March 27, 2013

Make Your Own Body Scrub

Ok, so technically, this is not a "Craft" but it was too good not to share!  With Spring here, well for most people,  we are still digging out after a foot and a half of snow a couple of days ago :)  I thought this was perfect!  I have always wanted to try making my own body scrubs and now I get to try these thanks to Elle&Blair!!  Please note that if you have sensitive skin- like me, the sugar scrub is probably best:


5881904761:Yahoo:photo

Get your legs ready to shine for summer (and those 4th of July parties) with these easy DIY (Do It Yourself) body scrubs that you can make with a few simple ingredients straight from your kitchen. So pick one, mix it up, and scrub your legs to gorgeousness!
  1. Super Sweet Sugar Scrub
    1 cup brown sugar
    1/2 cup mashed avocado (optional)
    1 cup of olive oil
  2. "Wake you up!" Coffee Body Scrub
    2 cups of ground coffee
    1/2 cup of sugar
    3 tablespoons of olive oil
  3. Yummy Chocolate Body Scrub
    1/2 cup white sugar
    1/2 cup brown sugar
    1/2 cup canola oil
    1/4 cup Cocoa
  4. Ocean Beauty Sea Salt Scrub
    1/2 cup sea salt
    1/2 cup of olive oil
    5 drops of an essential oil in your favorite scent. I would choose one that reminds you of the beach... maybe a clean, breezy scent.
Note: For all of these scrub recipes, the instructions are the same... Mix everything together, adding in the oil last. Then scrub away and rinse with water!

When I use a body scrub, I apply it in the shower and rub the mixture in small circles, focusing on dryer areas such as my elbows, knees and feet. If you need help selecting your scrub, here is a quick cheat sheet:

The Super Sweet Sugar Scrub is best for dry, sensitive skin. The brown sugar is more gentle than the salt or coffee scrub, and the avocado will add extra creaminess to the scrub and boost the hydration it gives your skin. The Coffee and Ocean Beauty Scrubs are the most exfoliating and good if you have non sensitive skin that you really want to get glowy. These scrubs will give you a level of exfoliation that the Super Sweet Sugar Scrub will not. Between the two, it's just your preference! I'm not a huge coffee fan so I would choose the Sea Salt one, but I know some of you are total coffee addicts! The Yummy Chocolate Scrub is good for anyone who has a sweet tooth. :)

After you have finished exfoliating your body you should apply a nice thick body butter to keep your skin hydrated since scrubs can leave your skin a little thirsty. You can use a store bought body butter, or you can make your own! In today's video I show you how to make a luxurious body mask to truly moisturize your skin.

Tuesday, March 26, 2013

Wire Ring Tutorial

Awesome tutorial to make a wire ring out of copper wire from the Handmade Spark Blog.  This tutorial is really well done and makes this look like a breeze!!

How-to make a copper wire ring
The ring I made before went well so I wanted to play around with that some more. Here I have a gauge 22 and 18 wire. The smaller the number the thicker the wire.
Yes, it’s a handle of some sort. This end makes a bigger ring, something like a size 8. the other end has a metal collar and is more like a size 6 1/2 – 7. The beads I used today are a semi-precious amethyst and they fit both wire sizes.

This is the 18 gauge which I’m wrapping twice. The 22 gauge I wrap three times. I brought the wires together and bent one up and one down in the center.

Work one bead at a time.
Once strung with a bead each wire goes behind in the opposite direction.

Like so.

Time to put the ring back on our “form”. This is when you want to tighten everything up and make sure the wire is going where you want it to go.
wire wrapped ring
Now you want to make the wire and beads symmetrical. What you do on the top, do the opposite on the bottom. I do feel my way through each ring, for me it’s an organic process. I’ve also snipped the wires to and inch, inch and a half. This depends on how big you want your spirals.
I prefer smaller ones so I snipped mine to an inch. Use the round nosed pliers to start the spiral.
With the thicker wire especially I need to get the spiral into my flat nosed and really crank. Let the spiral sit in the bottom part of your pliers and the wire feed through the top.
This spiral will sit below the top bead.
Like so.
Again, what you did with your first spiral do the opposite with the other.


Monday, March 25, 2013

Easter Deviled Eggs - So Pretty!


Easter Eggs

From:  http://www.foodjimoto.com/2011/04/easter-eggs.html

My family loves deviled eggs.

So much so, that I can make 3 dozen eggs, which makes 72 deviled eggs for a party--and they're ALL GONE by the end of the party!

That's a LOT of eggs!


For Easter, we make them festive.

We color them, like Easter eggs!


I remember the first time my mother made deviled eggs colored like Easter eggs.

I thought they were the prettiest eggs I'd seen!


They're lots of fun to make, too!

Ingredients:

10 hard boiled eggs
About 1/2 cup mayonnaise


Put the eggs in a pot and cover with water.


Bring to a boil, turn down the heat to low, cover and simmer for 15 minutes.


After 15 minutes, cool the eggs with running cold water.


Peel the eggs.


Then cut them in half.


It's okay if some of them tear a little, the filling will camouflage that.

Or just eat that one.


Put the yolks in a separate bowl.

It doesn't matter if the yolks turn a little darker around the outside--that happens when the eggs aren't cooled thoroughly right after cooking.


Next, you'll need some food coloring.


Make the colors just as you would easter egg dye.

A teaspoonful of cider vinegar in each glass helps.

I used about 3 drops of food coloring in each glass.


Take the eggs out when they're a pretty pastel color.


Drain them on a paper towel.


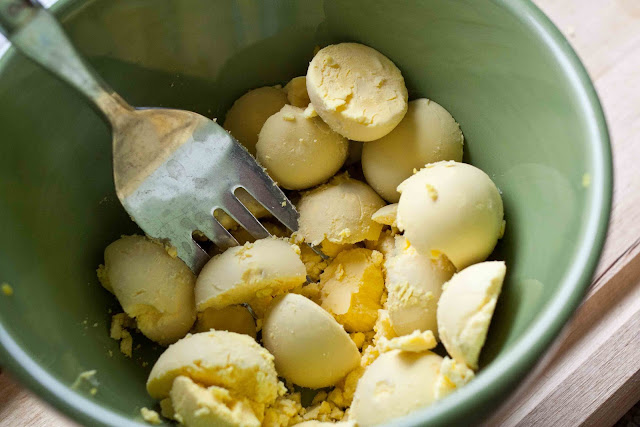
Mash the yolks with a fork.


When they're uniformly crumbly, add about a 1/2 cup mayonnaise.

Scoop from your measurement and add half at a time.

Make it as creamy as you like.


When it's nice and creamy, you can add any extras--mustard, minced chives, freshly ground pepper, bacon bits, etc.

We like it plain.

You don't need to add salt, the yolk is salty itself.


Time to fill the eggs!


I've had this Super*Shooter forever, it seems, but it still works well.


If you don't have one, you can fill the eggs by hand with a teaspoon.


Put a little bit of the yolk mixture in each egg, so you don't run out, then go back and add a little more on top.


Aren't they pretty!

Friday, March 22, 2013

Chocolate Caramel Turtle Cake Roll


Chocolate Caramel Turtle Cake Roll 


This Chocolate Caramel Turtle Cake Roll is out of this world! A chocolate cake rolled and filled with a whipped caramel then frosted with chocolate and pecans. Turtle indulgence to the max!
chocolate-caramel-turtle-cake-roll-1-words
Have you ever been so afraid to try something that you worked yourself up into a frenzy about it and then convinced your brain you couldn’t do it so why try?
Yeah, that was me and cake rolls. Until now.
chocolate-caramel-turtle-cake-roll-2-words
chocolate-caramel-turtle-cake-roll-3-words
I am serious, the ease of making this cake is unfathomable. It was easier to make than any cake I’ve ever made, ever.
It starts with a box cake mix. I found the recipe in one of those Betty Crocker books you get at the grocery store. It used only part of a cake mix, and fills exactly one jelly roll pan. And, because it’s cake mix, it bakes up great.
When the cake is hot, straight from the oven, you turn it over a (clean) kitchen towel that’s been dusted with powdered sugar. It comes out the pan easy, because there is foil lining the pan. Peel off the foil, and roll up the cake in the towel. It rolls easy – no ripping or universe exploding.
I filled this cake with the caramel filling.  Basically it’s caramels melted with heavy cream, chilled, and then whipped, almost like a ganache. A caramel ganache. It’s so easy to make and spreads like frosting. It’s true magic!
Once the cake is cool, you simply unroll it carefully. It does not break or sprout a cape and fly across the room. It’s just…bendy cake. Frost the center with the caramel and roll it right back up. It’s happy to do so.
Frost it with a chocolate glaze and top with toasted pecans. (You could also fill the center with some pecans. Which would be wonderful. I didn’t because my dad was eating some of it, and he can’t eat nuts.)
Slice, and enjoy the fact that you have accomplished something amazing and magical. Something that should have been hard, but wasn’t. Something that everyone will think you slaved over and worked super hard for hours to make.
chocolate-caramel-turtle-cake-roll-4-words
And well. Why not let them think that? What they don’t know won’t hurt them…and they’ll think you’re amazing. :)
Chocolate Caramel Turtle Cake Roll
Recipe adapted from Betty Crocker.
Ingredients
    For the Cake:
  • 3 eggs
  • 1 3/4 cups Devil’s Food Cake Mix (I used Betty Crocker SuperMoist)
  • 1/3 cup water
  • 2 tablespoons vegetable oil
  • 1 tablespoon powdered sugar
  • For the Caramel:
  • 30 caramels, unwrapped
  • 1/2 cup heavy whipping cream
  • For the Frosting:
  • 1/2 cup heavy whipping cream
  • 1 cup milk chocolate chips
  • 1 tablespoon corn syrup
  • 1/4 teaspoon vanilla
  • 1 to 1 1/2 cups chopped toasted pecans
Instructions
  1. Add caramels and heavy whipping cream to a large, microwave safe bowl. Heat about 2 minutes (up to 2 1/2) on HIGH, stirring every 30 seconds, until the caramels dissolve into the cream. Stir until smooth. Chill in refrigerator until completely cooled, about 2-3 hours.
  2. Preheat oven to 350 degrees. Line a jelly roll (15x10x1-inch) pan with foil and spray with baking spray that has flour in it.
  3. Beat eggs in a large bowl on high speed for about 5 minutes, or until they are thick and lemon colored. Add cake mix, water, and oil. Beat on low speed for 30 seconds and then medium speed for 1 minute, scraping the sides of the bowl occasionally. Pour into pan.
  4. Bake 11-14 minutes, or until cake springs back when lightly touched. Do not overbake - mine cooked in about 11 minutes. Remove from oven and run a knife around the edges of the pan if the foil did not cover the whole thing to make sure the cake does not stick.
  5. Lay a clean kitchen towel on a flat surface. Sprinkle with the powdered sugar. Turn the cake upside down on the towel and remove the foil. While hot, roll up the cake in the towel, starting at the short end. Cool completely on a cooling rack, while rolled up, about 1 hour.
  6. Meanwhile, make the frosting: microwave the heavy whipping cream uncovered on HIGH for 1 minute, until it just starts to boil. Stir in the chocolate chips and corn syrup. Let stand 3 minutes and then beat with a wire whisk until smooth. Beat in vanilla. Refrigerate about 1 hour, stirring every 15 minutes, until it is spreading consistency.
  7. Once cake is cooled, remove caramel from refrigerator. Using a hand held mixer, whip the caramel until it is spreadable, like frosting, about 3 minutes.
  8. Unroll the cake carefully. Spread the caramel evenly over the cake. Reroll the cake. It should roll easily.
  9. Place the cake on a cooling rack with a cookie sheet underneath to catch any drips. Frost the cake with the chocolate frosting. Top with toasted pecans.
Schema/Recipe SEO Data Markup by ZipList Recipe Plugin

Thursday, March 21, 2013

Easter Finger Puppets

This is such a cute project for your little ones this Easter or any time.  I think I was more excited about this project than my little ones were- they are just so cute!!  Brought to you from Craft Jr.  Here are simple pipe cleaner finger puppets:


Easy Easter Crafts: Easter Finger Puppets

easter finger puppets Easy Easter Crafts: Easter Finger Puppets
Easter Pipe Cleaner Finger Puppets
When I had to idea to create some finger puppets out of pipe cleaners, little did I realize what creativity I would unleash in my children. 3 packages of pipe cleaners later, I have enough different finger puppet ideas for probably 10 more posts! I had no idea these would be such easy crafts for kids.
Pipe cleaners are extremely forgiving and deceptively easy to work with. Anything you ‘mess up’ while bending them is fixable. And by using a hot glue gun, you are pretty much unlimited in how you can attach eyes, limbs, and embellishments.

What you Need to Make Easter Finger Puppets

Pipe cleaners of various colors
Mini pom poms of various colors and sizes (you can substitute cotton balls sometimes)
Googly eyes
Hot glue gun
Wire cutters
(Our local Dollar Store had great cheap coordinating sets of pipe cleaners with matching pom poms)

How to Make Easter Finger Puppets

Once you see the components of each of these pipe cleaner finger puppets, assembly is pretty self-explanatory. But here’s the key “puppet base” that they are all made from:
puppet base Easy Easter Crafts: Easter Finger Puppets
Finger Puppet Base
Step 1 is to take the pipe cleaner and wrap it around your finger. I like to do it rather tightly, because once it is off of your finger, it is easier to stretch it out than it is to tighten it up.
Important: Notice that the top of the pipe cleaner coils down to a smaller circle. Do this so that it is easier to glue the pom pom head on top, and to lessen the possibility that you will get the hot glue on your fingers (which, if it hasn’t happened to you yet, pray that it doesn’t. OMG.)
Here are the pieces of each of the pipe cleaner finger puppets shown above. I was skeptical whether the hot glue would work on some of these pieces, but it worked perfectly. Just put a tiny dab of glue onto the wire end of the pipe cleaner and stick it straight down into the pom pom – it will stick after just a second or two of holding it in place.

Easter Bunny Pipe Cleaner Finger Puppet

bunny finger puppet Easy Easter Crafts: Easter Finger Puppets
Easter Bunny Finger Puppet
After gluing the white head onto the pipe cleaner body, stick a dab of glue onto both wire ends on one of the bent pipe cleaner ears. Stick them firmly into the pom pom while squeezing the ends together.
Glue two tiny white pom poms on the face as a base to stick the googly eyes. This is really optional, and you can see on the kitten finger puppet below that you can also just glue the googly eyes directly onto the pom pom head.
Then glue on the pink nose and the medium sized pink pom pom for the tail.

Easter Chick Pipe Cleaner Finger Puppet

chick finger puppet Easy Easter Crafts: Easter Finger Puppets
Easter Chick Finger Puppet
After gluing the white head onto the pipe cleaner body, clip a tiny piece of orange pipe cleaner and bend it into a V shape, and glue it onto the middle of the face. Glue the two yellow mini pom poms right above the beak to make a base for the googly eyes, then glue them on top of them. Take about a 4 inch piece of extra yellow pipe cleaner and bend it into the wing shape as shown. You don’t even need to glue these in, just slip them onto the body in between the coils and they will stay put.

Spring Kitten Pipe Cleaner Finger Puppet

kitten finger puppet Easy Easter Crafts: Easter Finger Puppets
Spring Kitten Finger Puppet
After gluing the white head onto the pipe cleaner body, clip two small pieces of white pipe cleaner (about 3/4″ long) and bend them into a V. Glue them onto the top of the head. I skipped the extra tiny pom pom eye base on this one, wanting to go for a more “Hello Kitty” look. You only need one tiny pink pom pom for the nose, but here’s a little tip: if you don’t have a tiny pom pom to use, you can clip a tiny piece of pink pipe cleaner (less than 1/4″ long) and glue it onto the face instead. The tail is attached by bending it onto the bottom coil on the back of the kitten’s pipe cleaner body.

Bluebird Pipe Cleaner Finger Puppet

bluebird finger puppet Easy Easter Crafts: Easter Finger Puppets
Spring Bluebird Finger Puppet
To make this variance on the Easter chick, I omitted the mini pom pom base for the eyes, and added a little tuft of feathers on the top of the head the same way I did the kitten’s ears (but only added one and put it on lengthwise instead of sideways). The wings are also a slightly simpler version of the yellow wings, and might be easier for smaller children to bend on their own.