Wednesday, May 8, 2013

Quilt Binding Tutorial

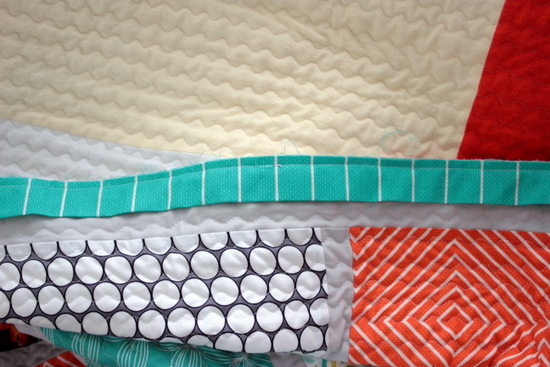
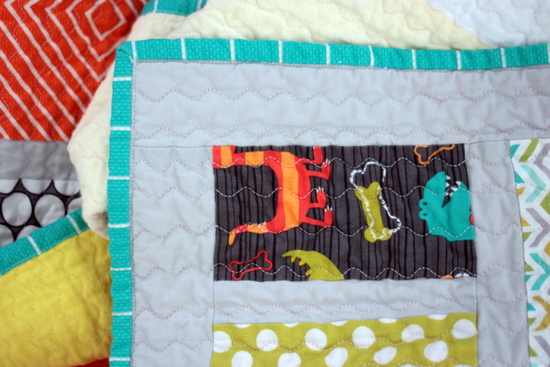
I don't sew a whole lot, but when I do, I usually make quilts.  They are so much fun and fairly easy too :)  I find the toughest part of the quilt is the very last step - the binding.  Then I came across this awesome tutorial from Vanilla Joy.  This makes the binding so much easier - such a simple step can make such a big difference.  I will be getting those clips she uses too!


7-IMG_6649
I’ve tried lots of times to bind a quilt with my sewing machine and it never looked as good as I wanted it to. For years I’ve been hand sewing my bindings, and although I enjoy hand sewing occasionally, I really don’t have the time to do it for every quilt! And I worry about how well it will hold up over time, etc.
Cluck Cluck Sew is one of the few blogs I read. I love her and her blog and her quilts and now her new fabric line! She shared a machine binding tutorial a few months ago that was just what I was looking for. I added one step that helped me get it just right.
perfect machine binding
Cut the binding strips 2.5″ wide, sew together end to end to make a super long strip, press in half, line up the raw edges with the raw edge of the quilt and sew at exactly 1/4″.
This is the step I added to her otherwise perfect tutorial:
how to bind a quilt
Mark a line 1/8″ away from the stitching line.
sew a quilt binding
Fold the binding over the raw edge and match it up with the line you just drew. I use these little clips instead of pins, they work so much better to keep the fabric just where I want it.
8-IMG_6658
Finish sewing the binding to the quilt now with the back of the quilt facing up. Sew right along the edge of the binding.

9-IMG_6661
Drawing that line makes the binding straight on the back side and the stitching line completely straight and parallel to the edge of the binding on the front side. My stitching line used to be all over the place and ended up on top of the binding in spots. It looked terrible!

Tuesday, May 7, 2013

How to Make a Fork Bracelet

I know what you're thinking - Fork bracelet?  Are you kidding me?  No - I thought this bracelet  was soo cute and this tutorial is extremely easy to follow.  Make sure you get the cheapest fork you can and you may need a bit of muscle too.  This is from StarsForStreetlights!


Monday, May 6, 2013

Monday Solutions: DIY Disinfecting Wipes +


DIY Tuesday: Make your Own Disinfecting Wipes + More!

I don’t know about you but I can really go through those tubes of disinfecting wipes, which over time, can begin to add up! So when I went on my cleaning spree this past weekend, I hopped on Pinterest first to see if there were any alternative solutions or creative ideas for cleaning. I came across the idea of making your own disinfecting wipes. I’ll admit, I was skeptical at first, thinking the paper towels would tear, dry up or they just wouldn’t work. But, I couldn’t be happier with the outcome and love using them!
Here’s how to make your own disinfecting wipes. I also provided recipes so you can create your own glass cleaner or a more natural cleaner using vinegar. I used Pine Sol because I had it and enjoy the fresh smell.
Supplies Needed:
  • Pine Sol or Vinegar (Recipes are at the bottom of this post for various types of cleaners you can create)
  • Sturdy paper towels (I choose Bounty)
  • Water
  • Glad or Ziplock Container that is large enough to fit part of a paper towel roll in ( I found the Glad Designer Bowl at Target–Two for $2.99)
  • Serrated Knife
  • Something to cut a 1/2″ hole through plastic (I used a 1/2 inch drill bit- that worked well)
  • Measuring cups
  • Bowl
1. Cut your paper towel role length wise so it will fit nicely in the plastic container you’ve selected. I used a large serrated knife and it cut through the paper towels just fine!
2. Next you will need to cut a hole in the top of the plastic lid so you can easily pull the paper towels or should I say, disinfecting wipes, out. I asked my husband for a 1/2″ drill bit and used that. But because the plastic you are cutting through is so thin, I think a knife or even sharp scissors will work just as well. Just be careful and use a cutting board.
3. Mix your desired solution.
Here are several recipes you can use:
Disinfectant Cleaning Recipe (this is the one I used):
  • 1/4 – 1/2 cup of pine cleaning solution such as Pine Sol
  • 2 1/2 – 2 3/4 cup of water
General Cleaning Surface Recipe:
  • 1 1/2 cups white vinegar
  • 1 1/2 cups water
  • Optional: A few drops of favorite scented essential oil to cut the vinegar smell
Window Glass Cleaning Recipe:
  • 1/2 cup of rubbing (isopropyl) alcohol
  • 2 1/2 cups water
  • 1 tablespoon white vinegar
4. Once you have your solution mixed and your paper towel roll set in the plastic container, pour the solution over the paper towels. Put the lid back on the plastic container and allow them to sit overnight.

5. Once the towels have sat overnight, then the cardboard tube in the center of the paper towel roll should easily come out (See the bottom right photo above).

6. Carefully pull the end of the paper towels from the inside, where the cardboard roll had been. Thread the end of the towels through the hole in the lid, and replace the lid.
TA DA! You know have your own household cleaning wipes. As I mentioned early, I was skeptical of this project and didn’t know if was worth the time it took to cut and drill but it really is simple to do and you can reuse the container over and over again.

Friday, May 3, 2013

Chicken and Cheese Lasagna Roll-Ups


Chicken and Cheese Lasagna Roll-Ups

Aug 13, 2012 by 

Ingredients:

  • 3 cups cubed and cooked chicken breast
  • 1/4 cup milk
  • 1 cup Ricotta cheese
  • 1/8 tsp white pepper
  • 1/4 cup  feta, crumbled
  • 8 lasagna pieces, cooked
  • 1/4 cup Parmesan cheese, grated
  • 2 1/2 cups of pasta sauce (either Prego or homemade tomato sauce)

Directions:

1.    Mix combine chicken, cheeses, milk, and pepper in a bowl.
2.    On every lasagna piece, pour the half a cup of sauce and roll.
3.    Pour one cup of sauce in a pyrex.
4.    Place the lasagna rolls in the dish with the edge of the fold facing down.
5.    Pour the rest of the sauce over the rolls.
6.    Place cover before putting in the oven.
7.    Bake for 30 mins at 375 degrees.
8.    Sprinkle on top parmesan cheese.
9.    Serve.


Thursday, May 2, 2013

Homemade Chocolate Peanut Butter

I am so very excited to try this.  My household are big peanut butter eaters and this sounds even better than regular peanut butter - of course it has chocolate.  I got this idea from averie cooks for more great peanut butter recipe's check out her entire article!

Just a note - you need a strong blender for this to work.  I have a Vita mix and I know it will work.


Homemade Chocolate Peanut Butter in 10 Minutes (Vegan, GF) averiecooks.com
If you were ever having a bad day, PMSing, your boss was being horrid again, your hair stylist didn’t listen, you dropped your only house key down the elevator shaft, your child volunteered you to be a driver but didn’t clue you into this fact, or life has thrown you some curveballs, try a spoonful of this. Or ten. Problems solved.
Homemade Peanut Butter, including chocolate peanut butter, is like no other, and once you try it, for straight up eating (not for baking with) you’ll never want storebought again. Homemade and storebought taste vastly different, and you really can’t imagine quite how different until you try homemade. After one taste, it’ll all make sense. Not to mention, making your own is infinitely cheaper than those pricey gourmet jars you see for $11.99 and up, for a small little jar that’s gone in no time and not even as tasty as homemade.

Recently I made Homemade Cookie Butter Peanut Butter and it’s wonderful. Full of pulverized gingersnaps, a hearty dose of cinnamon, white chocolate, which come together creating a warm, rich spread. I made four batches of the stuff in two weeks right after I cracked the homemade code.
Good as it is, it’s not chocolate. Some days, I just have to have chocolate.
The peanut butter comes together in less than 10 minutes in a food processor and is basically work-free. Grab your ear plugs and get ready to blend your way into a much better mood. If chocolate and peanut butter doesn’t set you straight, nothing will.
I’ve made this with both lightly-salted roasted peanuts and honey roasted peanuts. Using honey roasted creates a spread that’s slightly sweeter than lightly salted peanuts, but either is fine. Unnroasted or unsalted peanuts are far too bland for my taste and I don’t recommend them. And I’ve had readers write in the past who’ve tried to make peanut butter with raw peanuts and it didn’t go so well.
Homemade Chocolate Peanut Butter in 10 Minutes (Vegan, GF) averiecooks.com
You could substitute cashews in place of peanuts and because they’re a soft nut, they blend into butter in no time. I’ve done it accidentally when I’m making Raw Vegan Chocolate Chip Cookie Dough Balls and on purpose in Chocolate Coconut Cashew Butter.
I’m not a big almond butter fan although you can substitute almonds in place of peanuts. However, almonds are a much firmer nut and will take longer to break down. If you have an older food processor, I would work in small batches and be prepared to lose some hearing after all that blending time elapses.
Like making Homemade Peanut Butter, much of the process is the same for Chocolate Peanut Butter. Begin by adding just the peanuts and nothing else at all to the canister of food processor. No oil, no liquid; just peanuts.
Homemade Chocolate Peanut Butter in 10 Minutes (Vegan, GF) averiecooks.com
Turn it on and the first initial seconds are incredibly loud as the peanuts rattle against the plastic, but it softens after just a few seconds. I always tell my family members before I make nut butter so no one jumps out of their chair with that loud blast coming out of no where before I power the machine on.
Homemade Chocolate Peanut Butter in 10 Minutes (Vegan, GF) averiecooks.com
There peanuts go through various stages in the approximately five minutes it takes to go from peanuts to peanut butter:
crushed peanuts
crushed into a fine powder
a paste
a thicker paste
and a big peanut butter “dough ball” forms
Homemade Chocolate Peanut Butter in 10 Minutes (Vegan, GF) averiecooks.com
Then the big ball magically breaks down.
It starts out gritty and thick but in just another minute it smooths out and liquifies.
Homemade Chocolate Peanut Butter in 10 Minutes (Vegan, GF) averiecooks.com
As you keep processing, the peanut butter becomes smoother, creamier, and thins out. Keep processing until the peanut butter is very smooth and liquidy, another minute or two.
Homemade Chocolate Peanut Butter in 10 Minutes (Vegan, GF) averiecooks.com
I like my peanut butter buttery smooth and allow it process for a couple minutes after it’s liquified until I’m certain that’s it’s velvety smooth. I’ve never experienced any issues with over-processing and it may seem almost too liquidy and runny but this is normal. Because it’s natural peanut butter and hasn’t been treated with hydrogenated oils like storebought, it’s going to be runnier than Jif or Skippy.
It firms up at room temperature and solidifies much more in the refrigerator. As a bonus, it doesn’t separate into a layer of oil and a solid dry mass, which is something I dislike about many storebought ‘natural’ peanut butters.
Homemade Chocolate Peanut Butter in 10 Minutes (Vegan, GF) averiecooks.com
After the peanut butter is runny and smooth, add the semi-sweet chocolate chips, along with the vanilla and optional salt. I don’t add salt because I find the peanuts to be salty enough, but salt to taste.
I have a ferociously strong food processor and add the chips at once through the feed tube with the machine running. If your machine is older or not as strong, sprinkling the chips in slowly may prevent it from struggling.
do not melt the chips first or do anything other than simply add them whole. The power of the machine, coupled with the heat the peanut butter has taken on after 5 minutes of blending, is enough to incorporate them. Process until the chips are incorporated and the spread is smooth, another minute or two.
chocolate chips averiecooks.com
You may wish to start with 1 cup of chocolate chips and work up from there. I use 2 cups, one standard 12-ounce bag, and the peanut butter is robustly chocolate-flavored. If you prefer peanut butter with more of a hint of chocolate and less chocolate-in-your-face quality, use fewer chocolate chips. I like in-my-face.
Based on the chocolate used, the peanut butter really isn’t so much sweet as it is bold and chocolaty. I use semi-sweet chips and would never use milk chocolate chips, simply based on personal taste preference, but I could envision it getting a bit (too) sweet if milk chocolate was used.
Homemade Chocolate Peanut Butter in 10 Minutes (Vegan, GF) averiecooks.com

Wednesday, May 1, 2013

Fabric Bleach Art

image

This is so cool - I can't believe I never thought of this with all the clothes I've ruined with bleach stains! I found this on the Paula Deen's site! So cool and so easy!


Step 1: You will need some bleach, a pencil with eraser, a pencil sharpener, toothpicks, and some fabric or linens. We happened to have some great navy napkins from our last shoot handy but any fabric or dark colored linen will do.


Step 2: Add the bleach to a small jar.


Step 3: Use the pencil sharpener to make the tip of the pencil eraser smaller.


Step 4: Dip the eraser into the bleach.


Step 5: Press firmly onto the fabric letting the bleach soak in. This dot will be the anchor of the firework.


Step 5: Dip the toothpick into the bleach.


Step 6: Make curved lines coming from the anchor.


Step 7: Use the tip of the eraser to embellish the firework at the end for a finishing touch.


Step 8: Finish setting your table with some pretty red, white, and blue touches!