Tuesday, July 22, 2014

Tuesday's Jewelry Spotlight is Shining on Dianne Harwood of "Sparkles by Dianne"

Our Jewelry Spotlight of the Week is Shining on Dianne Harwood of "Sparkles by Dianne"


Catching the Sun, Rear View Mirror Charms & Rosaries
My shop is my place of relaxation, visiting and meeting with old friends and new friends. Sharing ideas is so much fun with others who have the same desire you do.

In this shop, Sun Catchers, Jewelry is so popular and there is so much competition that i thought why not make Rear View Mirror Charms and Rosaries. And Sun Catchers for the Sun Room or Window. I love Crystals in all colors, and I love Sparkling Beads of all kinds.
Texas Girl, who loves people, and making someones day by giving a gift that I made.

VISIT MY OTHER SHOPS :

Her Special Day, pearls & Crystals
/www.artfire.com/ext/shop/studio/herspecialday

Diannes Fun Art Studio
www.etsy.com/shop/kdianne56

Jewelry 
http://www.etsy.com/shop/WhatYaThink

Visit my Blog
www.sparklesbydianne.blogspot

Web site:
www.sparklesbydianne.com

Monday, July 21, 2014

Monday Solutions ~ Earring and/or Ring Organizers

MONDAY SOLUTIONS ~  EARRING AND/OR RING ORGANIZERS
from:  http://nickandcaeli.blogspot.com.es/2013/03/currently.html

Current organization victory~ I cut down ice cube trays to fit in this piece of furniture I found at an antique store. Its much easier to find earring pairs!  Can also be used in large jewelry boxes with drawers.

Wednesday, July 16, 2014

Crafty Wednesday ~ DIY Sand Footprints

Sand Footprint Craft – Full DIY instructions!

by:  http://pagingfunmums.com/2013/04/30/sand-footprint-craft-full-diy-instructions-louise/
DIY Plaster Footprints
Summer is my family’s favourite time of year – we’re very blessed to live 5mins away from many beautiful beaches. It’s not surprising to know we spend nearly every weekend during summer at the beach.
I wanted to do a beach themed craft to celebrate the amazing summer we’ve just had. I thought it would be cool to do something that could mark this particular summer and try to ‘freeze it in time’. This is what I came up with –
Sand Footprint moulds - using just a Photo frame, sand, plaster of paris and some shells for extra decoration.
Exactly what you’ll need -
  • an old sheet or plastic tablecloth (to protect your work surface).
  • A photo frame big enough to fit the number of prints you wish to use. (A small frame with just one print would look great too).
  • Sand
  • Plaster of Paris (you can find this at most craft & discount stores). I used a 1kg bag to do this sized frame and it cost $4.95.
  • Water for making the plaster
  • Cardboard to use to smooth the sand (we just used some from our recycling)
  • Spray on sealer
  • Glue gun
  • Sea shells for decoration
Start by covering your work surface with something to catch the sand and any drips of plaster – we used an old tarp.
Remove the cardboard backing off the frame and carefully discard the glass from the frame (this will not be needed). Place the cardboard backing over the front of the frame and flip it over – this will create a nice box that you will then fill with sand. I used a flat piece of cardboard to smooth the sand out level with where the glass used to sit (the first inside groove).
How to prep your frame.
Carefully stamp each foot into the sand to make a nice impression – we had to re-do this part a few times with my 1 year old – he just wanted to squeeze his toes into the sand. Once I was happy with the imprints I set about mixing the plaster of paris as per the packet instructions.
Don't worry if you don't get a perfect one - you can re-smooth.
Don’t worry if you don’t get a perfect one – you can re-smooth.
Then gently and slowly pour the mixture over the sand, starting in one corner and covering the whole inside of the frame then using a piece of cardboard level the mixture GENTLY – don’t press down too firmly.
3 easy steps...
3 easy steps…
As you can see in these photos it can get a bit messy but this is the back of the frame anyway.
Leave plaster to set as per directions on packet – mine was hard after 5 hours – it was a hot and dry day though.
Once you’re sure your plaster has set you can remove the cardboard from the front, tip the frame over and dust off the excess sand. I then gave it some more drying time in the sun before spraying with a sealer. This will help glue and seal any loose sand.
Drying in the sun

I then used a glue gun to attach some tiny shells around the picture to add some extra detail. I also wrote “Summer 2013″ on the back with a little blurb about all the fun things we did over the summer.
Hanging on our wall :).
My little girls feet frozen in time.
Finished plaster footprints
We have added a YouTube tutorial using a handprint which you can view here.
We look forward to trying some other designs in the sand – maybe some writing or paw prints would be fun :).
Please let me know if you make one…we love to hear feedback on our crafts :). Have fun!
You may also like our:

Tuesday, July 15, 2014

Tuesday's "JEWELRY SPOTLIGHT" is Shining on Clara's Jewelry

Tuesday's "Jewelry Spotlight" is shining on Clara's Jewelry

https://www.etsy.com/listing/192918932/vintage-foliate-spray-brooch-with-white?ref=listing-shop-header-2

Our Sparkly Ladies Blog “Tuesday Jewelry Spotlight” is shining on Clara’s Jewelry from Victoria, Texas. 

Her shop is known for affordable Vintage & Retro Jewelry: 1940's -1980's, Rhinestones, Sterling Silver, Designer, Lucite, Figurals

Please visit Clara’s Jewelry on Etsy:
https://www.etsy.com/shop/ClarasJewelry?ref=pr_shop_more


Claras Jewelry on Facebook
www.facebook.com/pages/Claras-Jewelry/408667479197862


Elaines Antiques & Collectibles on Ruby Lane since 2001
http://www.rubylane.com/shop/elainesjewelry

Monday, July 14, 2014

Monday Solutions ~ Homemade Makeup Remover

Homemade Makeup Remover {One Ingredient, All Natural}

03/05/2014. THIS POST MAY CONTAIN AFFILIATE LINKS. READ MY DISCLOSURE POLICY.
By:  http://myfrugaladventures.com/2014/03/homemade-makeup-remover-one-ingredient-natural/
Homemade Makeup Remover
Here is an idea for those of you that might be looking for more natural productsfor your body and your home.
A very simple and all natural homemade makeup remover using just one ingredient you might already have on hand.
The beauty of this is that it works incredibly well and really takes seconds- no complicated products to buy or steps to follow.
You simply need to head out to the store and pick up a jar of Coconut Oil- by now probably most of us have this in the pantry anyway because Coconut Oil is kind of magic in that it works very hard to do all sorts of cool stuff.
If you are not familiar it is about $6 a jar at Trader Joes, Whole Foods, Sprouts etc… in the cooking oil departments.  You can also get a good price online from Amazon here.)  Try to find organic if you can it is usually the same price.
Now the only trick with Coconut Oil is that it will change consistency according to the season.  When it is warm in summer you will have oil.  In cooler months it is a solid like a pat of butter. For this application it is easier to use in a solid state so you might pop it into the fridge if yours is melted.
You can literally scoop the coconut oil directly from the jar after you purchase but I prefer to take just one second to whip it first.  Totally not necessary- just my preference.  It makes a smoother consistency that is easier to handle.
How to make makeup remover
I just grab a scoop from the jar and spoon it into the bowl of my Kitchen Aidand then whip it baby!  Just whip for a few minutes- it starts to look like frosting instead of Crisco.
Now use a spatula to put it in a little jar and you are good!  This is awesome to keep in the bathroom anyway because it smells good and you can use this for a zillion different things.  Smear a little on your lips if they are dry, put a tiny bit on your hair to get out knots or tame strays (CAREFUL as your hair will look greasy so literally a tiny bit) or slather it before you shower for a deep conditioner, any dry spots on your skin rub it right in like lotion, put it on your cuticles… This little jar will work hard for you!
Now as for the actual application- dip a little bit onto your fingers and smear it on your eyes- I sort of rub my lashes a bit to get all the mascara off.  Rinse your face and then wash your face and moisturize as usual.
I have extremely sensitive eyes and I wear contacts so I like to use a little cotton cloth (pictured at the top there) and I get it damp first.  Then I dip the damp cotton cloth into the coconut oil and rub that on my eyes.   Whatever way you prefer.
I use waterproof mascara so I usually have to work on the lashes for just a second to get it all off and then I take the same cloth and swipe the black smears from under my eyes.
Boom!  You should have makeup free eyes!  Easy peasy.   Oh and even though you spent that $6 on the jar the portion you see below is about 1/4 th of the jar and this would last for ages.  So give yourself an extra pat on the back for being frugal ;).
The first time I tried this I used my regular makeup remover (Clinique) on one eye and this on the other.  I was skeptical that my face would be greasy or it would hurt my eyes.  I did not notice a difference in the effectiveness between the two products.
How to make your own makeup remover

Tuesday, July 8, 2014

Jewelry Spotlight Featuring Amy Brandum of Metal Chocolate

Today's Jewelry Spotlight Featuring Amy Brandum of Metal Chocolate

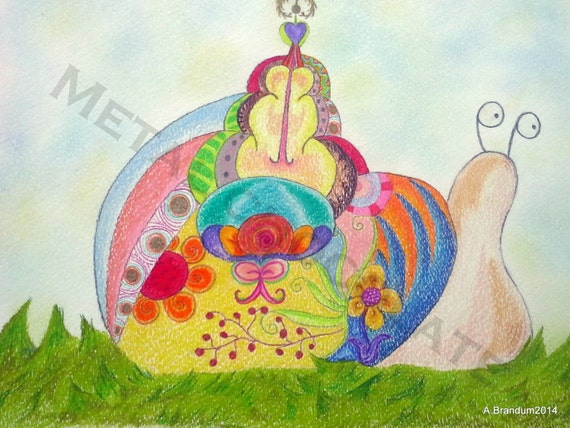
His Shell is His Castle - Print 8x10"


Emotive Jewelry

Jewelry can be lovely and delightful, whimsical and silly, or even moody and melancholy. One piece of jewelry can transform an outfit. It can speak for the wearer. Also, the really cool thing is, one size fits all! 
Taking basic elements and restructuring them in a way that reflects mood and makes statements is almost magical. I feel that is what I do when I cut and shape metal or when I personify everyday objects in drawings. 
The topics of the art I make (celestial images, faces, nature) are subjects I enjoy studying. The edge that I give them reflects my own taste that leans toward fantasy as well as punk and rock in popular culture with a hint of silliness. 
You can follow my current projects on Facebook (www.facebook.com/MetalChocolate). I also have other art and photos on my website (www.BrandumConcepts.weebly.com). Feel free to contact me if you see something you'd like that's on the website but not currently in the Etsy shop.
https://www.etsy.com/shop/MetalChocolate?ref=pr_shop_more
Amy has degrees in Psych. and Spec.Education. She has had a lifelong love of art. She has experience in art ranging from stained glass and photography to drawing and sculpting. She's even been a professional textile designer and maker.

Tuesday, July 1, 2014

Jewelry Spotlight is featuring Laurie Martin-Gardner of the Gypsy Grove

Today's Jewelry Spotlight is featuring Laurie Martin-Gardner of the Gypsy Grove
https://www.etsy.com/shop/GypsyGrove?ref=pr_shop_more
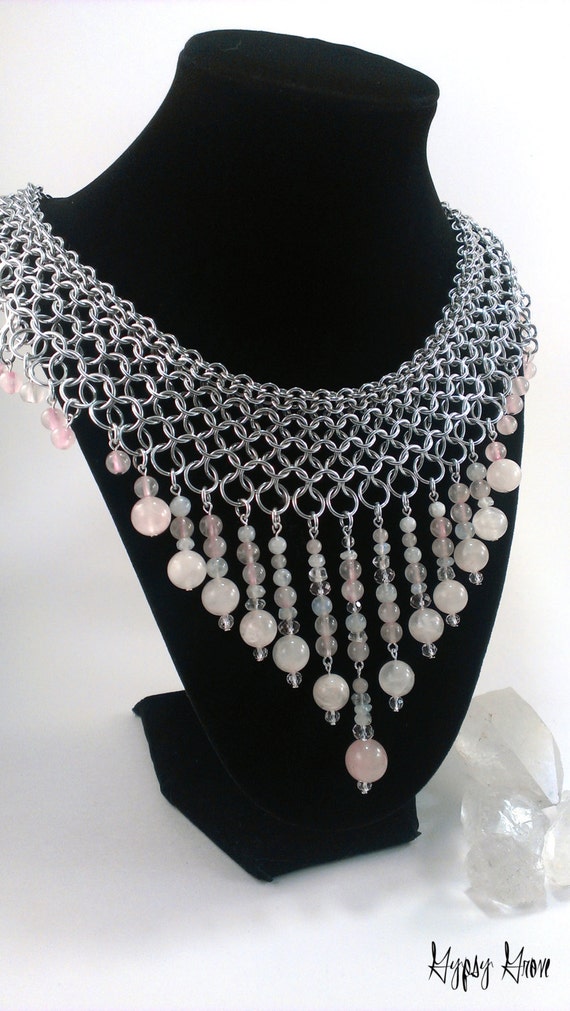
Stunning Chainmaille Collar Goddess Necklace with Rose Quartz, Rainbow Moonstone, Quartz Crystal, and Faceted Glass Beads


In the Grove, the Gypsy creates.

In the rolling hills and quiet woods of northwest Alabama, just off a battered country road, stands a little house. Around that house are rings of trees -- tall pines, fragrant cedars, blossoming magnolias. In the spring and summer, the trees grow full and thick, blocking out the rest of the world. On the windows of the little house, shadows dance across the blinds giving the impression, with a bit of an imagination, that the house has become submerged in water. It is a magical place where laughter reigns and hugs are frequent.

In that little house, there lives a gypsy. At least, that is what her husband likes to call her. She lives there with him, their children, two cats, a dog, and a turtle. It is when the house is quiet that her work begins, weaving tiny silver rings into intricate designs, some adorned with precious stones or sparkling glass. It is a passion. A calling perhaps. And in the Grove, the gypsy creates.

* * * * *

I am the gypsy in the Grove, although most know me as Laurie. I began this grand adventure in 2011 with no plan, no direction, and no true idea what I was doing. But learning, like so much in my life, is a passion. I began small, stringing beads into interesting patterns. It didn't take me long, however, to bore myself half to death with that. I needed a challenge. I always need a challenge. I do not like easy. I ventured into wirework, and while I still enjoy it to this day, it just wasn't "me".

And that's when I discovered chainmaille. Ah, glorious, tedious, finger-breaking chainmaille! It was love at first weave. Chainmaille was the challenge I had been searching for. Three years later, it's a full-blown love affair.

My goal when I created Gypsy Grove was simple -- make amazing pieces that almost anyone can afford. You shouldn't need a huge bank account to own a unique artisan piece. I strive to create a variety of prices while keeping the high quality my customers deserve.

When you interact with Gypsy Grove -- through this website, Etsy, Facebook, Google+, or email -- you are interacting directly with me. The Grove is a one-woman show. Well, except at shows when my oldest daughter, Madison, joins me for backup. Other than that, Gypsy Grove has been crafted from the ground up by my own two, always achy, slightly stiff hands. It is a labor of love and passion and has brought amazing people into my life.

From its humble beginnings, Gypsy Grove has grown into more than I could have ever dreamed of. I have been honored to provide gifts for popular Korean pop bands U-Kiss and Vixx while on their American tours. I have also been honored and humbled by becoming the exclusive jeweler to international author, Chantel Lysette. Pieces from the Grove have shipped out to all around the world, with more countries being added every month. As a member of The Artisan Group, Gypsy Grove is branching out to include celebrity and press giftings and will be sending items to various television shows for consideration by the stylists. 

It is a joy to create items that others come to love. And as long as my hands allow, I will continue to craft beautiful creations that connect me to so many beautiful spirits. Thank you for visiting the Grove and for helping me create this magical life I am so blessed to live.